• This site contains eBay affiliate links for which Sea-Doo Forum may be compensated.

2001 Seadoo Sportster LE. Just got it!

Status
Not open for further replies.
From Full Bores tech tips:

When installing WSM rings if there is a polished edge, it is installed in the top ring groove.

On Sea Doo 947/951 the rings only go on one way, if they don't compress in the groove flip them over. Small letters near end gap face up.

Thanks!


Sent from my iPhone using Tapatalk
 
New problem. The piston won't go in. It goes in easily until half way as shown in the photo.
694.jpg


Sent from my iPhone using Tapatalk
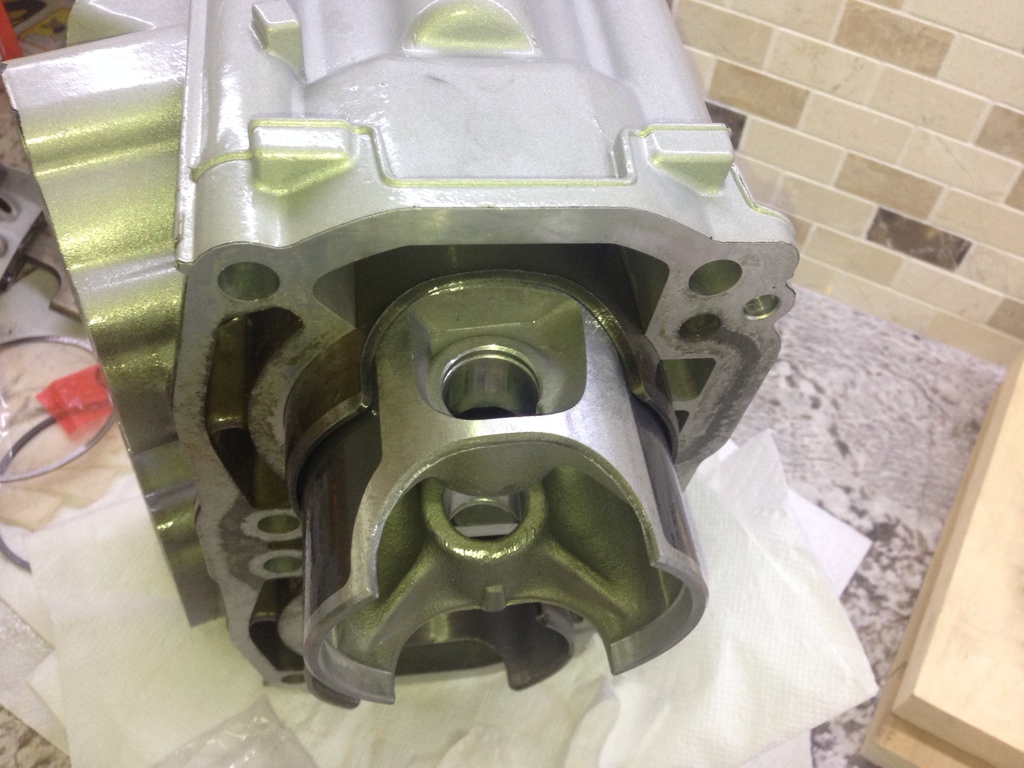
 
New problem. The piston won't go in. It goes in easily until half way as shown in the photo.
694.jpg


Sent from my iPhone using Tapatalk

It is pretty tight, I pushed a little, still stuck. Didn't want to stuck the piston in there. Calling the dealer right now.
Tried the other piston, same thing.

If I turn the piston 90 degree, it will go in.
 
Are your rings floating in the piston grooves?

I didn't install the rings. I was going to try the piston clearance to the spec before I put the pistons on the rods. Glad I did that, otherwise I will be stuck in the bilge and don't know what is going on.

I dropped of the cylinder and pistons at deal's. He said could be the heat from boring. The bottom of the cylinder clasped in a little after it cools down it think.

I hope he can figure it out today and I can install them.
 
According to the shop manual.
The piston/cylinder wall clearance is only 0.09mm(0.0035in) for new parts.

I did try drop the piston from the top, it nicely slid down all the way to the bottom where the sleeve extension is. So I think the clearance is all the way good except the sleeve extension part.
Not sure what the dealer is going to do, probably rebore and rehone, so that I need to rebath it :banghead:??

piston clearance.JPG
 
Yep, another bath it is.

The bright side is that I didn't rush. Not familiar with the boring process. Isn't it a standard bore size that goes into the cylinder, or it is adjustable?
Don't want it come back too big. Can I check the ring end gap to see if it is out of spec after I get it back?
 
Yep, you can compress the rings and measure gap easy enough. A boring bar is infinitely adjustable up to it's maximum reach.
 
Yep, you can compress the rings and measure gap easy enough. A boring bar is infinitely adjustable up to it's maximum reach.

Is the cylinder supposed to be straight ideally? The max taper is only for manufacturing tolerance?

Infinity is good. I thought he needs to go to the "next" available size :-D

Sent from my iPhone using Tapatalk
 
It is pretty tight, I pushed a little, still stuck. Didn't want to stuck the piston in there. Calling the dealer right now.
Tried the other piston, same thing.

If I turn the piston 90 degree, it will go in.

You cannot mix oval pistons and round cylinders, ask for round type pistons! (joke!)

How is the honing in the lower portion, is it not aggressive?

I think the machinist should bore to the piston, thus he must have the piston to machine the cylinder.

But, it seems your piston is oval?
 
Last edited by a moderator:
You cannot mix oval pistons and round cylinders, ask for round type pistons! (joke!)

How is the honing in the lower portion, is it not aggressive?

I think the machinist should bore to the piston, thus he must have the piston to machine the cylinder.

But, it seems your piston is oval?

Honing is even in the cylinder wall. Not aggressive to me. But what do I know. :-D He did have the piston. Not sure why he didn't try fit. Maybe he tried when it was warm? Or he dropped the piston in but didn't let it slide out of the bottom.

The piston is not oval I think because both piston did the same. The bottom part of the sleeve is oval.


Sent from my iPhone using Tapatalk
 
You can always just drop those pistons in the freezer for a couple hours, bet they fall right in that hole! (also a joke, but it would actually probably work and I don't want you to do that)
 
You can always just drop those pistons in the freezer for a couple hours, bet they fall right in that hole! (also a joke, but it would actually probably work and I don't want you to do that)

Lol manual does say hear it up to 50,60 C before install it in.


Sent from my iPhone using Tapatalk
 
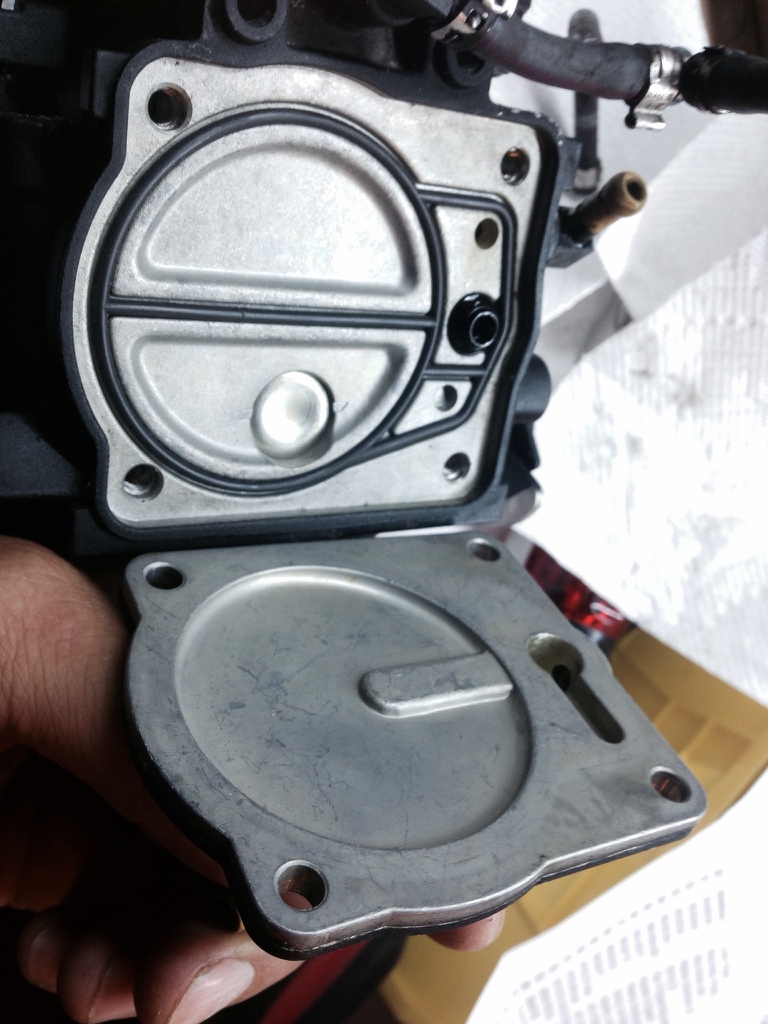
Just noticed there is a ball in side the valve body assembly. Do I need to check if this ball is working?


Sent from my iPhone using Tapatalk
 
PTO pop off is 21/22psi. Is there any other "seal" test I can do other than the pop off using the gauge?


Sent from my iPhone using Tapatalk
 
No diaphragm on PTO side?
698.jpg


Sent from my iPhone using Tapatalk

There is no fuel pump on PTO carb. So you only need the o-ring type gasket.

"If I turn the piston 90 degree, it will go in."

This must be the special Amsoil bore clearance? Although, this doesn't sound good to me b/c both piston and cylinder should be round?

I think sometimes the machinist is aggressive with honing in the cylinder top where the rings are traveling and not so much in the bottom. I guess this could make the bottom tighter. The problem with very aggressive "honing-to-fit" is the bore becomes out of round.

But, I'm not sure if the piston sleeve rod reliefs are causing confusion about which is out of round (piston or bore), my bet is the piston is round but the bore is oval.

And, I think your machinist should also properly chamfer the ports and clean the bore for you too.
 
PTO pop off is 21/22psi. Is there any other "seal" test I can do other than the pop off using the gauge?


Sent from my iPhone using Tapatalk

Condition/size of the needle/seat, spring tension and metering lever geometry are the factors effecting pop pressure.

21psi is the correct value for the 80gr spring, so if you are using the black spring this is correct.
 
Condition/size of the needle/seat, spring tension and metering lever geometry are the factors effecting pop pressure.

21psi is the correct value for the 80gr spring, so if you are using the black spring this is correct.

Just the spring in the kit. Which is the "new" part. Manual says 19/23.


Sent from my iPhone using Tapatalk
 
Just noticed there is a ball in side the valve body assembly. Do I need to check if this ball is working?


Sent from my iPhone using Tapatalk

Are you sure it's not a staked-in plug? Maybe you are describing the oil injector on the intake, or the accelerator nozzle and in that case I would hose them out using carb cleaner.

And you asked earlier if the acetone would soften the carb paint, the answer is YES. I wash the outside of carbs in the parts washer using a bristle brush, my parts washer had diesel fuel in it until recently and I liked the diesel fuel although it began to stink badly over time.

At first I thought I needed a shower then realized it wasn't me, it was my parts washer stinking up the shop.
 
Just realized the pinched the seals are not included in the carb rebuild kit! I hope I didn't throw them out. May need to search the garbage bin now


Sent from my iPhone using Tapatalk
 
Just the spring in the kit. Which is the "new" part. Manual says 19/23.


Sent from my iPhone using Tapatalk

Seadoo calibrated using the 95gr spring and 2.0 seat, and Mikuni predicts these parts will pop around ~25psi, not 19~23psi.

So how about the condition of the springs (bent or stretched?) and the geometry of the metering lever?
 
Just the spring in the kit. Which is the "new" part. Manual says 19/23.


Sent from my iPhone using Tapatalk

So make both carbs the same using the same spring, it's best for these parts to be matched. and the pop should be the same for both carbs for smooth operation.

21psi is okay. I think I would prefer 23~24, but I can tell you 21psi works good in my 951 b/c I used the black spring and this is where they popped, as Mukini predicted.
 
Status
Not open for further replies.
Back
Top