• This site contains eBay affiliate links for which Sea-Doo Forum may be compensated.

2001 Seadoo Sportster LE. Just got it!

Status
Not open for further replies.
Yes, you can spray WD-40, there will be no damage.

I suspect the studs were installed using lock-tite red so it may be necessary to heat them using a torch to soften the lock-itte.

I think you should be able to lift the cylinder assembly while the head studs are still installed, I don't understand why seadoo says you cannot..

Ok. Soaked in


Sent from my iPad using Tapatalk
 
Yes, and normally with detonation issues the top of the piston and the squish area are both affected. Your's pistons don't show much for signs of detonation at all.

Here's an affected piston picture.
View attachment 26779

As you can see, this piston was in danger of the top ring land breaking due to the sudden forces of hundreds of thousands of detonation events. Depending on the piston design, occasionally the 2nd ring land breaks first.
 
Agreed, this engine seems to be at the limit of it's normal service life. If kept running in this condition, mechanical failure will occur.

I believe we share the same opinion of the general practice of top end rebuilds and the pit falls that come with them, but it occurs to me that like 80% of the motors that I got into for low compression and or noises that didn't belong all came from engines that were just out in front of this one at a point of mechanical failure that might otherwise have had significant time added to their service life had they been gotten into at this point and the top end restored.

It's always been my contention that anything with more than a 15% loss of compression is killing the engine at the crank with blow by and might otherwise be restorable multiple times in it's service life if addressed early on. Of course that didn't happen in general practice and now these have been relegated to obsolescence but it sure is fun to participate in seeing one saved.
 
One more thing I just confirmed. All 4 rings are not seized. They move a little. And lower rings have a little more play then the top rings. I can squeeze out oil by pushing the lower ring by a screw driver.


Sent from my iPad using Tapatalk
 
One more thing I just confirmed. All 4 rings are not seized. They move a little. And lower rings have a little more play then the top rings. I can squeeze out oil by pushing the lower ring by a screw driver.


Sent from my iPad using Tapatalk
So that surprises me based on the pictures as one of them looked frozen in place and locked in the groove by aluminum transfer. You may still find it's locked in at some point and rest of it still floats in the groove. Egging of the cylinder tolerances will allow for this at times without breaking the ring.
 
So that surprises me based on the pictures as one of them looked frozen in place and locked in the groove by aluminum transfer. You may still find it's locked in at some point and rest of it still floats in the groove. Egging of the cylinder tolerances will allow for this at times without breaking the ring.

That photoshopped picture doesn't present this part totally true.
I will have a real one tomorrow.

Do I need anything special to take the piston off?


Sent from my iPad using Tapatalk
 
That photoshopped picture doesn't present this part totally true.
I will have a real one tomorrow.

Do I need anything special to take the piston off?


Sent from my iPad using Tapatalk
I use a surgical pick and needle pliers to remove the c-clips that retain the wrist pins, reading the manual it shows these may be pressed in pins so some force may be needed to get them out. Remember once the cylinders are off you want to get the case covered up right away with cardboard and towels to retain anything that might fall down that way.

You want the piston rotated down so you're not putting a lot of force on the rod and lower crank bearing while driving that pin out if it's tight.

The new piston, wrist pin and caged bearing will go together easier than this comes apart.

So I can use a proper size socket and a clamping tool to push it?


Sent from my iPad using Tapatalk
 
So I can use a proper size socket and a clamping tool to push it?


Sent from my iPad using Tapatalk

Yep, that should work famously. I'm still not 100% sure if the bearings are caged or loose, looking at it again they may be loose with a press fit ring that retains them on the outside and the pin on the inside.

Keep a retrieval magnet handy! Better to pull those up and off your cover with the magnet than poke and prod at them trying to pick them up by hand if they are loose and fall out.
 
The bearings are caged apparently, I'm not sure if the cage is metal or plastic, I think the early motors were plastic but don't quote me. Plastic cages can become brittle/break/melt and once that happens the bearing will bind/seize, thus this may be the cause of the reported piston skirt cracks.

To insert the pin you may warm the piston in an oven possibly. To remove the pin you can use a tool you may decide to make yourself to extract it (like pulling teeth :)) Just be careful not to damage the rod by placing sideways forces on it or any force that may bend the rod or damage the bearings.

You may also notice the big end of the rod has thrust washers on either side, I believe the 951 uses copper ones? Anyway, some engines used paper composite thrust washers even, which are brittle and often found missing (disintegrated).

If all that's still serviceable, there's the question of the balance shaft bearing condition...... Such fun!
 
I just looked his motor up in SD's online parts and the description just calls it a needle bearing and the diagram doesn't show a cage per say, but there is a shaded area at each end of the bearing shown so it almost has to be.

If it's plastic, it might not be in one piece anymore. Fun times when those come spilling out.
 
So you don't think the 951 piston pin photo I posted a couple days ago is the right one? I got it from ebay, the seller claimed if was for the 951. The cage of that one looked like steel to me, but the factory cage may have been plastic.

Honestly I'm not sure where or if I read somewhere the early 951 piston pin bearing were plastic cages and later changed to steel or if I'm thinking of another motor completely.
 
I'm not sure, I've seen pictures of two very different pin and cage assemblies for these when I browse for information. I didn't save any of it for future reference because I don't own this particular motor.

So, where's our pal? This is his darn project and he's no where to be found :) He's got two old wrenches in his corner and comes up MIA.

I went out and stared at my 787 over coffee this morning and had an overwhelming desire to open it up for a look.
 
So I have a rhetorical question about the scored piston photo, or rather, I will state my opinion instead. I think this piston was scored due to metal to metal contact with the cylinder bore, not directly due to combustion gas blow-by. I'm not arguing that a piston cannot melt, but this damage appears to be a consistent with abrasion.

The reason for metal to metal contact is because the oil film failed to provide lubrication, most likely due to excessive clearance and wear which resulted in low compression and allowed heat from blow-by to interrupt the function of the oil film.

This may have occurred more rapidly due to the PO using the wrong oil, TCW-3
 
I went out and stared at my 787 over coffee this morning and had an overwhelming desire to open it up for a look.

LOL, me too. I swear those RAVES must need cleaning again......

The scary part is a reman motor blowing low compression may have a thick base gasket, excessive squish gap and great rings/pistons with no blow-by. Ugh, hopefully the head wasn't modified!!!

I saw a few days ago a 951 on fleabay the guy is selling as seized due to sinking, the silver paint is dark brown from overheating.
 
This motor blows 135psi according to the seller, and it doesn't appear to have been violated yet.

Was just noticing the cylinder sleeve thickness on these seems to be pretty thin.
 

Attachments

  • $_57.JPG
    $_57.JPG
    220.5 KB · Views: 10
Do you know the history on your motor, or in other words is it a reman or original? You're absolutely right about the base gasket impacting compression numbers.

I specifically went looking for the boat I have because I wanted a 787 motor for future service needs, one piece head with individual jugs. Mine is blowing compression numbers way to good to mess with it right now but if that ever changes it get's opened up on the spot.
 
This motor blows 135psi according to the seller, and it doesn't appear to have been violated yet.

Was just noticing the cylinder sleeve thickness on these seems to be pretty thin.
Bet it does blow 135, that piston looks soaked in oil lol. Guess it should be since it's open to atmosphere, I'd be wanting a good all original spare 951 if I owned one of those boats and I'd be buying it sooner than later.

Thinking the supply of those engines is short by comparison to some of the other models they sold in larger numbers. I've got all the local marina's keeping an eye out for me for an original 787 motor with the top service plug for the balance gear.

I want one all built and ready to drop in, our season here is to darn short if something goes wrong right about now. I know S&S is a couple weeks out for a total rebuild and would expect any good shop to be. I'd rather just swap them out and send the other one in over the winter time when they need the work.
 
Ok back to the project now.
I guess I need to remove the exhaust pipe first. The pipe has two parts. Do I just need to remove the upper part?

Or I just take off the screws at the exhaust port and the manifold and cylinder will slide out?


Sent from my iPhone using Tapatalk
 
Last edited by a moderator:
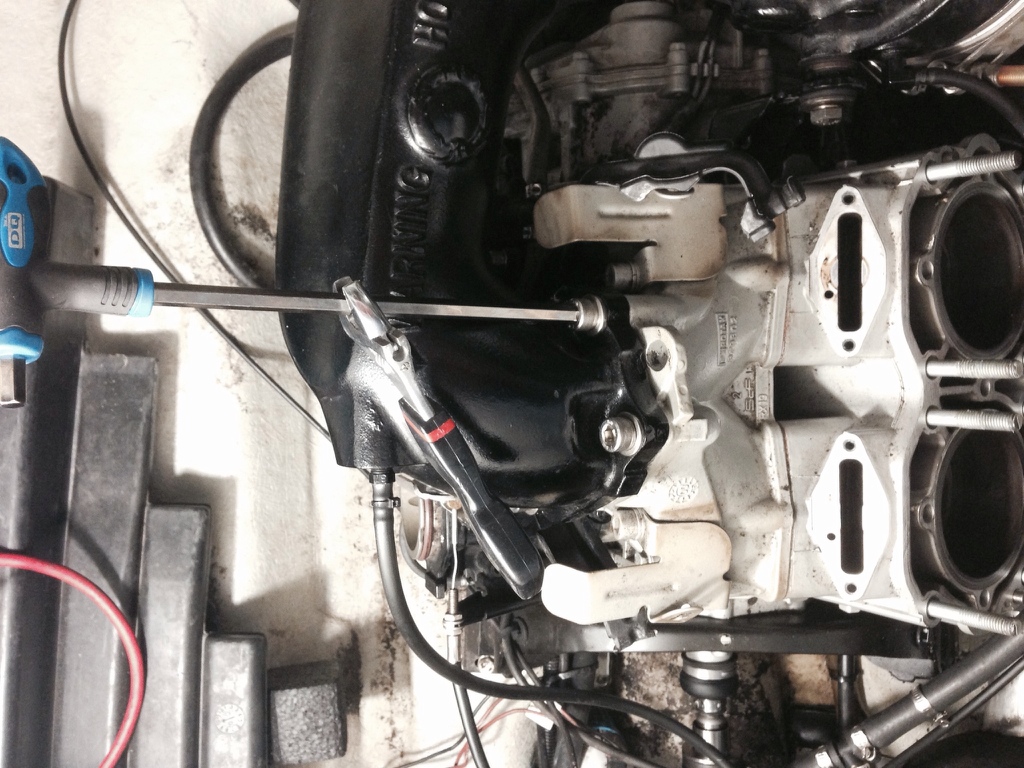
Man these bolts are super tight!
476.jpg


It has 3 bolts and 1 nut holing tuned pipe head to the manifold. The nut can be removed only if I removed the carbs.
Is it true??


Sent from my iPhone using Tapatalk
 
If you just remove the upper elbow where it attaches to the manifold will the cylinder have enough room on the left side? Place a straight edge on it at the top left and see if it clears all the way down.
 
Man these bolts are super tight!
476.jpg


It has 3 bolts and 1 nut holing tuned pipe head to the manifold. The nut can be removed only if I removed the carbs.
Is it true??


Sent from my iPhone using Tapatalk

Were on the way home in the big boat and all I have is the phone right now, take a minute to read the cylinder removal steps in the manual it will show you exactly what to remove to get it free. I recall it referencing the carbs in cylinder removal so you're probably right.
 
If you just remove the upper elbow where it attaches to the manifold will the cylinder have enough room on the left side? Place a straight edge on it at the top left and see if it clears all the way down.

The angle between The cylinder come out and manifold opening plane will help.
If the manifold port to the tuned pipe head can be "slide" open then it will work.
But do I have to take off the carbs?


Sent from my iPhone using Tapatalk
 
Status
Not open for further replies.
Back
Top