it’s been awhile since I’ve had any time to work on the HX, tenants left our rental house so I’ve been working there to get it ready, hopefully for May 1st. throw in an ice storm, hydro outage followed by lots of rain and voila, I get 3 flooded basement jobs. A roof I have to start May 9th. Been busier than I want to be. But anyways my Seadoo alignment tool that I purchased used from a member here came in today and I’m super happy to have it . Just wondering if there is a special way to store it, to keep it true? I was thinking either on a flat surface or hang it on the wall?
-
This site contains eBay affiliate links for which Sea-Doo Forum may be compensated.
You are using an out of date browser. It may not display this or other websites correctly.
You should upgrade or use an alternative browser.
You should upgrade or use an alternative browser.
1995 HX Project
- Thread starter burtshaver2021
- Start date
- Status
- Not open for further replies.
Store it standing on it's end, just like a crankshaft. I spray it with some WD-40 and keep it in the original plastic sleeve.it’s been awhile since I’ve had any time to work on the HX, tenants left our rental house so I’ve been working there to get it ready, hopefully for May 1st. throw in an ice storm, hydro outage followed by lots of rain and voila, I get 3 flooded basement jobs. A roof I have to start May 9th. Been busier than I want to be. But anyways my Seadoo alignment tool that I purchased used from a member here came in today and I’m super happy to have it. Just wondering if there is a special way to store it, to keep it true? I was thinking either on a flat surface or hang it on the wall?
I’m not sure if I posted that link correctly or not but I was reading a thread where you had mentioned that you use tiny tach to read the rpm’s. I searched up tiny tach and it over 100.00. Would the one in the last link work ok? Being how cheap it is
They are $54 on Amazon in the US.
https://www.amazon.com/Digital-Mete...ocphy=1014254&hvtargid=pla-570678540958&psc=1
I have had mine for over 25 years and keep replacing the battery even though they are "factory sealed".
The problem with some of the cheaper ones is they don't update fast enough to do much good and the TinyTach you can adjust it for different firing orders.
On the cheaper ones I don't know much about them.
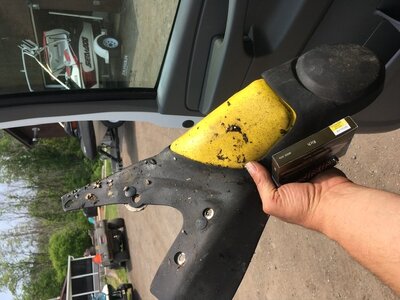 I found a unicorn, hopefully the fellow I got it from can find the one for the other side. He has a barn full of parts but not organized.Its from a 96 but I’m good with that, this one is in fantastic condition. A piece of bad news for me though, my laptop went for a sh@t, it says I have no hard drive, I’m really hoping it can be fixed or pictures recovered. I had taken probably in the neighborhood of 60 to 100 pictures throughout my project and it will be much more difficult for me without them. Keeping my fingers crossed
I haven’t even looked at the manual or parts catalog, I will tonight. I’m going to place another order now for my 95XP parts and ordering a water channel cover for my 99 GSX RFI.
So for this 95 HX I have never aligned an engine before, or taken off a jet pump. Is there anything I should be ordering for this HX? I already have the oil for the pump and the o ring for the cone. I’m thinking there will be some type of gasket where the pump mounts to the hull? Should I maybe order driveshaft bumpers? I did have the 1 that butts up to the PTO, I will have a look tonight at the manual and parts catalog but thought something might jump out at you.
So for this 95 HX I have never aligned an engine before, or taken off a jet pump. Is there anything I should be ordering for this HX? I already have the oil for the pump and the o ring for the cone. I’m thinking there will be some type of gasket where the pump mounts to the hull? Should I maybe order driveshaft bumpers? I did have the 1 that butts up to the PTO, I will have a look tonight at the manual and parts catalog but thought something might jump out at you.
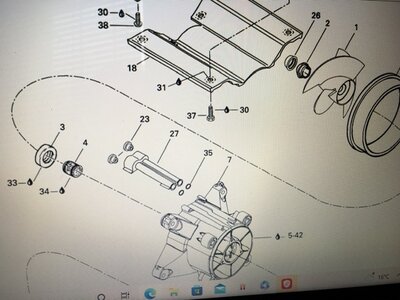 Is that the shoe at the top Center of this picture? I’ve looked through the 1995 parts catalogue and the 96 shop manual and I cannot find the neoprene pump to shoe seal. I keep seeing this sealant u black part number et 293800028, is that what they used to use instead of the neoprene seal? Sorry, I’m pretty lost here. Also looking through these manuals, there are a ton of little parts and o rings when taking the pump apart, do I need any of this stuff? like needle bearing for driveshaft p/n 293350007, double lip seal p/n 293350007, needle bearing for pump p/n 293350001, another double lip seal, impeller boot, and the list goes on. Or will I be able to re use all this stuff? Sorry, this will be the first time taking a pump off so it’sgoing to be painful, thank you for the help, it would be much more difficult without having you. Also will I need any additional tools? Ibelieve I have an impeller removal tool, but I will have to che k the part numbers to see if it is the right one for sure
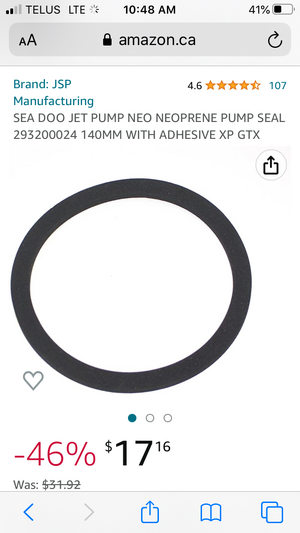
Yes, that is the correct part and I use it on all the 720 and 787 pumps but it is not shown on all diagrams.View attachment 62648Ok, I think I’m on the right track here for that neoprene seal? This one doesn’t mention the 1995 HX for forment but I will have another look at the parts catalog tonight.
That price is high though as the MSRP is only $10.99 from Seadoo.
Seal Neoprene GTS 5818.
293200024
You should not need any seals unless they look bad or the pump fails the pressure test.
thank you, but I will need that neoprene seal correct? I will go through the manual again before I start and then once I get time to do some work I will just go ahead until I come to something I’m not sure about. Just trying to get an order together now so I have everythingYes, that is the correct part and I use it on all the 720 and 787 pumps but it is not shown on all diagrams.
That price is high though as the MSRP is only $10.99 from Seadoo.
Seal Neoprene GTS 5818.
293200024
You should not need any seals unless they look bad or the pump fails the pressure test.
I wouldn’t know, this is a 95 HX. Would it have the seal now? If it doesn’t would putting a seal on it create a gap in the drive system anywhere?Yes, they are much better than messy sealant unless you have the old hulls that the pump goes directly on the fiberglass.
Your HX has the plastic pump shoe that is bolted and glued onto the hull. Your pump goes into the recess on this shoe and that is where the neoprene seal goes.
Install it, it is soft and seals the pump whereas originally the only seal was the little plastic lip on the OEM wear ring. My theory is Seadoo found out it didn't always seal and came up with the neoprene seal to fix this as it only shows on some of the 1997 and later parts diagrams.
Install it, it is soft and seals the pump whereas originally the only seal was the little plastic lip on the OEM wear ring. My theory is Seadoo found out it didn't always seal and came up with the neoprene seal to fix this as it only shows on some of the 1997 and later parts diagrams.
Thank you, I will have a look at the 97 parts catalogue and manual which should help me.
It couldn't be easier.
Clean the hull side where the pump goes, peel the adhesive paper off the neoprene seal and stick it to the hull then bolt on the pump.
 Trying to learn about these 2 strokes starting at the age of 47 makes me feel like this, I sure wish I would have gotten into seadooing 25 years ago when I was young but I’m thankful I have some now and have the help on this forum, Love it, thank you
So progress is going pretty slow but at least I’m getting out here a little bit now, it is supposed to be a hobby but I find myself putting this ahead of regular duties like lawn mowing and weed eating etc. But anyways, I’m on to the 800 grit wet sanding for the white and each step is going quicker. Just thinking ahead, once I have the hull polished out I’m going to move on and replace the gaskets on the engine and paint it. Questions, 1. For the 518 on the o rings for the cylinder cover do I lay a small bead beneath the rubber o ring first or lay the o ring in dry and run a small bead of 518 on top? Or both? For the painting of the engine I was going to wash it down with a degreaser, give it a hand sanding with say 220 grit or so, maybe 320 and then spray it with the paint bomb. I was going to do it once it was all bolted together, it won’t be perfect but I do want to do a decent job. Does this sound ok? Any suggestions? Thank you
So just enough in the groove first so that it is a continuous bead and then smear whatever has pushed up past the o ring? Or apply another small bead after the o ring is laid in. Sorry, and to clean up where the o rings go, just a brass brush and vacuum?
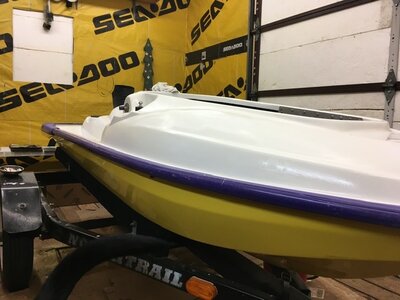 Perfect, that’s what I will do.I’ve got the 1200 grit wet sanding done, just 2000 grit now and t he n I can tape up the rub rails and do the rubbing compound. I’m looking forward to moving on from this body sanding and polishing. Thank you for all the replies, I don’t know how you find the time to help so much on here but I sure am glad your here.
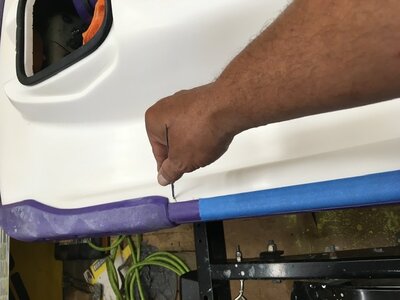 For anyone who ever reads this and hasn’t done it before,i find a pick in the shape of an L gently placed unde the rub rail lifts it up enough to slide the tape under the rub rail to get perfect cover with the blue tape. And this blue tape that Mikidymac recommended is awesome, way better than the green painters tape
- Status
- Not open for further replies.
Similar threads
- Replies
- 2
- Views
- 507
- Replies
- 4
- Views
- 347
- Replies
- 3
- Views
- 353


