The "L" ring will only fit in the cylinder one way. The tip of the leg of the "L" goes in the ring groove and the top of it fits in the recessed dome of the piston. The lower ring will have a mark stamped on it and this mark goes up so that when you look down at the top of the piston you can see the mark.


-
This site contains eBay affiliate links for which Sea-Doo Forum may be compensated.
You are using an out of date browser. It may not display this or other websites correctly.
You should upgrade or use an alternative browser.
You should upgrade or use an alternative browser.
cylinder specs
- Thread starter NIL8er
- Start date
- Status
- Not open for further replies.
NIL8er
Active Member
I'm almost positive they show a picture. Your talking about the L shaped ring, which I think SHOULD be flat down.
Sent from my SGH-T889 using Tapatalk
ill double check . thanks
NIL8er
Active Member
regarding reassembly of my 1996 Seadoo Bomb, GTX rotax 787 carbureted unit . what should i lube the new crank bearings and counter bearings with? and any other advice that isn't in the manual or common knowledge would be greatly appreciated.from what im reading just lube with 2 stroke oil and its fine? any opinions on putting a access port for Counter balance pto bearing area. mine doesnt have one but some 96GTX's do?
Last edited by a moderator:
shawnsolo79
New Member

Sent from my SM-G900V using Tapatalk
NIL8er
Active Member
perfect!!! thanks.this is a stock pulled yesturday hope this helps
Sent from my SM-G900V using Tapatalk
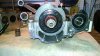
Yes that's Normal. look at your pto flywheel. The inner part is what rides on the seal. Also have a close look at it for scoring. There may be pitting where the seal was riding and it might lead to you tearing up the seal.
racerxxx mentioned earlier about his mod to add the counterbalance access port in his build thread. Not hard to do and it means you can change it when ever you want instead of when she blows I do mine every 50 hours like the 96 manual says.
and FYI, last rebuild i did was with WSM top end kits and for the second ring I couldn't find any specs for which way the ring went (writing up or down) After lots of searching and calling wsm i found out that the ring is square and could go either way. ( reason i questioned it is because the writing i thought was supposed to face up but on the wsm they put it on the bottom of the upper ring. so i thought both rings were supposed to have the writing face down)
Anyways, back to the build")
racerxxx mentioned earlier about his mod to add the counterbalance access port in his build thread. Not hard to do and it means you can change it when ever you want instead of when she blows
I do mine every 50 hours like the 96 manual says.and FYI, last rebuild i did was with WSM top end kits and for the second ring I couldn't find any specs for which way the ring went (writing up or down) After lots of searching and calling wsm i found out that the ring is square and could go either way. ( reason i questioned it is because the writing i thought was supposed to face up but on the wsm they put it on the bottom of the upper ring. so i thought both rings were supposed to have the writing face down)
Anyways, back to the build
NIL8er
Active Member
Yes that's Normal. look at your pto flywheel. The inner part is what rides on the seal. Also have a close look at it for scoring. There may be pitting where the seal was riding and it might lead to you tearing up the seal.
racerxxx mentioned earlier about his mod to add the counterbalance access port in his build thread. Not hard to do and it means you can change it when ever you want instead of when she blows
and FYI, last rebuild i did was with WSM top end kits and for the second ring I couldn't find any specs for which way the ring went (writing up or down) After lots of searching and calling wsm i found out that the ring is square and could go either way. ( reason i questioned it is because the writing i thought was supposed to face up but on the wsm they put it on the bottom of the upper ring. so i thought both rings were supposed to have the writing face down)
Anyways, back to the build
thanks a million . here goes nothing
NIL8er
Active Member
no pitting but a shinny thin area. is that ok?Yes that's Normal. look at your pto flywheel. The inner part is what rides on the seal. Also have a close look at it for scoring. There may be pitting where the seal was riding and it might lead to you tearing up the seal.
racerxxx mentioned earlier about his mod to add the counterbalance access port in his build thread. Not hard to do and it means you can change it when ever you want instead of when she blows
and FYI, last rebuild i did was with WSM top end kits and for the second ring I couldn't find any specs for which way the ring went (writing up or down) After lots of searching and calling wsm i found out that the ring is square and could go either way. ( reason i questioned it is because the writing i thought was supposed to face up but on the wsm they put it on the bottom of the upper ring. so i thought both rings were supposed to have the writing face down)
Anyways, back to the build

NIL8er
Active Member
lol i was going to say post a pic but there it is
so is ok?............
Too blury to really tell but as long as there is no pitting along the whole line and its not that deep it should be just fine.
Also want to add something to the squish clearance and base gasket question.
Take your cylinders and bolt the head on to them as close to perfect as you can.
look inside while your doing it and you will see that you can move the cylinder and head all over the place and then the head will be pushed to one side more than the other.
That means you will get a different squish reading on one side of the piston compared to the other side of the piston.
So by bolting the cylinders onto the head you can line them up by looking down the bores and making sure the ridge all around at the top is the same.
Try and keep the exhaust flanges as square as you can or even bolt that on too in order to help make it sturdier.
Next, ke some marks with a sharpie all around the head and cylinders so that when you take them apart and bolt them onto the base, you can see if they line up properly before torquing down the cylinders.
After the lines all match up, you can torque the cylinders down properly and then the head with the marks lined up and then do the squish measurement. That way you will have a consistent reading on both sides of the piston along the same axis as the wrist pin.
Its all because of the play in the cylinders and heads when you bolt it together.
So lets say you need a squish of 1.4mm (spec 1.3-1.6mm i think) and without a gasket you measure the solder to be squished to 0.9mm that means you need a gasket with 5 holes to get you to 1.4mm overall squish. (I've had to use a 3 hole in my last build!)
but if the head or cylinder was shifted to the left or right, you would get something like 0.5 on one side and 1.8 on the other or something weird like that. (can you tell I've fought with this one for a bit lol )
Last edited by a moderator:
About the rotary valve question, if you have to replace the valve, go with OEM. Aftermarket, especially wsm, have issues. either won't line up or are thinner.
When you get there you will need to check the clearance on the rotary valve surface as well. That process is in the manual and its pretty easy.
When you get there you will need to check the clearance on the rotary valve surface as well. That process is in the manual and its pretty easy.
what oil for impeller? other than seadoo jet pump synthetic oil
Mobil 1 LS 75W-90 Synthetic or, any 75W-90 syn gear lube
- Status
- Not open for further replies.
Similar threads
- Replies
- 23
- Views
- 1,244
- Replies
- 13
- Views
- 841
Share: