• This site contains eBay affiliate links for which Sea-Doo Forum may be compensated.

Challenger 4tec Upgrade

Status
Not open for further replies.
Congrats SUKE!! Another little Sea-Doo Rider! :) He probably won't be able to reach the handlebars for a few years, might be time for a boat!

PS my buddy and I had our first ride of the season yesterday. I saw a Challenger just like mine getting towed back. It made me sad, but also made me remember why I'm doing all the work I'm doing. Another 787 didn't deliver. The boat had BOTTOMS UP on the side, I feel like I've seen him before on the forums...

You have the SPX fixed already? I think I've seen that boat before too.
 
You have the SPX fixed already? I think I've seen that boat before too.

No, haven't touched the SPX... boat is taking full priority right now. I realized that I let the skis get too much in the way of the Challenger project. I'll have to pull the SPX engine all apart and put that new crank in there after my wedding. Do you or anyone you know have an ultrasonic bath I can throw my carbs in? I'm wondering if that won't help fix my stupid stumble on acceleration I've been plagued with all these years.
 
No, haven't touched the SPX... boat is taking full priority right now. I realized that I let the skis get too much in the way of the Challenger project. I'll have to pull the SPX engine all apart and put that new crank in there after my wedding. Do you or anyone you know have an ultrasonic bath I can throw my carbs in? I'm wondering if that won't help fix my stupid stumble on acceleration I've been plagued with all these years.

sure don't. Wish I did. I'd like to be able to figure out my bog issue as well. Wonder if that would help me too? I do know they're not supposed to run like ours did. I rode my buddies 95 XP(Mpower) and it took off like a rocket. Not a single stumble in any of the RPM range.
 
So since my fuel pump will be an in-tank unit, I will need an overhead access port in the event I need to service it. I plan to use one of those 8" screw-off marine access ports installed under the seats, but removing those seats was a huge PITA with the fuel tank and engine out. I literally had to stand in the engine bay and reach to get those front-most bolts out. I'm thinking of redesigning the way the seats attach to the hull. Ideally, I want to make them like our jet ski seats. Use those 90's metal brackets the seats clip in with instead of those hard-to-reach bolts. I could still use the bolts closer to the engine. As for the plastic anchors on the sides of the seat cushion, I'll just leave that off permanently. I don't see a point for those.
 
The progress continues. Fiberglass work can really fun and rewarding. This is especially true when you have the right equipment like my awesome positive-pressure full-face respirator (thanks again Dad), and the West System pumps to measure the right quantities of resin-hardener. Sanding and fairing fiberglass under the boat SUCKS! I'm trying to work down the glass so that I can build up a nice thick layer of gel-coat. I'm finding all sorts of bubbles (one really big one) and will go back and fill them in. For that I've been using epoxy resin mixed with fiberglass dust I've filtered, but I will probably switch to using polyester resin. It's cheaper and I'm running out of the epoxy. I want to save that to put down a few more layers of glass around the inside seams, and generally beef up the union of the graft and hull. The bottom is coming out very nicely, though the picture doesn't look it.
20150210_233843_zpsiy9qdqxt.jpg
[/URL][/IMG]
The hard part will be fixing the part where the ride-plate joins up. Eventually, I will have to build a very strong reinforcement for it, as right now the only thing to hold it are those two bolts in the front.
Today I tacked in place the front mount. I set the engine on the rear mounts and again set up my alignment tool. I used a ratchet strap to lift up the front to about where I wanted it. I cut off the top of the old mounting surface, glued the aluminum backing block to it and bolted it to the bottom of the motor mount. This whole thing I bolted to the engine, using a few shims (to give myself some play room later) and let it hang where it needed to be for the engine to be damn near perfectly aligned. I figure I can shim and wiggle it in place once the time comes, those mounts have plenty of space to move around the mounting bolts, and I can always make more. Here's a pic of the mount before I glued it.

I will probably have to fill that channel in with foam/fiberglass as this mount essentially turns it into a place where water can sit. Here's a shot with the front mount tacked in place. I used loose fiber and resin to stuff underneath it with a few layers of glass over one edge where I could reach. I will secure it all around tomorrow.
20150210_233818_zpszo5jebcq.jpg
[/URL][/IMG]
Phew, it's bed time. I'm tired and sore from all that lifting of the sander up against the hull. I better get some muscles out of all this to impress my fiance with when she comes.
 
Just purchased all the aluminum for the fuel tank. I was really happy to find a good distributor that gave me REASONABLE prices on sheet-aluminum. Others were quoting me literally twice as much for the same thing. How do these people stay in business??
 
Gel coat? I thought you used epoxy resin? I'm surprised you'd put up with a carburetor hesitation, considering your capabilities.

I hear there's a ceasefire in Ukraine, man what a different world I can't even imagine what it must be like.......

When they want 2x price it's either b/c they sell to government or large government contractors and avoid encouraging the little guy they'd rather not see his face.
 
Last edited by a moderator:
Thanks Slasher

Gel coat? I thought you used epoxy resin? I'm surprised you'd put up with a carburetor hesitation, considering your capabilities.

I hear there's a ceasefire in Ukraine, man what a different world I can't even imagine what it must be like.......

When they want 2x price it's either b/c they sell to government or large government contractors and avoid encouraging the little guy they'd rather not see his face.

Sportster: Gel coat has no problem adhering to epoxy, as long as it's properly prepared, and doesn't have that amine blush. Gel coat adheres via a mechanical bond, so before I apply, I'm going to lightly rough everything up with a wire wheel. I tried 80 grit on my random-orbit sander, but it produces too smooth a result IMO. Gel coat is thick and acts almost as a high build. I will brush it on, and apply probably 2-3 coats depending on how thick the stuff comes out. I have the gel coat from my dad's earlier boat project. he gave up, so now I'm a proud owner of 2 gallons of the stuff lol. The wax additive is on its way.

The carburetor problem has been the bane of my existence for over three years now. I've tried literally everyting I could think of. I've tuned the carbs every which way there is, I've tried different carbs, I've tried disconnecting the rectifier, running it from a different fuel source (to eliminate possible fuel line/selector problem). I've cut back plug wires, gotten new plugs, verified rotary timing, tried different grades of fuel, tried different oils, verified I don't have a case leak and probably a ton more stuff that I've forgotten about. There is a race team that comes to Jordan Lake every Sunday, and one of the guys and I talked about the 787 a few years ago. He said they used to race them, but stopped because they just couldn't get that low-end power out of it, probably the same problem I'm having. I even keep a spreadsheet log of all the stuff I do and settings I tune to because I've been trying to so many things. This is the only machine I've ever owned where you set everything to factory spec, and it still doesn't work right. Unless it's something like a stator ring or ECU, I'm out of ideas. That is actually a big reason I decided to ditch the 787 in this boat. I feel that boats should be a reliable and quiet, something I can relax on. I'm still keeping the 787 in the x4, it's worth all that trouble, but when I got out on it, I know I'm likely to have it break down on me (it's why I used to go boating with a trolling motor in my ski locker).

Yea, I'm happy to hear about the cease-fire too, but I don't want them to give more of Ukraine away to those Russian terrorists. It's bad enough they stole the Crimean peninsula. The guy who taught me all about 2 strokes and fiberglass back when I was 15 lives in Crimea now in Sevastopol. I need to visit him next time I go back there. I miss that place, it is truly beautiful. Haven't been there in ages, but now I need a visa to go back :/ I just want NATO to come in and set things right. The US signed a document along with Great Britain and (ironically) Russia stating that the three will defend Ukraine's borders, from exactly the shit that's happening right now, in exchange for Ukraine's disarmament of WMD's. Seems like they got screwed in that deal...
 
Sounds like your carbs are too lean in the low speed circuit.

Nice work on that graft, looks great from the bottom and inside is pretty slick looking as well. My transom isn't flat across the back like yours, my pump is set forward in a little cubby pocket. Pretty funny mine's that way, so many people go to a lot of trouble to move their jet pumps further back.

Ukraine is stuck between a rock and a hard place, there are some who claim the ultimate goal involves colonializing Russia, this of course sets up Ukraine as a pawn. I guessed Russia wanted guaranteed access to a winter seaport, thought Putin might stop there. But for now it looks like NATO is standing off, so maybe there's something to the colonialization theory? It's all messed up from our perspective of course, too bad we aren't allowed to know what's really going on.
 
Last edited by a moderator:
Ukraine is stuck between a rock and a hard place, there are some who claim the ultimate goal involves colonializing Russia, this of course sets up Ukraine as a pawn. I guessed Russia wanted guaranteed access to a winter seaport, thought Putin might stop there. But for now it looks like NATO is standing off, so maybe there's something to the colonialization theory? It's all messed up from our perspective of course, too bad we aren't allowed to know what's really going on.

I agree with you there. I don't know who to believe. Russia says one thing, the US another. I know our media is controlled, and we are told what we need to hear/know to stay happy and be good little consumers. I don't know what I don't know, but this all seems so dumb and senseless. I've always thought of Putin as a smart man, and this shit-storm doesn't look anything like what a smart man would do. There has to be a bigger reason than just dumb-old colonialism. The world has already been through that, and realized that IT IS A BAD IDEA.
 
Well, the 4tec officially has a new home in my Challenger :)
Here it sits all aligned and happy.
20150217_205858_zpse81quhvv.jpg
[/URL][/IMG]
Here are the mounts all glassed in. I used West System epoxy on the rear mounts and all around the graft, and 3M polyester resin on the front mount. They're in there solid as rocks.
20150217_205943_zpsryouuval.jpg
[/URL][/IMG]
That front mount has 1/4" or more of fiberglass all around it. I'm going to have to seal the mysterious pocket directly in front of it (below the fuel tank), as it now forms a little pool for water to collect. I'm not sure why seadoo left it there, it never really served a purpose before. Here's a pic of the inner transom.
20150217_205927_zpszjyjao61.jpg
[/URL][/IMG]
I built it up really thick all around on both sides. I want this transom to be super tough as it now has to absorb more power. The thought of some day increasing that power makes my lips curl in a smile :)
Here's what the bottom looks like.
20150217_210019_zpsecabjbfb.jpg
[/URL][/IMG]
It's all smoothed out, little air pockets and imperfections filled in with a little body filler (fiberglass just takes too long to harden and the amount was so minuscule). I ground the glass down a little to give myself some room to lay down a nice layer of gel-coat. I will probably apply it tomorrow.

Here's where I need some input: I smoothed out the strange shape W shape of the ride plate to make a true V
to better contour with the boat's hull, but the dead-rise is still off. There is now a step up from the hull of the boat to the ride plate (opposite of a catch).
(looking from the back of the ride plate towards the bow)
20150217_214132_zpsy8b4mtd1.jpg
[/URL][/IMG]
If you look toward the front of the ride plate, beside the bolt holes where it meets the hull, you'll see the issue. The hull sits a little deeper at the center than the ride plate. At the outer edge of the ride plate, the situation is reversed and there is a small lip that will catch the water. At speed, would this create a low-pressure zone and maybe pull air from the outside or will the lip balance it out, pushing water into that low pressure zone? Should I fill that in with glass and just gradually blend it in over a 2" run, or can I get away with using heavy duty silicone and just seal the crap out of it? I'm perplexed and don't want to spend any more time than I have to here.
 
Last edited by a moderator:
The shape of the hull is important, including how the pump is being stuffed.

You might like to see this idea for getting around some of these limitations:

http://www.boatdesign.net/forums/bo...neffective-pwc-converted-propeller-21381.html

An alternative, assuming you can't manipulate the existing ride plate satisfactorily, might be to plumb raw water cooling (downside: subject to debris) or use a mercruiser style heat exchanger (these are pricey, new)?

http://www.marineengine.com/boat-forum/showthread.php?384479-Picture-of-inside-heat-exchanger
 
Last edited by a moderator:
An alternative, assuming you can't manipulate the existing ride plate satisfactorily, might be to plumb raw water cooling (downside: subject to debris) or use a mercruiser style heat exchanger (these are pricey, new)?

http://www.marineengine.com/boat-forum/showthread.php?384479-Picture-of-inside-heat-exchanger

I'm actually not using the ride plate as a heat exchanger. I'm planning to use a water-water heat exchanger.
http://www.***********/350-000-BTU-30-Plate-Exchanger/dp/B00496OK2A
The only reason I'm using this ride plate is because it bolts up to the pump and is the correct shape. I've already found and bought a water-water heat exchanger and strainer to keep debris out. The reason is I don't want rubber hoses going in and out of the hull, and I'm not sure how I would even route them. The ports are about .5" away from the transom. I will probably gut the ride plate's heat exhcange tunnels and trim the lid to save a little weight once I get this more finalized, and still have a big, strong ride plate to help me plane out quicker.
 
Lately I've been pondering my plans for the exhaust system. I even started a thread just for this topic ( http://www.seadooforum.com/showthread.php?75987-Is-4tec-exhaust-water-injected ) I realized that my earlier plan to have the two mufflers at the edges of the hull was not going to work. Marine exhaust systems, turns out, are much more complex that I initially thought. I did some research and realized that the waterline plays a major role in how these systems are designed. Having the two mufflers at the edges of the hull would put them above that waterline. Also, turning the JPipe 90deg to aim at the WB would take away that bend, which is a high point in the system. That's always supposed to be above the water line, to help ensure water never backs up into the motor. Anyway, after much research, I finally got around to visiting the issue in person.

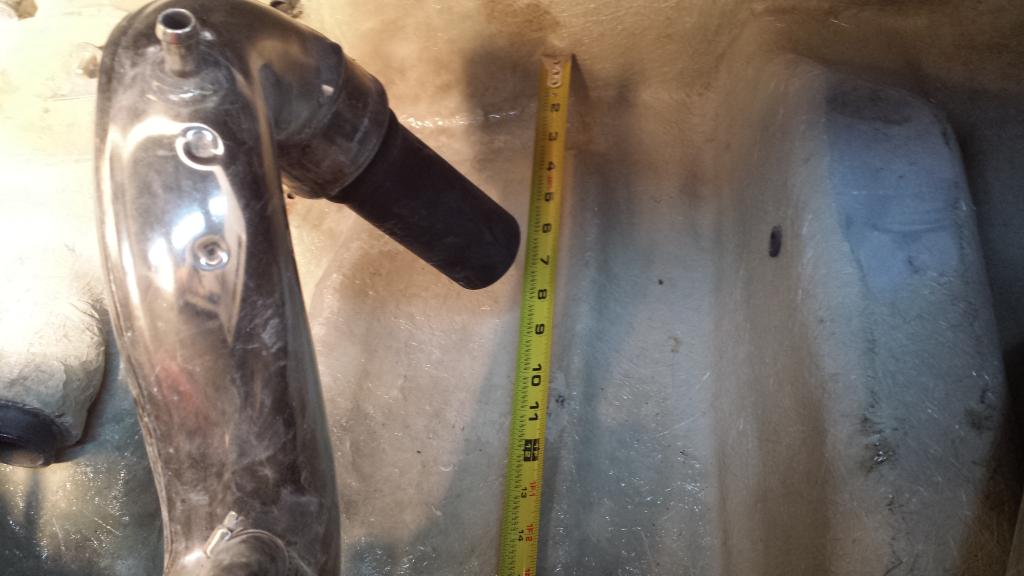
We're going though a cold snap this week, so after heating the garage for an hour, it was bearable to work in. I stuck the JPipe on and stareted taking measurements.
[/URL][/IMG]


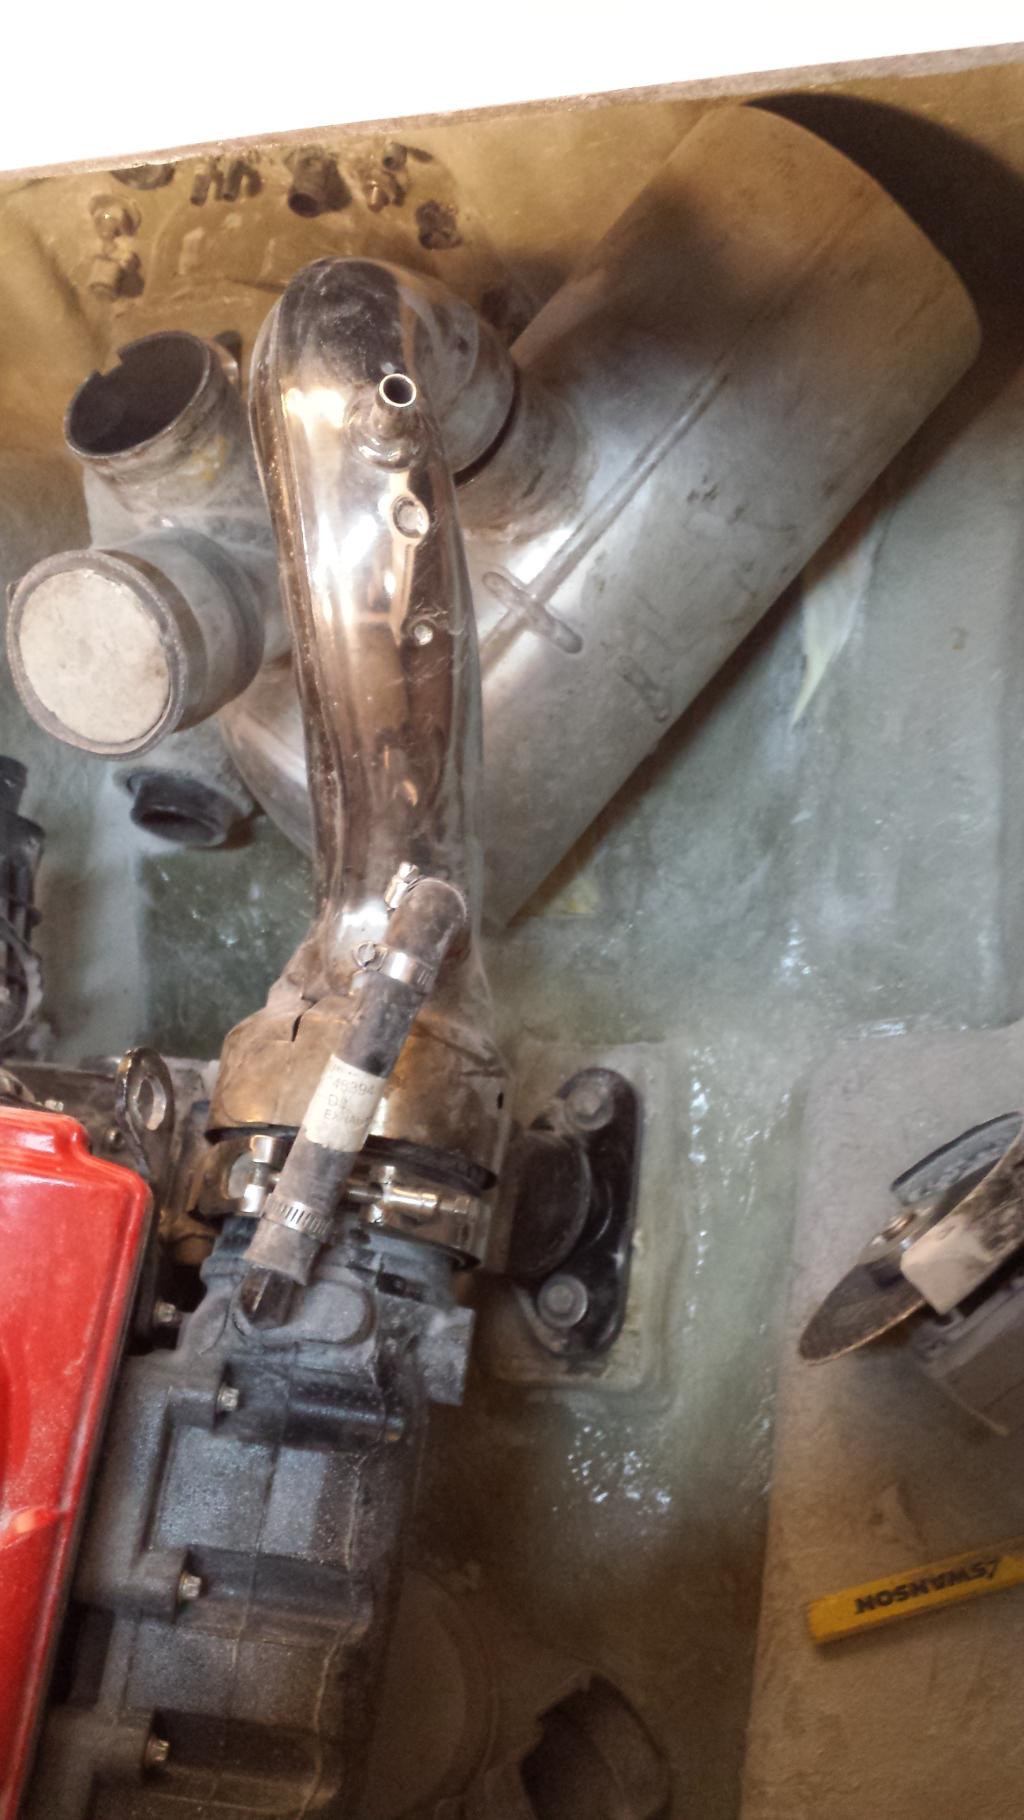
The old 787 muffler was parallel to the motor, and my initial attempts were to simulate thas scenario. Today, I realized that in the jet ski, they mufflers were out at angles. So I turned it and saw that it was much closer to fitting. It seemed I was off by about 4". I proceeded to remove that insulating jacket. Once off, it was MUCH closer. I saw many picture where people switched their WBs for shorter ones. Figuring I had nothing to lose, I cut into the waterbox. I deleted about an inch off the end. Here's what it looks like inside.
20150220_193106_zpsfhqm67yb.jpg
[/URL][/IMG]
I had to cut another 1" ring off it AAAAALMOST WENT IN. I was blocked by the inner hull molding. I took out the grinder and shaved away some of the shaping for the old muffler. 5 minutes of grinding and behold!
[/URL][/IMG]


Looks like the (semi)stock system is a GO. :thumbsup: I still have some questions though.

1. What is the angle of the water box. Is it tilted toward the bow, the stern? How many degrees is the inlet tilted? I guess a better way to ask that second question is how tilted is the JPipe? Should that outlet water-jacket spout point straight up? A little to port? It's been ages since I took all this apart, and I never owned it long enough to know such things. I believe this is critical because if you look inside the WB, the water and exhaust has to come under that baffle to get out. If it's an angle, it'll change how things move in there.

2. Is that black insulation on the first WB necessary? Would I melt the epoxy if I left it off? I ask because the stuff is really heavy and I'm really weight conscious with this project. Also I may have to make the WB even shorter if I have to put it back on. What if I only put on part of the insulation? Does it cut down on noise THAT much?

Man, I'm so relieved I can use my stock system. I wonder how much louder it'll be with a shorter WB or if I'm screwing up any other design dynamics...
 
Hey Sportster, how far from Smith Mountain Lake are you? I think it's only about 4hours from me. I've been meaning to go. When I get this baby running, we should go cruising out there :)
 
If you look toward the front of the ride plate, beside the bolt holes where it meets the hull, you'll see the issue. The hull sits a little deeper at the center than the ride plate. At the outer edge of the ride plate, the situation is reversed and there is a small lip that will catch the water. At speed, would this create a low-pressure zone and maybe pull air from the outside or will the lip balance it out, pushing water into that low pressure zone? Should I fill that in with glass and just gradually blend it in over a 2" run, or can I get away with using heavy duty silicone and just seal the crap out of it? I'm perplexed and don't want to spend any more time than I have to here.

Steps in the hull actually aid in top speed....air bubbles...less friction. A cove shaped bead of permatex or marine epoxy...just to fill the void and slightly soften the change in plane is about all I'd do. The water ain't gonna pull your plate off with no lip to catch.
 
Last edited by a moderator:
Steps in the hull actually aid in top speed....air bubbles...less friction. A cove shaped bead of permatex or marine epoxy...just to fill the void and slightly soften the change in plane is about all I'd do. The water ain't gonna pull your plate off with no lip to catch.

Damn! I already faired it in with fiberglass filler... Oh well :/
 
Damn! I already faired it in with fiberglass filler... Oh well :/

But you're not using the ride plate for cooling that motor...right?

Just noticed that you said the outside lip will catch water...glassing the hull there to flush it to the plate would be a good idea.

One thing to keep in mind....adding a lot of glass...or changing the angle that the surface of the plate hits the water is gonna effect how that boat handles.
 
Last edited by a moderator:
Well, I sanded it all flat today and it looks pretty flush. If anything, that catch at the outer edge of the ride plate is less than 1/8" I feel that after I gel coat the bottom, it'll be flush. I'll probably just paint the ride plate with automotive paint.
My uncle came and checked out the progress today. He said to keep the ride plate intact. I was going to take off the top lid and gut the heat-exchange channels, but maybe i'll just plug it up and ride the way it is. It'll certainly be stronger when it's intact. Who knows, maybe some day I'll want to use it for cooling purposes... though I'm not sure how that'd work with all that fiberglass stuck to the bottom of it. I'll get pics once the filler dries and I sand it all smooth again.
 
Exhaust

I sat in the boat and stared at the exhaust situation for like 30 min today. It took me forever to figure out how to mount it. The pipe was suspended in the air about 1" in the front, and a bit less in teh rear. I strapped the straps onto it and glassed them in. This is to just tack them in place and give me an outline of the shape I will build. Once that all sets, I'll remove the pipe and make two mounts to hold the two rubber pads that the pipe will sit on. I'm going to leave the muffler insulation off of it for now. Looks like I'll need to create some custom plumbing as the stock pipes don't quite get me there. I'll cut them up and use the bends though. I'll have to find some straight pieces of aluminum pipe to bridge the straight distances.
 
I sat in the boat and stared at the exhaust situation for like 30 min today. It took me forever to figure out how to mount it. The pipe was suspended in the air about 1" in the front, and a bit less in teh rear. I strapped the straps onto it and glassed them in. This is to just tack them in place and give me an outline of the shape I will build. Once that all sets, I'll remove the pipe and make two mounts to hold the two rubber pads that the pipe will sit on. I'm going to leave the muffler insulation off of it for now. Looks like I'll need to create some custom plumbing as the stock pipes don't quite get me there. I'll cut them up and use the bends though. I'll have to find some straight pieces of aluminum pipe to bridge the straight distances.

I'd locate a local custom car build shop to do the welding and buy the piping off eBay, JEGS, or Summit. I have friends who do a lot of one off exhaust kits and love taking on challenges like this.
 
Aluminum piping or ss? I feel like ss would be to heavy

Aluminum is lighter but can be welded. I'd go Walmart, buy a few pool noodles, cut them to shape. Using a combination of the noodles, cardboard, and duck tape, should get a template to take to the welder. I'd imagine bringing your own supplies would only mean your out of pocket for the labor. Unless they give a deal for the Aluminum and labor together.
 
I"m actually going to do all the welding myself. My dad and uncle welded up a little sail boat in their basement

They have some equipment and expertise to draw from. I plan to weld a custom fuel tank for my boat. I'm shooting to get at least 35gal out of it. Not sure if I'm going to weld up a metal exhaust or just use rubber pipes. I love the noodle mock up idea though. I will probably use that, thanks for the tip :thumbsup:
 
Status
Not open for further replies.
Back
Top