


-
This site contains eBay affiliate links for which Sea-Doo Forum may be compensated.
You are using an out of date browser. It may not display this or other websites correctly.
You should upgrade or use an alternative browser.
You should upgrade or use an alternative browser.
Challenger 4tec Upgrade
- Thread starter IDoSeaDoo
- Start date
- Status
- Not open for further replies.
IDoSeaDoo
Well-Known Member
Spent last night finalizing and creating custom arms to attach to the VTS lever to push the original vts buttons that will control the module. The arms aren't pretty as I had to hack them out of scrap aluminum with just a side-grinder, but they'll work. Going to wrap some of that clear seadoo cooling hose around the end so it doesn't deteriorate the rubber quickly. I still have to go find the right springs to return the lever back to center position. The final product won't be very pretty, but it'll be behind the scenes and will work well.
I also proved the concept of filling in the neutral position on that metal restrictor plate with JB weld. It worked flawlessly.
 [/URL][/IMG]
I put a piece of tape over the side I wanted to keep flat and filled in from the back. There was groove worked into the piece from ten years of use, so I flipped it and am now using the smooth side. I had to sand the JB Weld a little, but it fits in perfectly now. The throttle in neutral is now restricted to only 20%.
I also proved the concept of filling in the neutral position on that metal restrictor plate with JB weld. It worked flawlessly.
I put a piece of tape over the side I wanted to keep flat and filled in from the back. There was groove worked into the piece from ten years of use, so I flipped it and am now using the smooth side. I had to sand the JB Weld a little, but it fits in perfectly now. The throttle in neutral is now restricted to only 20%.
IDoSeaDoo
Well-Known Member
Was scratching my head for like 20 min about the vts malfunction I had  When I would lower it all the way, it would stop on it's own, as it sensed that it was at the end of the allowed travel. Well, it would not come back up. It was like the safety system was backwards. I reversed the wires on the motor and it worked like it was supposed to. I scratched my head and deliberated, then finally realized I put the magnets around the armature backward. I caused the motor to spin in the opposite direction
 ") I flipped it and now it spins like it's supposed to, safety feature works well. Going to test the sending unit with a known good gauge. FINGERS CROSSED!
I flipped it and now it spins like it's supposed to, safety feature works well. Going to test the sending unit with a known good gauge. FINGERS CROSSED!
When I would lower it all the way, it would stop on it's own, as it sensed that it was at the end of the allowed travel. Well, it would not come back up. It was like the safety system was backwards. I reversed the wires on the motor and it worked like it was supposed to. I scratched my head and deliberated, then finally realized I put the magnets around the armature backward. I caused the motor to spin in the opposite direction I flipped it and now it spins like it's supposed to, safety feature works well. Going to test the sending unit with a known good gauge. FINGERS CROSSED!Sportster-2001-951C-Stock
Well-Known Member
I finally came across your thread, LOL, lots to catch up on.....
IDoSeaDoo
Well-Known Member
Man, I wish I had your boat right about now... Wouldn't have to do 75% of the work! Just make some new mounts and drop that baby in.I finally came across your thread, LOL, lots to catch up on.....
Sportster-2001-951C-Stock
Well-Known Member
Oh snap, a 4-tec might fit in my Sportster? Hmm, that's encouraging man, b/c I'll definitely consider this idea when my 951 finally tosses a rod.
If I was you, I wouldn't beat myself up trying to limit throttle travel in reverse or neutral, I'd be more concerned with just getting the throttle bellcrank lever geometry correct and once that's done onto the next thing.
Hey, I noticed you were considering using vinylester resin for laying up the fiberglass mods.... I think I'd use epoxy, I really like the Aeromarine epoxy system, this guy John Greer in San Diego packages this stuff and sells through ebay, (ph:877-342-8860), So far I've bought 10 gallons from him and it's great to work with this stuff, it has the perfect pot life for my slow work speed and I can adjust the viscosity to my liking by just mixing it with sawdust. I dunno man, Vinylester resin has a shelf life of just a few weeks, right? It takes me that long just to change my mind sometimes, LOL.
Oh, and all my best to your folks in Ukraine, I hope everything turns out okay?
IDoSeaDoo
Well-Known Member
Oh snap, a 4-tec might fit in my Sportster? Hmm, that's encouraging man, b/c I'll definitely consider this idea when my 951 finally tosses a rod.
If I was you, I wouldn't beat myself up trying to limit throttle travel in reverse or neutral, I'd be more concerned with just getting the throttle bellcrank lever geometry correct and once that's done onto the next thing.
Hey, I noticed you were considering using vinylester resin for laying up the fiberglass mods.... I think I'd use epoxy, I really like the Aeromarine epoxy system, this guy John Greer in San Diego packages this stuff and sells through ebay, (ph:877-342-8860), So far I've bought 10 gallons from him and it's great to work with this stuff, it has the perfect pot life for my slow work speed and I can adjust the viscosity to my liking by just mixing it with sawdust. I dunno man, Vinylester resin has a shelf life of just a few weeks, right? It takes me that long just to change my mind sometimes, LOL.
Oh, and all my best to your folks in Ukraine, I hope everything turns out okay?
A 951 platform would have been great to start with. You already have the 155mm pump in there whereas I have to glass mine in. The biggest question I have now is whether the engine will touch the bottom of the hull when I put it in. If I match the bottom (water contact surface) of the graft with the hull, I get about a 1" depth difference inside the hull between the graft and hull. I held the graft up to the engine and mounts, and it appears that the donor ski had about 1"-1.5" of clearance. It MIGHT work, but I now regret now that I didn't decide to glass in the front mount as well. I may have to raise the graft a little and just build up the bottom to match using fiberglass.
The throttle-in-neutral restriction puzzle has been solved. I was able to mechanically mod the original control unit to do this. The VTS lever conversion is almost done too. I just need to slightly mod the lever arms I made to push the switches and test it all out. I really hope the vts brain I have will output a good signal for the gauge.
The resin system I went with was the West System 101 epoxy. From other forums, it appears that this is the industry leader in marine epoxy. It's also what Trond used in his Jetling build, and his held up to 300+ ponies. I already bought it, just hope a gallon will do me.
Yesterday I did more cutting and fitting the graft. It now fits right in and is aligned. I had to carefully hang bolts on a string off the chines as plumb-bobs to get accurate centering measurements. Only thing left to do is cut out a little more hull to make space for the ride plate and verify engine-depth fitment before I can begin glassing it all back together.
Thanks for your sympathies of my fam. They all seem to be doing okay, they're not in immediate harm's way. But the economic system there is in peril. Noone is certain what will happen in the near future.
Sportster-2001-951C-Stock
Well-Known Member
I think you might need more than a gallon since you're fabing motor mounts too, but it might come close. You can always buy more.
IDoSeaDoo
Well-Known Member
Eh, I might just buy regular polyurethane resin from lowes at that point. As long as I have good strong stuff for the hull, especially where the engine pushes. Also, I'm glassing in only the front mount. The others sit almost flat on the hull bottom.
Didn't get much done tonight as my buddy came over and I showed him my ambitious project. I marked the last piece I have to cut out for the ride plate. We also thoroughly measured the space I need under the engine. It appears the original hull had about an inch under the lowest point. I may have to raise the graft to where it's not flush with the bottom of the hull, as the original hull comes up about an inch from the graft. I don't want it to bottom out if the motor mounts ever squish down when I land a big wave or something.
Another concern is the front of the engine hitting the seats when I drop it in. It's definitely going to encroach on the fuel tank room. Tomorrow I plan to find out just how much. Going to dangle the engine over the mounts and see where it puts things. Might have to slide it back an inch or so.
IDoSeaDoo
Well-Known Member
Dropped the engine in last night to make some final adjustments for fitment. Ran a ski rope under the whole motor to ensure that it's not sitting on anything. I used my engine alignment tool to align the engine with the graft and a level to make sure the engine was parallel to the bottom of the hull. All is well there. I had to cut a little more of the humps and bumps away on the inside of the hull to make room for the oil cooler and a coolant hose. I believe I'm almost ready to start the final prep for glass-work.
Sadly, it's going to be a shitty weather weekend. I wanted to wash the hull real well, but don't think it will dry this weekend. Fri and Sat will be rainy and cold. High humidity will slow drying and is bad for resin curing. May have to wait till next week
Sadly, it's going to be a shitty weather weekend. I wanted to wash the hull real well, but don't think it will dry this weekend. Fri and Sat will be rainy and cold. High humidity will slow drying and is bad for resin curing. May have to wait till next week
Sportster-2001-951C-Stock
Well-Known Member
Nice, all except the weather. Same eww as here.
IDoSeaDoo
Well-Known Member
Did more on the boat this weekend. Mocked everything up and it seems unavoidable to have my nozzle aim down about 1.5-2 degrees at all times. Otherwise I run the risk of having my motor bottom out on the original hull. I know this will slow me down a little, but I used to ride with the nose down more often than not as this boat likes to bounce ALOT. It's rarely NOT choppy on the water.
I ground off all the gel coat and MAN is that some tough stuff. My arms were falling off, working underneath it against gravity. I ground 1/8-1/4 inches off the thickness of the fiberglass about 3-4" all around the seam, then ground it with 60 grit to give the epoxy something to bite into. I will build that 1/4 back up to flush with the rest of the hull and really build it up on the inside where dimensions are a little more lax. I also plan to move and build up some of the inner beams/stringers I had to destroy to make room for the motor mounts. I'm really starting to wonder if a gallon will do it....
Washed everything yesterday and put a fan on it to dry it out real well. I found a lot of water between the bottom of the hull and the lower layer of the foam. I bet all boats have this...
Anyway, I left it outside overnight after peering up at a starry sky. "Doesn't look like rain" I said to myself, and went to bed. I cursed outloud this morning as I came out to a nasty drizzle and found everything soaked. Rain has always been my enemy. I should never underestimate it's asshole potential.
Sportster-2001-951C-Stock
Well-Known Member
My boat tries to bounce as well, I expect there's a bit too much rocker in the keel for the ride angle.
Maybe you could install a nozzle wedge on the pump support?
I didn't know there's foam in the keel, you're kidding?
Maybe you could install a nozzle wedge on the pump support?
I didn't know there's foam in the keel, you're kidding?
Last edited by a moderator:
IDoSeaDoo
Well-Known Member
No need for wedge. The nozzle will be aiming down about 2 degrees just by how the graft will be glued to the hull. The main reasons for this are A. rideplate alignment with the bottom and B. the boat had a more shallow hull than the ski because the 4tec needed more clearance. Anyway, I think the 2 degrees will help with the bounce and only slightly impact speed/efficiency. I will probably have the trim pointing down most of the time anyway, so this will only help me.
The keel on these boats is actually flat. There is 6" of flat space going from the pump inlet to about the start of the built-in cooler.
And yes, there is foam. Lots of foam. Everything between the bottom of the hull and the top of the mold is filled with foam. The bottom inch of which was totally saturated. Both my ski and boat had this water issue. It seeps in from those stupid zip-tie attachment points they stick into the mold. They drill a hole and just pop them in. No silicone or anything... If you ever get more than 4" of water in the hull, it enters the inside mold and permeates through the foam.
Sportster-2001-951C-Stock
Well-Known Member
Oh man, holes allow water seepage into any core. Then if wood, it rots. Regardless, the water makes the boat heavier, sometimes by a huge amount.
IDoSeaDoo
Well-Known Member
Oh man, holes allow water seepage into any core. Then if wood, it rots. Regardless, the water makes the boat heavier, sometimes by a huge amount.
8 hours of shopvac ought to fix me right up :thumbsup:
IDoSeaDoo
Well-Known Member
Well, the glasswork has begun. How I envy all the guys that did similar projects and their ability to flip the boat. It would make this 100,000 times easier. I'm having to use a staple gun to temporarily hold the heavier cloth up long enough to have the epoxy cure to hold it up to the hull. I am using non-woven mat and applying very thin pieces at a time. I did have to use one heavy woven piece to bridge the gap where I had to cut out the part of the graft that was causing a lip on the bottom of the hull. The jet ski had a deeper hull than the boat and hence a 3x5" rectangle had to be removed and bridged.
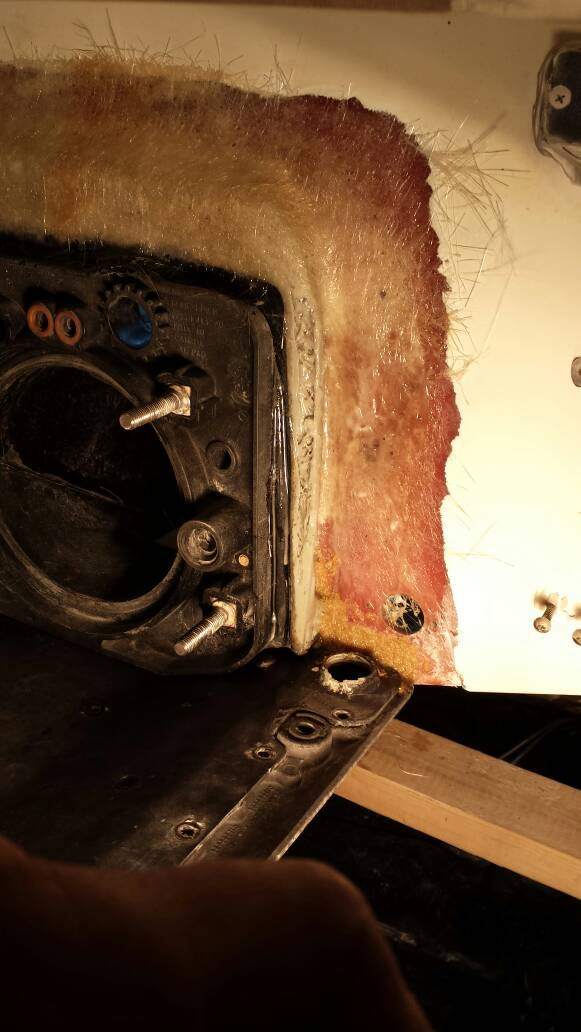
One of the biggest challenges thus far has been remolding the part of the hull where the ride plate came through. I had to cut the lower ednge of the transom out, leaving me with some holes right above where the ride-plate wings come out. Can't post pics now, but I will when I get home. Anyway, I had to use the ride-plate as a mold and glass over it. I waxed it with car wax and applied several coats of hair spray as a release agent. I didn't want to get the legit stuff as this is teh only part I have to mold. I used sawdust and epoxy mixture to make a putty, and molded that putty in that gap. I tested a chunk of that stuff once it dried, and it was crazy strong. I'm not using it as a structural part, but I'm positive it could serve as such.
Another special tactic I used was making a filling putty out of loose fiber and epoxy. This I stuffed in the gap between the graft and the transom. There was about a gap all around where the graft overlaps the transom. The loose fibers made a thick putty, but harder to work with than the saw dust. I had to take extra care to avoid bubbles. I used it here because I think the fibers make a much stronger final result, and this is a much more structural part of the construct. I layed mat over this once it cured. It's not pretty yet, but will be in the end. And man, this epoxy is strong!! I have 0 doubts about the future final integrity of this graft.
IDoSeaDoo
Well-Known Member
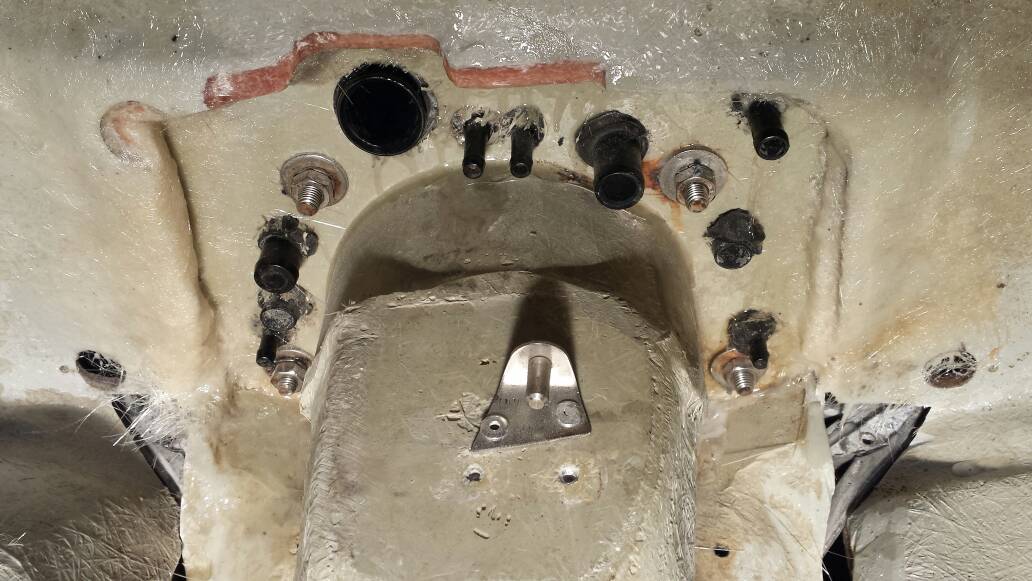
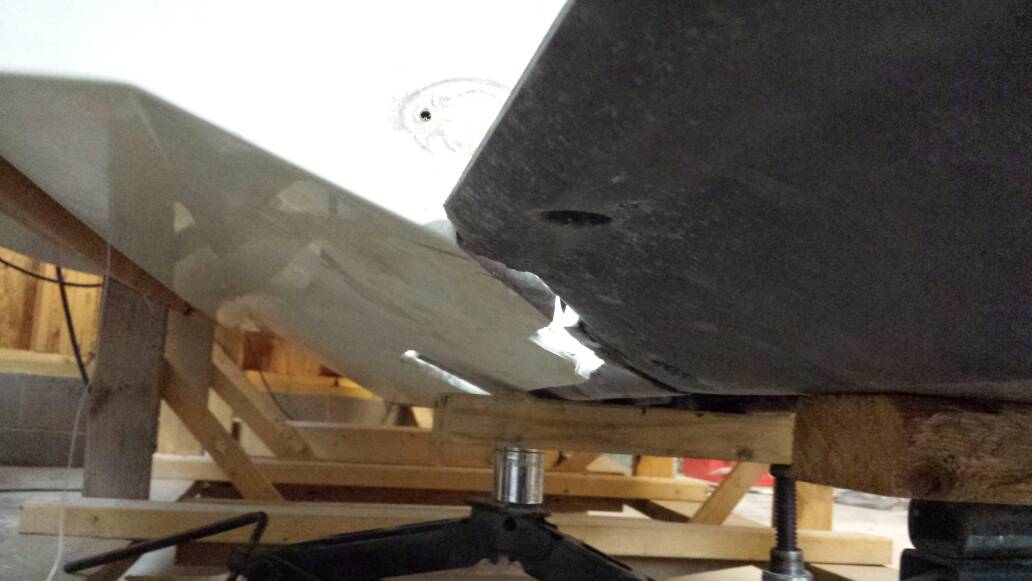
Here you can see the ride plate showing through. I had to mold around that and close that hole with the wood-epoxy.
Here you can see the gaps I was dealing with. That is solid epoxy and fiber now.
Had to attach a layer of glass all along the bottom seam so that when I continue laying up the inside of the hull, the resin won't drip out. Here is a good before pic
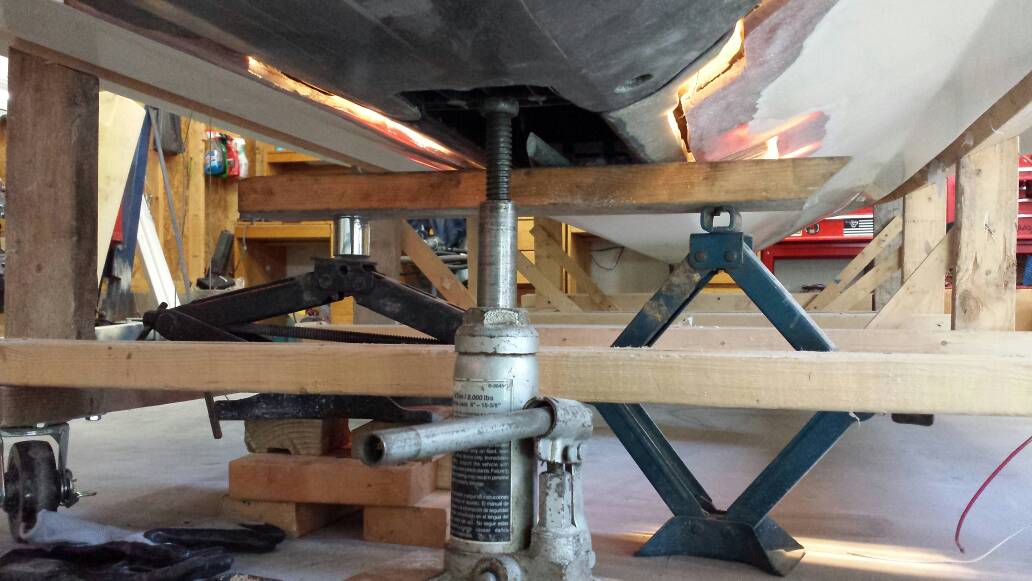
The jacks are how I was able to align and positron the graft relative to the hull. Can't wait to cone home and do more tonight. Should go faster now that most of the holes are filled.
Last edited by a moderator:
Sportster-2001-951C-Stock
Well-Known Member
Yep, epoxy is great stuff for this type job! I drill small holes every so many inches and use copper wire for temporarily stitching panels together, work the putty mixture into the joint, cover with woven cloth bedded into the putty, then once the epoxy cures cut the wires and pull those stitches out.
Oh, and putting duct tape on the bottom over the stitches first, keeps the putty mixture from running out of the joint.
Working upside down like that always sucks.
I'd like to see photos of the hull cross section if you have some.
I drill small holes every so many inches and use copper wire for temporarily stitching panels together, work the putty mixture into the joint, cover with woven cloth bedded into the putty, then once the epoxy cures cut the wires and pull those stitches out.Oh, and putting duct tape on the bottom over the stitches first, keeps the putty mixture from running out of the joint.
Working upside down like that always sucks.
I'd like to see photos of the hull cross section if you have some.
Last edited by a moderator:
IDoSeaDoo
Well-Known Member
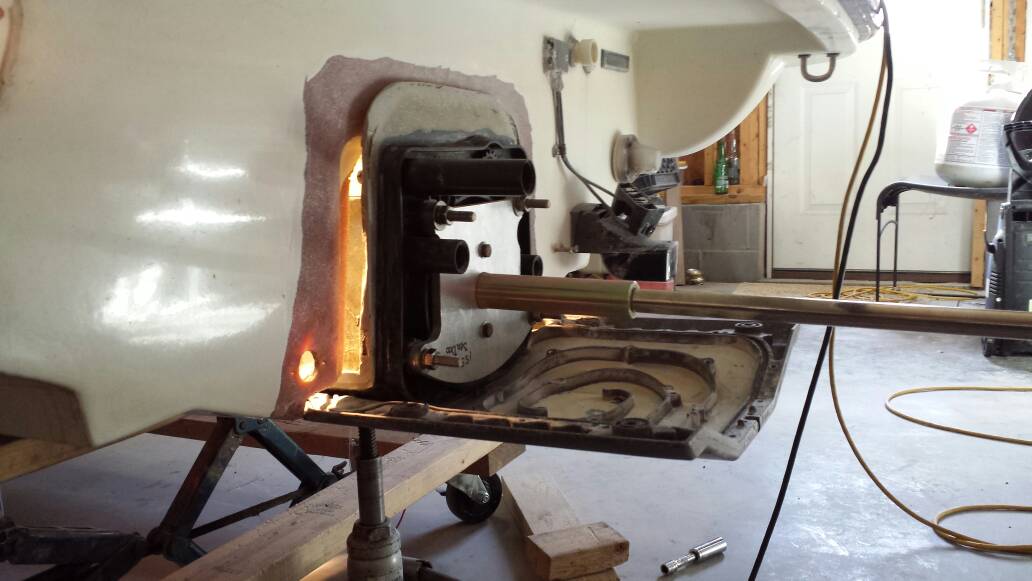
Not sure if this is what you mean. You can see I will have some fairing to do on the ride plate to make the transition south. A difference in deadrise, shape of ride plate, and boat hull depth caused this.

Here is the graft before I started glassing it. I had to cut out that rectangular section just in front of the tunnel because it dipped down and caused a lip.
Sportster-2001-951C-Stock
Well-Known Member
Good job! Man, with that much foam core it's amazing our boats aren't lighter. I think I'll be avoiding jumping the spit, as well.
Man, with that much foam core it's amazing our boats aren't lighter. I think I'll be avoiding jumping the spit, as well.
Last edited by a moderator:
IDoSeaDoo
Well-Known Member
Wow, this is extremely time consuming and tedious work. I'm really impressed with the strength of this west system epoxy though. I bet it's stronger now than it ever was. I'm almost done filling the gaps and low spots on the bottom, will have to go through and do a ton of sanding soon. Not looking fwd to that at all... hopefully this weekend though I can glass in that front mount and set the motor in its new home. Preliminary measurements suggest I will NOT have to mod the storage tray, but we'll see soon enough.
Also we just got our fiance visa approved [emoji106] we are so happy! This probably means this project will probably slow down quite dramatically in a few weeks.
Also we just got our fiance visa approved [emoji106] we are so happy! This probably means this project will probably slow down quite dramatically in a few weeks.
Sportster-2001-951C-Stock
Well-Known Member
No, no, no........ The project needs to pick up speed and hit hyperdrive for completion before summer begins!!!
suke
Well-Known Member
Wow, this is extremely time consuming and tedious work. I'm really impressed with the strength of this west system epoxy though. I bet it's stronger now than it ever was. I'm almost done filling the gaps and low spots on the bottom, will have to go through and do a ton of sanding soon. Not looking fwd to that at all... hopefully this weekend though I can glass in that front mount and set the motor in its new home. Preliminary measurements suggest I will NOT have to mod the storage tray, but we'll see soon enough.
Also we just got our fiance visa approved [emoji106] we are so happy! This probably means this project will probably slow down quite dramatically in a few weeks.
That's awesome about your fiance! Can't wait to see it on the water this summer. This little guy may slow my days at the lake a little, but i'll def be out as much as possible.

IDoSeaDoo
Well-Known Member
Congrats SUKE!! Another little Sea-Doo Rider!That's awesome about your fiance! Can't wait to see it on the water this summer. This little guy may slow my days at the lake a little, but i'll def be out as much as possible. View attachment 29414
He probably won't be able to reach the handlebars for a few years, might be time for a boat!PS my buddy and I had our first ride of the season yesterday. I saw a Challenger just like mine getting towed back. It made me sad, but also made me remember why I'm doing all the work I'm doing. Another 787 didn't deliver. The boat had BOTTOMS UP on the side, I feel like I've seen him before on the forums...
- Status
- Not open for further replies.
Similar threads
- Replies
- 2
- Views
- 199
- Replies
- 2
- Views
- 263
- Replies
- 2
- Views
- 428