-
This site contains eBay affiliate links for which Sea-Doo Forum may be compensated.
You are using an out of date browser. It may not display this or other websites correctly.
You should upgrade or use an alternative browser.
You should upgrade or use an alternative browser.
RESTO 1997 Seadoo Spx Restore/ Rebuild
- Thread starter stovetop19
- Start date
- Status
- Not open for further replies.
stovetop19
Member
Sounds like someone got bit by the SeaDoo bug. Sir, you now own one of the funnest toys known to man. Congratulations, and good choice! :thumbsup: Now you know what we've all been going through
Haha its such a terrible and great feeling all at once, right now i'm pretty deep into it but every time I talk you guys or snap some pictures it allows me to take a step back, look at the big picture and get excited all over again haha I'm 23 so I realize i'm still young, but I feel like a total kid at the moment and the lake is going to be like christmas morning! Wahoo!:willy_nilly:
Krispy
Well-Known Member
23 is a good age to own one of these. This is a pretty intense ski. Riding an X4 for what it's worth is a workout!
I was ready to call BS on this reading it in other posts. After my first ride in rough water last weekend my shoulders/ arms were sore from man-handling mine. I am kind of excited. It makes me think I am getting a workout.
It makes me think I am getting a workout.
LOL that's what I use to tell my wife. "Oh, I'll so lose the winter weight come spring time.", yeah, that didn't work too well. So at almost 39 yo, I'm getting back on the X-4. Some days I think I'm still 23 but act like I'm 8, well, most days. I'll have to pull out the work out card again with her. LOL. Actually I think I might be more stoked about riding my HX believe it or not.
Get some pics up to tonight Stovetop!
I gave this one to my wife the other day after she was on me about the winter weight: http://online.wsj.com/article/SB10001424052702303714704576385560508380104.html
This one is next: https://www.exercise.com/activity/jet-skiing
This one is next: https://www.exercise.com/activity/jet-skiing
Last edited by a moderator:
stovetop19
Member
Hahaha! :lol: You know in the back of my mind, i was thinking "this will be my my summer workout" haha That and once I get my Girlfriend riding it, i'll be doing some wakeboarding behind it hopefully, more excercise!! And I got me a new life jacket, since we could always have a better "lake body"....it should keep me covered till the x-4 six pack comes along haha
stovetop19
Member
Ok I reeally should get back to working on this old suzuki thats on my lift, but since I bought the cleaning stuff I HAD to try it out quick. I went the easiest route I could since I was picking up the stuff on my lunch break and I picked up some soft scrub with bleach, some stainless steel scrub pads, and some scotch bright pads. Heres to instant results!:cheers::cheers:
Attachments
Last edited by a moderator:
manolocross
Well-Known Member
I wouldn't use the steelwool... That is more than abrasive ... It will damage it. You just want to lightly sand it with just the scotchbrite.. It WILL look like new but with a flat finish which is fine for me...
stovetop19
Member
ok guys, here is the progress for the night, had some delays, my gf's sister just had a baby like 5 hours ago, but as soon as i got home i set to work as fast as possible since i was working outside and it always seems to get dark to quick
Pics #1 and #2 are reposts but i wanted the whole process side by side for you to see
Pic #3 was the first time over the whole hood
Pic #4 was the 2nd time,
Pic#5 was the last time and it was still wet but I had to snap the pic before it got any darker
Pics #1 and #2 are reposts but i wanted the whole process side by side for you to see
Pic #3 was the first time over the whole hood
Pic #4 was the 2nd time,
Pic#5 was the last time and it was still wet but I had to snap the pic before it got any darker
Attachments
stovetop19
Member
I wouldn't use the steelwool... That is more than abrasive ... It will damage it. You just want to lightly sand it with just the scotchbrite.. It WILL look like new but with a flat finish which is fine for me...
Thanks! I discovered this when I did a small test spot, but went over it with the scotch bright pad and it looks fine now.
Krispy
Well-Known Member
Nice job on the hood!
Here is a pro tip for the handlebar pad:
Mine wasn't quite as bad as yours, but I removed it (held on by 4 screws) and then went after it with zippo lighter fluid on steel wool.
http://www.amazon.com/Ronson-Consumer-99063-12-Ounce-Ronsonol/dp/B0017X1NGO
It actually will remove a layer of the rubber, and somewhat dull the finish. But it worked well for me.
The steel wool will clog with the rubber layer, so I had to use several pieces.
manolocross
Well-Known Member
Damn it looks new!!! I'm sure doin this has got to get you juiced to restore th rest! Now go buy a new seat cover!!!! Let me tell you the cover they have on ebay are great. Only 35 bucks and includes strap and stainless staples with free shipping!!! You can't beat that and it's easy to do!!!Thanks! I discovered this when I did a small test spot, but went over it with the scotch bright pad and it looks fine now.
stovetop19
Member
Nice job on the hood!
Here is a pro tip for the handlebar pad:
Mine wasn't quite as bad as yours, but I removed it (held on by 4 screws) and then went after it with zippo lighter fluid on steel wool.
http://www.amazon.com/Ronson-Consumer-99063-12-Ounce-Ronsonol/dp/B0017X1NGO
It actually will remove a layer of the rubber, and somewhat dull the finish. But it worked well for me.
The steel wool will clog with the rubber layer, so I had to use several pieces.
Cool! I will try that today for sure!
stovetop19
Member
Damn it looks new!!! I'm sure doin this has got to get you juiced to restore th rest! Now go buy a new seat cover!!!! Let me tell you the cover they have on ebay are great. Only 35 bucks and includes strap and stainless staples with free shipping!!! You can't beat that and it's easy to do!!!
Well I actually got one when I ordered all my other stuff from SBT, so I already have a seat cover. I wish I would have thought to check ebay first, that would have saved me from having to get my hands on some stainless staples! Live and learn i guess! Its a black tip brand cover, its clean and simple:thumbsup:
Attachments
Nice job on the hood!
Here is a pro tip for the handlebar pad:
Mine wasn't quite as bad as yours, but I removed it (held on by 4 screws) and then went after it with zippo lighter fluid on steel wool.
http://www.amazon.com/Ronson-Consumer-99063-12-Ounce-Ronsonol/dp/B0017X1NGO
It actually will remove a layer of the rubber, and somewhat dull the finish. But it worked well for me.
The steel wool will clog with the rubber layer, so I had to use several pieces.
Go to Lowes and buy VM&P Naphtha, it's the main ingredient in Zippo fluid and WAAAAAY cheaper.
You can see my results here, just scroll down.
http://www.seadooforum.com/showthre...ay!-Project-HX&p=300251&viewfull=1#post300251
stovetop19
Member
You guys are the best!:thumbsup: I have some leftover lighter fluid from an old zippo, I tried it on a small area quick and it appears to be working really well! Pics to come soon, I'm also reassembling the carbs today and hopefully go through the pump to verify everything is in good shape.
stovetop19
Member
Well today was a step forward, and 2 steps back kind of day haha...... I was about due considering how well the rest of the project went. Here are some pics of the handle bar pad, used some lighter fluid and steel wool and it made a huge difference, that is, until a small hole in the pad decided to crack as i was pushing on it with the steel wool.
Attachments
stovetop19
Member
Since the handle bar pad went downhill, I moved to the next step I had lined up. The wear ring (was in great shape) broke when I removed the pump, the sealant pulled a chunk right out of it when I was pulling it out. So I set my self up my bench vise at home, stuck the impeller shaft end in the vise carefully, tightened it down, stuck the impeller removal tool in there and started to apply pressure to loosen the impeller. Before i got to put any muscle into it, the dang vise snapped. uugggggh:facepalm: good time to get a bigger and better vice i guess haha
Attachments
stovetop19
Member
Well since the other issues had happened today:nopity: I decided to install the electrical and the new battery to make me feel like I made some progress today! :thumbsup:
During all of the work today, it was interesting since we had tons of tornado warnings and sirens going off. also there was apparently tornado sightings within 20 miles of my place..... figured since theres no basements where i live, i'd take my chances and work through it, if i was goin i was goin to make damn sure i went out in a garage doing something i love:seeya:
During all of the work today, it was interesting since we had tons of tornado warnings and sirens going off. also there was apparently tornado sightings within 20 miles of my place..... figured since theres no basements where i live, i'd take my chances and work through it, if i was goin i was goin to make damn sure i went out in a garage doing something i love:seeya:
Attachments
stovetop19
Member
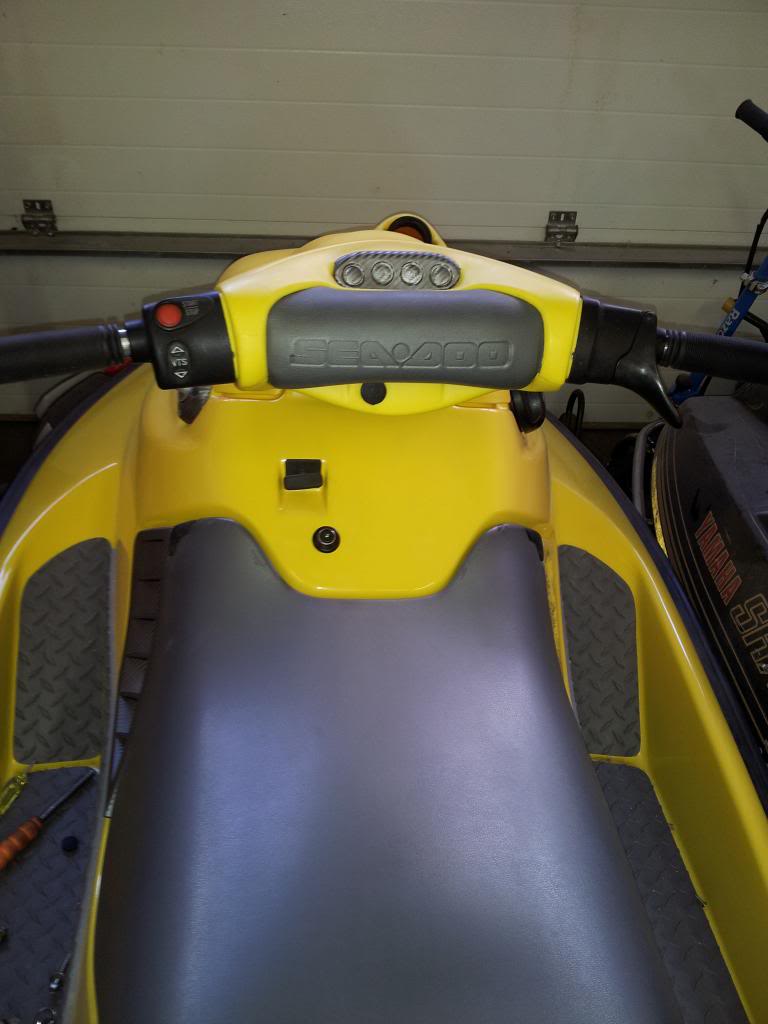
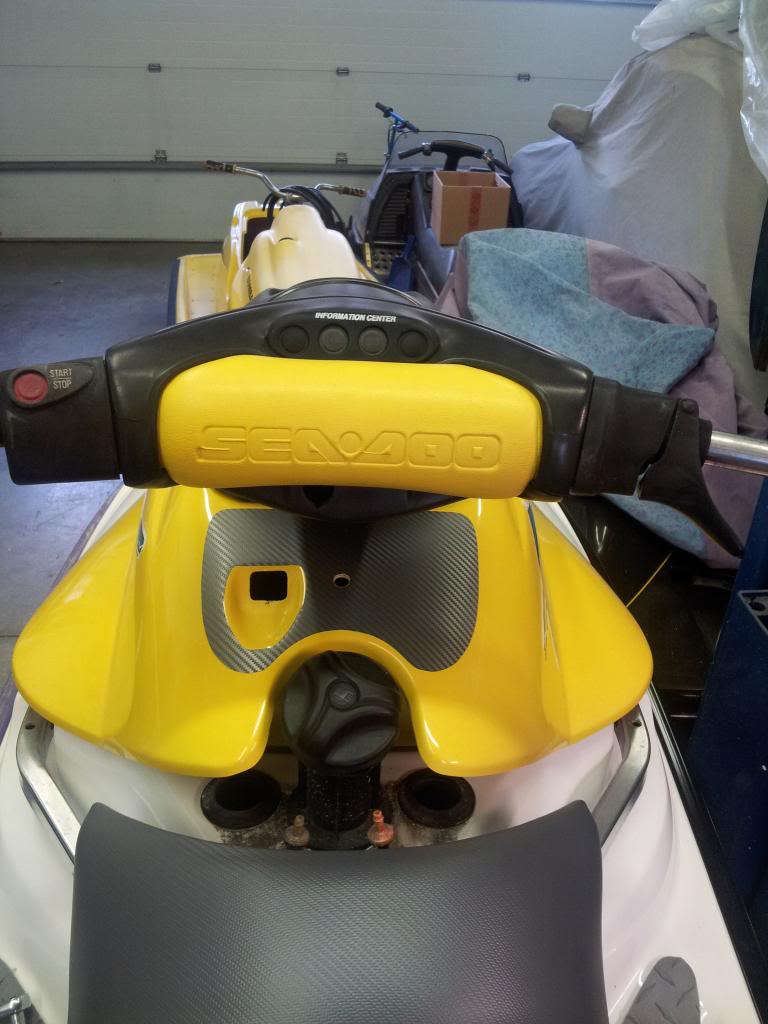
Now you might as well update to the later style like these ones. No more mildew and no more rubber. I think JSG has the mounts being made to make the install a snap.
Here is [MENTION=51350]Jetskigoodies[/MENTION] black one and mine the Yellow/Gray one.


I'm sold, I'm already this far into it, I want to make it as clean as possible without straying to far from stock,if yall have any extra covers let me know, I'm interested for sure!! I'll start watching for some on ebay or CL if no one has any.
I'm sold, I'm already this far into it, I want to make it as clean as possible without straying to far from stock,if yall have any extra covers let me know, I'm interested for sure!! I'll start watching for some on ebay or CL if no one has any.
You might want to hit up [MENTION=41828]Minnetonka4me[/MENTION] he supposedly has some mint ones. You want one off an RFI or DI ski so that you only have one hole on the cover. If you look at my yellow one you will see a black cover under the pad, that is where the DESS post is for the later skis, where your's is down under the bars. I just but a HEYCO cap in there and a small dab of clear silicone to hold it inplace. You can get the cap at Lowes. If you get one off a carb'd ski you will have two holse to contend with, the DESS and choke cable. So, pay attention to what you're buying. JSG fills his and then paints them, I preferred the unpainted look. I also put on on my HX. I bought my stuff of Ebay sorta al carte so I could get the exact pieces/color/texture of the material on the pad (I'm picky on certain things).

manolocross
Well-Known Member
Ok just wanted to show you my new to 97 spx. I do all the work myself and its almost ready!!!


CReynoldsMIZ
Well-Known Member
[MENTION=38668]manolocross[/MENTION] where is your ski build thread. The ski looks great and I LOVE that seat!
- Status
- Not open for further replies.
Similar threads
- Replies
- 38
- Views
- 1,370
- Replies
- 4
- Views
- 715


