-
This site contains eBay affiliate links for which Sea-Doo Forum may be compensated.
1995 HX Project
- Thread starter burtshaver2021
- Start date
- Status
- Not open for further replies.
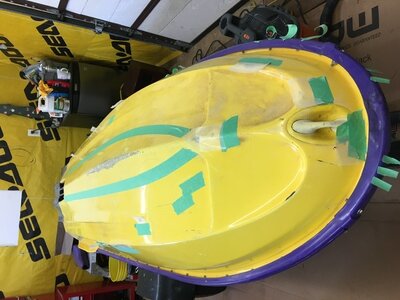
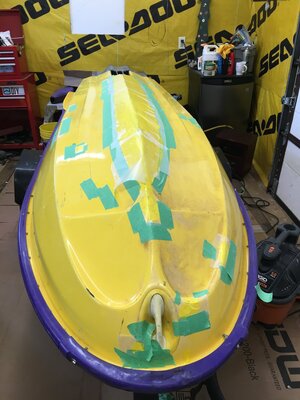
So far today I got the spots for gelcoat repairs prepped, used a rotary tool similar to a dremel with a small 1 inch sanding disc on it, ground out the bad spots, making sure to take enough of the old gelcoat off to get rid of any cracks in it, I dry sanded about 5 inches on each side of the keel with 800 grit, vacuumed up the debris left from sanding and grinding, blew it off with air then cleaned it with a lint free rag and acetone. Before mixing up the gelcoat which I got from gelcoat international ( gelcoat.com) super yellow which is a match for most of the older seadoo’s. So far I think it’s going to be a real close match. Anyways before mixing up the gelcoat I took put painters tape under each repair spot, then cut waxed paper for each repair spot, taped the waxed paper beneath the repair spot so it was ready to pull over the repair after applying the gelcoat, also had pieces of painters tape pre cut and stuck to the bumper to fasten the waxed paper pieces in place. I didn’t use the waxed paper for curing purposes as this gelcoat contains wax which will create a barrier allowing t he gelcoat to cure but to hold the gelcoat where I needed it rather than it dripping. I found that dipping the stir stick in the gelcoat worked well for application, I was able to control how much gelcoat I applied by how far I dipped the stir stick in the gelcoat. Note that I mixed up 100ml of gelcoat for all these repairs and that was enough. I will be needing at least 1 more coat. In most areas. I think the painters tape is a good idea if only so that no spots are missed while applying.
Attachments
I’m not sure why that last picture posted so many times, I had to log out of seadooforum to get it to stop uploading. Can some type of sander be used for this wet sanding? I’m not having fun
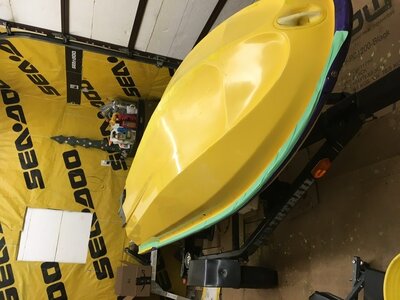 After a lot of hand sanding, had to use 400 grit to start, it was really rough with a pile of scratches, then went to 1000, then 1200, then 2000, 1 go around with the Meguires rubbing compound. Going to go over it at least once more with the rubbing compound and then the polish. Going to wait to wax it until after the new decals are put on. Probably going to wait to do that until after I have it running.
Any suggestions for brand of paint and primer for any aluminum parts? Think I would like to pretty up the intake grate and maybe the ride plate if there are no issues with taking it off? Hard to tell for sure what sheen the black paint was, are those parts matte or gloss black? I would think a matte black would look nicer as it wouldn’t show all the imperfections in the aluminum. What are some thoughts
You know what’s originally on them? Is it powder coat?
Yes, pretty sure.You know what’s originally on them? Is it powder coat?
I agree, 0 to 100 gauge would be better but I should be ok with this one, it’s marked every 5 pounds, I should be accurate within a pound or so
 Just about done with the hull, only have to polish the other side but not tonight. A word of caution to anyone who might ever read this, i wouldn’t recommend wet sanding with anything courser than 600 grit unless your willing to put the work in to sand those marks out and it’s a lot of work. I think I used as course as 320 grit on the very bottom and started with 800 on the sides. I didn’t quite get all the marks sanded out on the bottom.
If it makes you feel any better back in the racing days they would take brand new skis and run 80 grit from the front to the back. This was known as hull truing. It would not only make the hull even but all the grooves would act as little channels and help the hull handle and grip in the turns.
I read that somewhere on the forum, didn’t read that they used 80 grit but did read that they roughed the hull up to corner better. I will see how it goes once I ride it, it may get roughed up again if I need to beach it. After reading a thread from 2014 I’m really getting nervous about riding this.
It was a thread by 96spxpos. His first ride he dumped it after 10feet
- Status
- Not open for further replies.
Similar threads
- Replies
- 11
- Views
- 358
Share:


