• This site contains eBay affiliate links for which Sea-Doo Forum may be compensated.

Seadoo hasn't been fired up for 25 years

Status
Not open for further replies.

Jay777

Member
Hey guys new here first post ,my dad finally gave me his seadoo 1996 gtx .The seadoo only has 15 hours on it ,looks like it just came off the lot lol.He stopped using it because it wouldn't fire up anymore, iam thinking Because he used a shity canadian tire batter .I changed the spark plugs gap. 20 ,took the carbs off and cleaned them out ,cleaned the fuel filter out but the mesh fell apart when cleaning new should be here tmrw same with oil filter and 2 base gaskets. Only thing iam worried about is the oil pump not working because it's been sitting so long. The gas was drained and he put few drop of 2 stroke oil down on the pistons once a year .Anything you guys could think of I should check or look out for before I fire it up ?
 
Buy a spark checker at Auto Zone for $5 and make sure the plugs are getting spark. I can't imagine the carbs working properly without being disassembled and rebuilt, soaked in Carb Cleaner, new seats and such. I am assuming the fuel lines are gray. They need replacing and probably a new fuel valve. Did you pull the fuel tank and clean it? REplace the oil filter for the oil pump feed and drain the oil that was in the oil tank (at least get a sample to see if it still flows.) That's for starters. I'd do a 40:1 premix for the fuel tank in addition to the oil system. That's for starters. I have a 1996 and a 1997 GTX. I think they are the best skis. Good Luck !
 
Wow, that's a very long time. How drained was it? wouldn't matter to me, age is a big factor on the parts, at a minimum, I'd redo the entire fuel system, remove the tank, everything. You'll need new OEM carb kits, needles/seats, cleaning is likely not enough, sitting that long kills any rubber parts, orings, seals, etc. You need a new fuel selector, the rubber inside is likely hard as plastic. The fuel filter under the steering needs to be replaced, don't forget the square oring, likely it's bad. On that ski the fuel tank can come out through the front, I'd take it out and clean it thoroughly. Yes, all new lines also.

Oil pump is likely good, but I'd drain completely the 25yr old oil and fill with new full synthetic. New oil injection lines, bleed and prime the pump.

After all that, then I'd try to fire it up. But...before getting on the water go through the jet pump, inspect the carbon seal (oring was updated to a c clip), grease the driveshaft PTO, and make sure the bailers look good, there's orings to look at.
 
Buy a spark checker at Auto Zone for $5 and make sure the plugs are getting spark. I can't imagine the carbs working properly without being disassembled and rebuilt, soaked in Carb Cleaner, new seats and such. I am assuming the fuel lines are gray. They need replacing and probably a new fuel valve. Did you pull the fuel tank and clean it? REplace the oil filter for the oil pump feed and drain the oil that was in the oil tank (at least get a sample to see if it still flows.) That's for starters. I'd do a 40:1 premix for the fuel tank in addition to the oil system. That's for starters. I have a 1996 and a 1997 GTX. I think they are the best skis. Good Luck !
Thanks appreciate the help
 
Wow, that's a very long time. How drained was it? wouldn't matter to me, age is a big factor on the parts, at a minimum, I'd redo the entire fuel system, remove the tank, everything. You'll need new OEM carb kits, needles/seats, cleaning is likely not enough, sitting that long kills any rubber parts, orings, seals, etc. You need a new fuel selector, the rubber inside is likely hard as plastic. The fuel filter under the steering needs to be replaced, don't forget the square oring, likely it's bad. On that ski the fuel tank can come out through the front, I'd take it out and clean it thoroughly. Yes, all new lines also.

Oil pump is likely good, but I'd drain completely the 25yr old oil and fill with new full synthetic. New oil injection lines, bleed and prime the pump.

After all that, then I'd try to fire it up. But...before getting on the water go through the jet pump, inspect the carbon seal (oring was updated to a c clip), grease the driveshaft PTO, and make sure the bailers look good, there's orings to look at.
Thanks for help ,getting new fuel lines today ,and I'll pull the tank.Looks like I'll be making another part order
 
Also,,,go into the rear electrical box,,,check for corrosion,,,usually at the ground tower,,( pull the top plug and remove the negative ground wire to the battery to make it easier to pull the box),,,,pull the front electrical plug,,,get a mirror,,,look for corrosion in the pins,,,male and female,,,pull the front electrical box,,,look for corrosion in there,,,its rare,,,but can occur,,,the seadoo oil pumps rarely fail,,,I would also,,,pull the head because the "O" rings are reuseable,,,,and spray some SBT on the cylinder walls and rotate the crank by hand to spread the SBT on all the surfaces,,,let it sit for a day,,,,that stuff is amazing,,,and "e" is right,,that is also my favourite machine,,,(next to my racing 800Xp Ltd)...of course,
 
Also,,,go into the rear electrical box,,,check for corrosion,,,usually at the ground tower,,( pull the top plug and remove the negative ground wire to the battery to make it easier to pull the box),,,,pull the front electrical plug,,,get a mirror,,,look for corrosion in the pins,,,male and female,,,pull the front electrical box,,,look for corrosion in there,,,its rare,,,but can occur,,,the seadoo oil pumps rarely fail,,,I would also,,,pull the head because the "O" rings are reuseable,,,,and spray some SBT on the cylinder walls and rotate the crank by hand to spread the SBT on all the surfaces,,,let it sit for a day,,,,that stuff is amazing,,,and "e" is right,,that is also my favourite machine,,,(next to my racing 800Xp Ltd)...of course,
Popps. How do you clean the electical plugs? Especially the internal parts?? I'm hatin on that dielectric grease. I think it causes problems with the older loose plugs.
 
Pull the tank forward enough to remove the baffle. Be gentle prying around the tank when removing the baffle. Spray some penetrating oil on the big fat hose. Just cut the fuel lines off near the baffle. No sense in fighting anything you can't get ahold of.

You might be able to pull the baffle through the glovebox hole. When you get to that part... just stick a small screwdirver under that FAKE SCREW on top of the pin and lift the fake screw up a bit. The pin will come right out. When I tride my frist one you shoulda seen me trying to unscrew those things. LOL. Good Luck. Post up if you have questions.

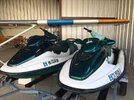
Mine is the pretty one on the left (recently painted) with the crooked numbers. I think my wife did that on purpose.

Gene Sissy Double GTX Hangar (4).jpg
 
Also,,,go into the rear electrical box,,,check for corrosion,,,usually at the ground tower,,( pull the top plug and remove the negative ground wire to the battery to make it easier to pull the box),,,,pull the front electrical plug,,,get a mirror,,,look for corrosion in the pins,,,male and female,,,pull the front electrical box,,,look for corrosion in there,,,its rare,,,but can occur,,,the seadoo oil pumps rarely fail,,,I would also,,,pull the head because the "O" rings are reuseable,,,,and spray some SBT on the cylinder walls and rotate the crank by hand to spread the SBT on all the surfaces,,,let it sit for a day,,,,that stuff is amazing,,,and "e" is right,,that is also my favourite machine,,,(next to my racing 800Xp Ltd)...of course,
I took a look at the box and it looks new ,no corrosion at all .I took the plugs out and the crank is very smooth ,my dad would put a few drops oil once a year and rotate the crank .Thanks man I that's a good idea I didn't know those gaskets are reuseable
 
Pull the tank forward enough to remove the baffle. Be gentle prying around the tank when removing the baffle. Spray some penetrating oil on the big fat hose. Just cut the fuel lines off near the baffle. No sense in fighting anything you can't get ahold of.

You might be able to pull the baffle through the glovebox hole. When you get to that part... just stick a small screwdirver under that FAKE SCREW on top of the pin and lift the fake screw up a bit. The pin will come right out. When I tride my frist one you shoulda seen me trying to unscrew those things. LOL. Good Luck. Post up if you have questions.

Mine is the pretty one on the left (recently painted) with the crooked numbers. I think my wife did that on purpose.

View attachment 55009
Those are nice looking machines man ,I got everything out no problem.Now I just have to figure out the best way to clean out the tank ,lots of crap in there
 
Pulled the gas tank and the oil tank ,man good thing tons of crap on the bottom.Whats the best way to clean them out so I don't damage the plastic .Love the look of this thing
 

Attachments

  • 16251180122778952276253289124241.jpg
    16251180122778952276253289124241.jpg
    211.6 KB · Views: 41
  • 20210630_223939.jpg
    20210630_223939.jpg
    182.6 KB · Views: 49
I put gas in the fuel tank to clean it. On one tank I did use a small amount of acetone but it was a pile of gunk in one particular spot. :) I put rags in the tank with a few cups of fuel and slosh it around. I use the flexible grabbers with a rag to wipe and clean the inside of the tank. I don't even let a speck stay in there. LOL Totally over kill. :D
 
Well got everything together and had the hoes running and water was spraying out the side by the down pipe ,cylinder block has a crack FML lol. Is there a way to fix that with jb weld or even get in welded? Here is a few pics
 
Pictures
 

Attachments

  • 20210702_181714.jpg
    20210702_181714.jpg
    319.5 KB · Views: 41
  • 20210702_181700.jpg
    20210702_181700.jpg
    259.2 KB · Views: 43
  • 20210702_180050.jpg
    20210702_180050.jpg
    310 KB · Views: 42
  • 20210702_181714.jpg
    20210702_181714.jpg
    319.5 KB · Views: 42
  • 20210702_181704.jpg
    20210702_181704.jpg
    280.7 KB · Views: 39
  • 20210702_180050.jpg
    20210702_180050.jpg
    310 KB · Views: 38
Crack from freezing with a blockage in the cylinder drain hose.

The only correct fix is new cylinders but I wouldn’t blame you trying some JB weld and nothing to loose.
 
2nd JB weld. Die grinder. Make a small vee groove on the inside of the cylinder crack and round it out a bit. Remove the paint on the outisde and rough the surface with a die grinder or your choice of tool. Just fill the uneven surface of the groove for the o-ring gasket and sand it smooth. I did this to my 787.... compression was 150pis per cylinder. I'm not about to rebuild/replace cylinders that are like new. LOL Still working... no worries. Good Luck !!
 
Crack from freezing with a blockage in the cylinder drain hose.

The only correct fix is new cylinders but I wouldn’t blame you trying some JB weld and nothing to loose.
Just picked some up original and marine ,exactly nothing to loose just want it running for the summer and I'
Crack from freezing with a blockage in the cylinder drain hose.

The only correct fix is new cylinders but I wouldn’t blame you trying some JB weld and nothing to loose.
That's probably what it was ,we are up un the west coast of Canada , it gets cold in the winter,picked up some jb weld and iam on it tmrw
 
2nd JB weld. Die grinder. Make a small vee groove on the inside of the cylinder crack and round it out a bit. Remove the paint on the outisde and rough the surface with a die grinder or your choice of tool. Just fill the uneven surface of the groove for the o-ring gasket and sand it smooth. I did this to my 787.... compression was 150pis per cylinder. I'm not about to rebuild/replace cylinders that are like new. LOL Still working... no worries. Good Luck !!
 

Attachments

  • 20210702_215759.jpg
    20210702_215759.jpg
    337.6 KB · Views: 42
Great news that it worked for ,now I have hope lol what jb weld did you use?
I pretty sure I used JB weld. I have had access to all the $300+ packs of repair media and wish I would have had some for this job. The problem we will encounter with the repairs we made is uneven heating and cooling of the surfaces. If the JB weld does not expand and contract at the same rate it will get loose and the reapair will fail. The good thing is the engine doesn't get all that hot in that area so it might not be a problem. I've had my ski out many times and it's solid as ever.

What I'm saying is you'd want an aluminum repair packet that is designed to mimic the qualities of aluminum..... but I think we're good. :D You're getting this ski back to snuff for sure. You're gonna love it and love the price too... LOL
 
I know you’ve already got it running, but I thought I’d throw this out. An extremely good spark tester can be made, at a cost of $0.
A piece of scrap wood, two pieces of household electrical wire, two screws & a short 1/4” bolt. (The bolt screws into the spark plug boot, holds securely & makes a good connection.)
The other wire, just put it in the open spark plug hole. The weight of the tool will hold it securely enough wedged in the head for a good ground.
Wrap the wire around each screw, then put a washer on top, (the only thing I had at hand was that yellow plastic thingy) & tighten the screws down til they hold the wires securely. You can then bend the bare ends to about 7/16” gap. if a magneto won’t jump that gap, with a bright blue crackling spark, you have ignition problems.
I built this for testing outboard motors.
 

Attachments

  • 986B1F4E-385E-4E3C-B310-5F19E3EDB079.jpeg
    986B1F4E-385E-4E3C-B310-5F19E3EDB079.jpeg
    229 KB · Views: 21
Last edited:
Status
Not open for further replies.
Back
Top