• This site contains eBay affiliate links for which Sea-Doo Forum may be compensated.

cylinder specs

Status
Not open for further replies.
we'll see . i'll believe when the money is actually refunded. :facepalm:

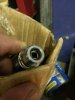
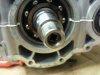
ALright ...why wont my oil pump shaft reach the square fitting on the crank shaft about 2-3mm too short???WTF did i get wrong crank or am i doing something wrong?


btw got the full refund!!
 
Last edited by a moderator:
The previous person may have used a puller that pushed the square key back into the crank. It should be flush with the end of the threaded part. I did this once. Fixed it by stuffing the hole full of jb weld, greasing the shaft of the oil pump drive shaft, and sticking it in there. It solidified perfectly and didn't stick to the grease at all. Worked just fine until the crank blew up

Sent from my SCH-I545 using Tapatalk

so its not actually a part of the crank shaft? . maybe i can pull it out some??
 
Just so you guys know, they're not supposed to be flush. Something is wrong with your set up. The one crank in my pic is original (one on the box), the other one is NOS (the one in the cases). I'll bet your white pin snapped and won't engage.

attachment.php


attachment.php


Sent from my SGH-T889 using Tapatalk
 

Attachments

  • uploadfromtaptalk1440298124330.jpg
    uploadfromtaptalk1440298124330.jpg
    89.3 KB · Views: 52
  • uploadfromtaptalk1440298139803.jpg
    uploadfromtaptalk1440298139803.jpg
    86.7 KB · Views: 51
Last edited by a moderator:
Not broken.The insert was pushed way in the shaft. Not suppose to be flush . I pushed it back like the one in the pic.
 
You will be better off updating to the newer style. The old style is prone to fall.

Sent from my VS985 4G using Tapatalk
 
It's off a 951 I will get the part number when I get home

Sent from my VS985 4G using Tapatalk
 
I think the 10mm bolts are like 35ftlbs

Sent from my SCH-I545 using Tapatalk

There is no THINKING LIKE in torque specs. Not to mention, you don't go right to max torque on your cylinders, it's a two stage torque process. First stage is 15 ft. lbs, second and final is 30 ft. lbs all in a criss-cross pattern for each cylinder WITH the exhaust manifold bolted up to align the cylinders. There is no half ass-ery in engine building if you want your stuff to hold together. I take building an engine very seriously, everything has to be 110%, every hole has to be tapped clean to obtain proper torque, no old chit in the threads. You just can't skip a step. Sorry to be harsh but I have to be truthful here.
 
Last edited by a moderator:
There is no THINKING LIKE in torque specs. Not to mention, you don't go right to max torque on your cylinders, it's a two stage torque process. First stage is 15 ft. lbs, second and final is 30 ft. lbs all in a criss-cross pattern for each cylinder WITH the exhaust manifold bolted up to align the cylinders. There is no half ass-ery in engine building if you want your stuff to hold together. I take building an engine very seriously, everything has to be 110%, every hole has to be tapped clean to obtain proper torque, no old chit in the threads. You just can't skip a step. Sorry to be harsh but I have to be truthful here.

Good advice. I built many cast alluminum motors, and torquing and sequence is important for mating, warping issues as well as initial warm up/ cool down , break-in proceedures.
 
Status
Not open for further replies.
Back
Top