• This site contains eBay affiliate links for which Sea-Doo Forum may be compensated.

96 GTX Carburetor Rebuild

Status
Not open for further replies.
That is great news.

I just wish OSD Parts was not on vacation til Thursday. I really want to get that carb rebuild kit on its way. Summer is wasting away!
 
All I was planning on doing to my 1996 GTX was to replace the gray fuel lines (see “96 GTX Gray Fuel Line Replacement” thread) But then Mikidymac gently persuaded me to rebuild the Mikuni carbs since they had not been touched since 2010.

And it was strongly recommended to stick to genuine Mikuni rebuild kits

So I found a couple of Mikuni rebuild kits on OSD Marine (osdparts.com) that appear to be a decent price. These kits appear to have more parts than the standard rebuild kits.

OSD 1223 $108.99

OSD 1270 “Back to OEM” $128.99

But then he has a bunch of add and delete options on both of these rebuilds? I’m really confused as to what I need or don’t need.

Second Question: Would it be preferable not to bump or run the engine at all until the carbs are rebuilt and the fuel lines replaced? Or would it be useful to run the ski for a couple of minutes on the hose to get a baseline for comparison?
I just replaced the fuel lines on the carbs themselves and about a foot of the main line going to the carbs with a filter between the old and new. Replace the filter every year. No problems yet. I used the biggest filters I could find for 1/4" line to avoid restrictions.
 
I just replaced the fuel lines on the carbs themselves and about a foot of the main line going to the carbs with a filter between the old and new. Replace the filter every year. No problems yet. I used the biggest filters I could find for 1/4" line to avoid restrictions.
That inline filter can give you serious issues if any condensation gets in your tank that's why the factory is a water separator. If the paper on an inline gets one drop of water on it, the filter will not allow fuel to flow through.
 
Agreed, adding inline filters is not a good idea on these, just a clean tank and the factory separator.
 
I just replaced the fuel lines on the carbs themselves and about a foot of the main line going to the carbs with a filter between the old and new. Replace the filter every year. No problems yet. I used the biggest filters I could find for 1/4" line to avoid restrictions.

Thanks for an alternative to changing out all of the fuel line.

I have 25 feet of new marine fuel line on its way along with a bag of Oetiker clamps, so I am sort of committed at this point.
 
I’m about to place an order tonight or in the morning at OSD Parts for the OSD1270 “Back to OEM” Carb Rebuild Kit. There are the following options on this kit:

DEDUCT FORMED O-RINGS (REMOVE FROM KIT) ( -$20.00 )
DEDUCT SS Bolt Kit (don't include in kit) ( -$3.00 )
Needle Arm/Pin Set ( +$8.00 )

Do I need the O-rings? SS bolts? Needle Arm/Pin set?


Update:
Crap, I waited too long. OSD is now showing this carb kit as being Out Of Stock.
 
Last edited:
OSD does have the OSD1223 kit in stock with the following options:

Accel Pump Diaphragm (Square One) ( +$15.00 )
ADD One (1) 8mm Fuel Valve (Used w 947 & Some 787) ( +$39.00 )
DEDUCT SS Bolt Kit (don't include in kit) ( -$3.00 )
Needle Arm/Pin Set ( +$8.00 )
O-Ring Round (x1) ( +$7.50 )
115 gr NV Spring (x2) ( +$4.00 )
65 gr NV Spring (x2) ( +$4.00 )
80 gr NV Spring (x2) ( +$4.00 )
95 gr NV Spring (x2) ( +$4.00 )


I think the only differences with the above kit and the out of stock “Back to OEM” kit is that it is missing:
  • One (1) OEM Fuel Pump Rebuild Kit which includes diaphragms, o-ring, gasket, check valves and grommets.
  • Two needle arm springs
 
Last edited:
I would get the o-rings.
I add the arms and pins because I have seen them cause issues.
If you are in saltwater then get the SS bolts. IF your carbs are not corroded then I don't get the SS bolts.

You can order as he builds the kits to order so if he has parts he will make the kits no matter what the stock level shows.
 
I placed my order at OSD last Wednesday. I knew that OSD wasn’t getting back into the shop until last Friday. I figured with their backlog that they would be lucky to get my order out late this week, with delivery being late next week.

Imagine my surprise when my order shipped today with an expected delivery of this Saturday.

I fear the carb rebuild kits are going to be waiting on me now rather than me waiting on the carb kits.

Thanks OSD for getting caught up with your order backlog so quickly.

And thank you mikidymac for all of your help and hand holding. I sure appreciate it.
 
OSD package actually arrived a day earlier than expected on Friday of last week.

GGuillot said:
Well, it's preference to reuse the old screws, once you get it apart, I recommend a stainless screw set for the carbs, which are allen head screws, except the little screw holding the needle pin down. If you ever need to get back into them at a later date it becomes a breeze.

I'll try and find the link, but a guy on ebay sells the ss screw kits for about $9 per carb. Also, I believe OSD has some stainless replacement options.

I would be interested in that eBay SS screw kit if you can find a link for it. I am kind of dreading what I’m going to find in these 787 carbs, seeing what the dingleberry’s did on my 07 GTX 215 Wake ski back in 2010.
 
This site contains eBay affiliate links for which Sea-Doo Forum may be compensated.
The eBay SS screw kit that I bought was only $13 for the dual carbs. The kit should arrive by Friday.

I am looking at the shop manual on the procedure for removing the dual 787 carbs and there is not a lot of detail on how to do that. The shop manual lists only six steps with no pictures or details.

- Remove air intake silencer
- Turn fuel valve to OFF position
- Disconnect pulse line from fuel pump
- Disconnect fuel supply line from fuel pump
- Disconnect fuel return line
- Disconnect oil injection pump cable, throttle cable and choke cable.

Everything seems straight forward except for that last step. I am unclear how to remove those cables without dorking up any settings.
 
Everything seems straight forward except for that last step. I am unclear how to remove those cables without dorking up any settings.

Just disconnect everything, you still need to readjust when reinstalling the carbs before reattaching the airbox. You'll want the carbs synced, ck that, with the idle screw just touching then 2 full turns in, then ck the slack in the throttle after turning the idle screw, watch how it fully opens etc. Reattach and adjust the choke plates, and reattach and adjust the oil pump alignment. Then when you start, tweak on the hose to 3K and recheck the oil pump alignment again. Then on the water try and tune idle to hold in the 1400 range.

Carb rebuild, use everything in the kits, orings, etc. At least ck the pop off, set low speed needles at 1 turn out, high speed needles at 0 Mag and 1/4 PTO. Personally on the highs I don't run them shut, about 1/8 to 1/4 is safe in stock setup.
 
Having rebuilt 3 carbs now I highly recommend the vessel JIS impact screwdriver. It was $65, but after stripping out one of the internal screws and getting lucky on an ez-out, it's worth it's weight in gold, IMO.

The big internal stainless steel screws can really get stuck, and even with a JIS screwdriver I had no luck. Get the vessel impact with JIS bits and don't look back.
 
Also make sure you pull both rave valves, clean them, and inspect for cracks... They should be cleaned every season. Very easy to do.

I pulled my raves. Both were incredibly dirty and not opening right. One of them was cracked. Glad I found it before it blew up my engine.
 
Dang it. I bought the less expensive JIS screwdriver without the impact feature. Hopefully I get lucky and those screws come out easy. I plan on putting in SS screws on the rebuild.

Thanks for the heads up on the rave valves. I have never touched nor even looked at them in the 25 years (83 engine hours) I’ve had the ski. Bad bad Seadoo owner.

Off to look up rave valve videos.
 
How does this aft RAVE valve look? The first two pics are when I first pulled the RAVE valve out. Very dirty with wet black liquid.

9D42CD76-B293-44B1-AE8B-8E265CA95D42.jpeg

FE2C88F6-D67F-4E5F-B9AF-9BE398B0ED00.jpeg


The next two pics are after an initial dry wipe down and before any carb cleaner has been used.

304FF6DF-4C25-4EBB-A3A5-BCB161D6B4A8.jpeg

E1837FAF-0EAD-4D10-BAA7-845E32F8829D.jpeg
 
Those look normal but are the older non "slotted" valves. The newer ones were issued through a TSB as some engines would get stuck in the 4,000 rpm range. Some don't have an issue at all.
 
I wonder what the slotted valves look like?

Not perfect, but way better than before.

18594FCD-5B25-405D-9D37-AB86BB82874A.jpeg

7FF35DEC-FC2A-4745-96FE-42E85C5E7AC8.jpeg

93C9AF9D-65EB-49FE-971D-E09C0D1D3416.jpeg


The o-ring and white zip tie are original, but still look good. I’m thinking of replacing the o-ring from my o-ring assortment kit. The zip tie is easy to replace also. The red bellows still needs more cleaning.

0770980F-E4B6-4DE7-9DEE-CECAAB58239C.jpeg


And does the slot where the RAVE valve rides need any cleaning?
 
Last edited:
I wonder what the slotted valves look like?

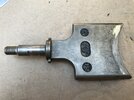
Here is a pic of the newer slotted RAVE valves from OSD.

OSD SEA DOO RAVE Valve Rebuild Kit - 787 CARB (Includes OEM Valves) [OSD3101-OEM] - $259.99

C0B313E4-BAA8-47E1-B3DE-EA48D06DA00F.jpeg


It’s unclear to me how exactly the slot would help prevent the valves from getting stuck. It would be a trivial matter to mill slots in my existing valves if one knew the slot dimensions.

The previous pictures of my RAVE valves seem to show some porosity in the valve.

My shop manual diagram does not show the white tie wrap that I see in my RAVE valve.
 
Status
Not open for further replies.
Back
Top