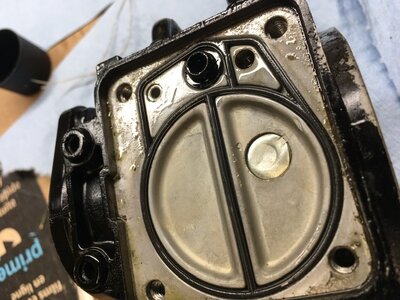
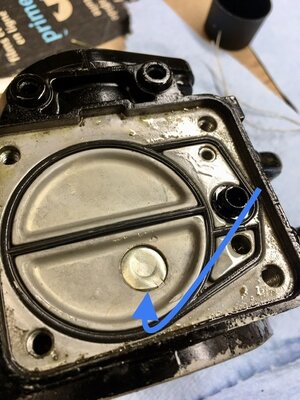
I put a new fuel selector valve and a new o ring in the fuel filter, still getting air bubbles in the intake line from the filter to the carb. I don’t see any air from the fuel baffle to the selector and I have black automotive fuel line from the out on the selector to the filter so don’t know if the new selector valve is sucking air or not. I have a roll of good continental fuel line on the way, should be here Thursday, I always thought I was a patient man, but I’m learning that I’m really not. I took it out on the water today but it was sputtering a bit so I headed right back in. Could the air bubbles in the fuel intake line cause this sputtering? Should I just go ahead and rebuild the carburetors? Or should I wait till the black fuel lines come in and just start by changing the fuel lines? I know when I change the fuel lines that I’m going to want to put a piece of clear line in temporarily to see if I see bubbles or not. Machine was peppy though, can’t wait till this gets sorted out.
-
This site contains eBay affiliate links for which Sea-Doo Forum may be compensated.
You are using an out of date browser. It may not display this or other websites correctly.
You should upgrade or use an alternative browser.
You should upgrade or use an alternative browser.
95 XP project
- Thread starter burtshaver2021
- Start date
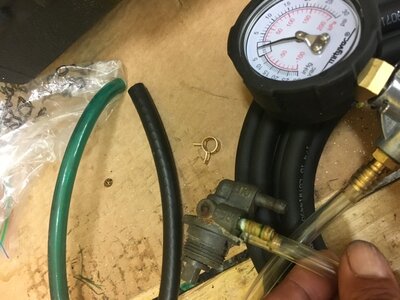 some observations, I took the old fuel selector valve from the XP put the hose from my Mity vac set from the pump to the ON fitting of the valve, then ran a little piece of the good 1/4” continental black hose rated SAE J30R7 from the OUT on the selector and put 8 pounds of vac on it and it held and that was without any clamps or zip ties. Switched out the black hose for a piece of the green clear hose I had taken off the machine with no clamps or zip ties and lost pressure fairly quickly, put 2 spring clamps on the clear hose and no pressure loss while under vac, took the spring clamps off and used zip ties on the clear hose and I get a pressure loss. I currently have the clear green hose on the machine with zip ties. I think I found my air in the fuel lines problem, need to have clamps on these lines not zip ties. Zip ties are fine for good black fuel line as that line has much more resilience to bounce back into shape but once the clear hose is stretched it doesn’t go back into shape. Like I mentioned the black hose held pressure without any zip ties or clamps. I know don’t believe there was anything wrong with my fuel selector valve or the o ring in the filter. Going to go ahead and remove the air intake to access all fuel lines, cut a quarter inch off and instal spring clamp. My question is, COULD THE AIR IN THE LINES HAVE CAUSED MY LITTLE BIT OF SPUTTERING? Or should I just go ahead and rebuild the carburetors? Also another question THE POP OFF WAS WITH IN SPEC BUT 5 POINDS DIFFERENCE, is that an issue? Do they need to be dead nuts on? I didn’t order the new lever with the kit and have never bent a lever to get desired pop off before. Thank you
Grim
Well-Known Member
I personally would try it out after this fix. That way you can see if that was the issue or not. If you rebuild the carbs before testing you could also introduce another issue without knowing if you solved the first one ( if you following my logic). I think the air could have caused the sputtering but it could still be the carbs too. As long as you are it the range on your pop off you should be ok, Someone told me once what happens if you are on the low side or high side of the pop off. For the life of me I can't remember, but it wasn't bad. I'll see if I can find it.
Thanks Grim, I’m of the same mindset. For me a carb rebuild set from OSD is 139.99 so being as I’m in Canada after the exchange around 180.00. I don’t mind changing something if it’s not right but not just for the sake of changing it to say it’s new. I’ve got the new clamps on now, just going to put the air box back on and I will see.... if this doesn’t do it, I’m going to vac test that new selector valve that I didn’t need, vac test the filter and if they test good, change all the lines out to good black onesI personally would try it out after this fix. That way you can see if that was the issue or not. If you rebuild the carbs before testing you could also introduce another issue without knowing if you solved the first one ( if you following my logic). I think the air could have caused the sputtering but it could still be the carbs too. As long as you are it the range on your pop off you should be ok, Someone told me once what happens if you are on the low side or high side of the pop off. For the life of me I can't remember, but it wasn't bad. I'll see if I can find it.
I think that for rid of the bubbles, when I first started it after putting the spring clamps on it was sucking nothing but air and rpm’s were up, I didn’t turn the fuel back on , I think In my old age I’m going to have to make a rule for myself that I take 2 minutes to look everything over before ever hitting the start button. So after turning the fuel back on, the air bubbles seemed to clear out, out of the intake first of course and then the return. I’m going to have to wait now to run it again since I probably had it running for about 45 seconds or so and don’t want to chance over heating the carrier bearing ( if that is what this one has?) once the bubbles cleared out she idled at about 3200 rpm, I can live with that. Next up for her is the vts is not working. I have never even looked at a VTS or even had a cover off so if anyone has any advice it is definitely appreciated. I would like to test and fix what can be fixed instead of just throwing money at it.
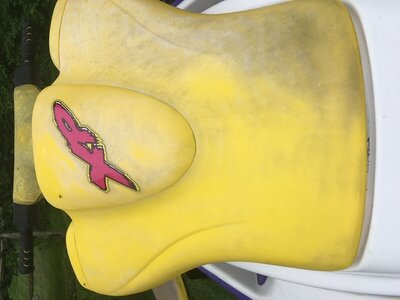 Yesterday I quickly went at the hood on it with barkeepers friend, that stuff works amazingly well at removing black spots which I assume are mold from the hood and handle bar pad. You can see in the picture that I stuck to cleaning the one side only pretty much. Once I go over it all real well 3 or 4 times with the barkeepers friend I will then either go at it with the heat gun which I’ve done before or I may try a fine cutting compound that I seen jetskigoodies do in an old thread.
Oh, forgot to mention. I’m constantly taking compression readings when I’m messing around with a ma home to see if I’ve hurt anything. Took 1 today on this XP and both sides were at dam near exactly 130, which I know isn’t real high but should be good enough to get a few years of driving out of if I want to. It starts like lightning even in the water, makes me think of my 2002 GTI which has roughly 130 per side as well and needs to be cranked for 2 or 3 seconds to get started. Sounds like i May have to make an attempt at having the rotary valve machines or at least check the clearance first. Anyhow, it’s a long weekend here, not sure if you guys have a long weekend in the States or not? But if you do, enjoy 
Argh, still sucking air. I guess I’m going to have to vacuum test this new selector valve and the fuel filter. If they hold vacuum, I’m just going to switch the lines to the good black hose and forget it. Pretty sure I will wonder for some time if there are still air bubbles in there but as long as it’s idling where it should than I think I’m good. I really think these clear lines that came on it had been the issue all along. I’ve been doing a little research into fixing the VTS trim and thankfully came across a few videos showing how to use a 451M relay to fix it. Seems very easy to wire in and at the time of the videos the relay was only 10.00
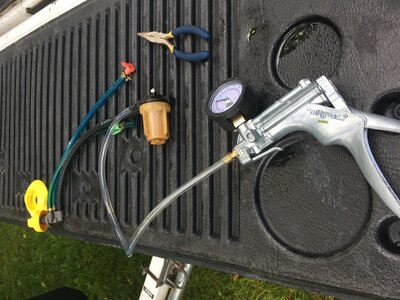 I really don’t know where to look next, I have the filter and valve off, hose from the vac to the fitting on filter that goes to carb, took the on and res lines off at the baffle, I plug the end of the on line where it attaches to baffle, turn selector valve to ON, and no pressure loss when under vac, same for the RES, plug the end of the res hose where it goes on baffle, turn selector to RES and no pressure loss when under vac. The way I’m set up I’m testing the filter and valve together and I mean it’s holding for like 10 minutes, probably indefinitely. Yet when I put the hoses back on the machine I get a few bubbles coming from the filter to the carb, I never seen any bubbles coming up the hose from the baffle to the valve, only out of the filter to the carb and some in the return line to the tank. Any ideas? I’m stumped?
Ok, Update, I tested with the selector in the ON position again, lost a pound in about 3 minutes so I changed the clear hose from the selector to a piece from a roll I had purchased at Canadian Tire, cheap Plumbshop hose, I could tell by the way it slide onto the fitting that I didn’t like it, tested the ON and still leaked, took that plumbshop hose off and put the last 4 inch piece of good continental hose on that I had, tested again and holding for about 10 minutes now. Sorry for all the posts about this bubbles in the fuel line issue but it’s taken a fair bit of testing for me to come to this conclusion but it’s only the 1/4” continental fuel hose with the SAE J30R7 rating for me from now on. It will fit properly and hold the vac without any fastener like zip ties, or clamps at all. To conclude, still holding right this minute. Selector and filter both hold vac. It’s been the connections of the lines all along. I have a 25’roll of the continental which should be in tomorrow or Thursday at the latest from Amazon for 50.00, It’s 3.99 a foot at Canadian Tire for the exact same stuff so half price.
Fuel line came in today, changed it, took it out on the water for about 5 minutes. Dam near quit on me so I’m rebuilding the carburetors
I have some doubts whether the oil injection is working on this. When I have the carbs off is it safe to take the plugs out, ground the wires and roll the machine over while I’m holding the oil pump lever open to see if there is oil coming out?
Yes, it is fine.I have some doubts whether the oil injection is working on this. When I have the carbs off is it safe to take the plugs out, ground the wires and roll the machine over while I’m holding the oil pump lever open to see if there is oil coming out?
Thank you
I’m rebuilding the carburetors for this now, for the 3 small holes, are they connected to the small jet which I’m assuming is the low speed jet, would I need to be spraying the carb cleaner in the small jet hole to see it coming out the 3 small holes? Or will it clean those 3 small holes out by spraying into the larger jet opening? Also, any issue with blowing those jetting circuits out with compressed air? After the carb cleaner
If there is a hell, it would be, being forced to put these rubber pieces in the fuel pump block for the Mylar check valves all day
I actually caved in and bought the special install tool for like 15 bucks. It works wonders with a dabble of dish soap on the tip of the rubber. just slowly work the tool in a circular motion until.. POP! No more torn grommets or creased check valves!If there is a hell, it would be, being forced to put these rubber pieces in the fuel pump block for the Mylar check valves all day
Really, were did you get the tool? I got both in without damaging them using some injection oil, dental floss wrapped around and pulling, pushing lightly using an Allen key like incMimidymacs thread but probably nearly an hour getting them in. I swore I would never change those discs again
Hmmmm, I have no idea what it is or what it does, Thankfully it jumped out at me that it seemed different. I’m just about done putting these back together, do you think I should put them back on the machine? I do have the carbs on my HX that are rebuilt that I could put on the XP
I just searched "sea doo check valve install tool" on ebay. $14.95 free shippingReally, were did you get the tool? I got both in without damaging them using some injection oil, dental floss wrapped around and pulling, pushing lightly using an Allen key like incMimidymacs thread but probably nearly an hour getting them in. I swore I would never change those discs again
Thank youI just searched "sea doo check valve install tool" on ebay. $14.95 free shipping
I’ve got the carburetors back together now, I don’t know what that thing is or what it does but do you think I should go ahead and put those carburetors back on it? Or just go ahead and put the ones off my HX on it? Unless your saying the original carbs off the XP are no good because of that thing that looks like someone hit it with a punch my thinking is I might as well put them on and see if the rebuild made a difference, if they don’t then I could always put the ones of the HX on and see if that fixes things. Also I got to playing around with idle screw while the carbs where off, not for any particular reason other than I was curious. What would be a good baseline to set the idle screw at before I start it? I’m thinking how far open should it be holding the butterflies? I’m thinking just a sliver open?I haven't noticed one like that. Almost looks like someone hit it with a punch.
Similar threads
- Replies
- 4
- Views
- 500
- Replies
- 1
- Views
- 442


