• This site contains eBay affiliate links for which Sea-Doo Forum may be compensated.

2001 RX Reboot Project – MPEM related question

Status
Not open for further replies.
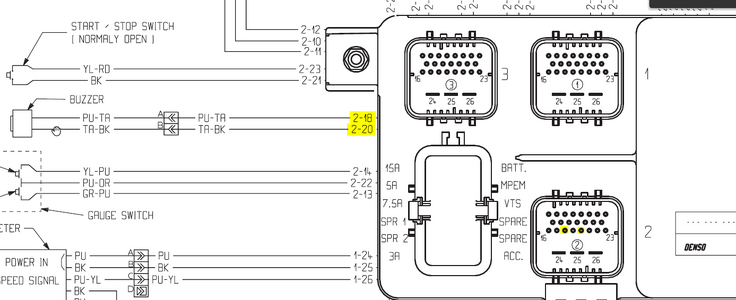
The problem with the beepers is that the MPEM sends such a small short pulse. So some will work when connected directly to the battery but not when the MPEM sends the signal.
So what you're saying is that something within the buzzer may not be able to take the lower power and output as loud. So the buzzer is likely defective. I have one of those on the way as well.
 
Last edited:
Not trying to argue, just throwing thoughts out there. We know so little in how the MPEM actually internally is designed and works. And yes, the manual says that the memory of the MPEM is permanent, but how? Computers don't work that way and that's what the MPEM is -- a mini computer. What if the memory is permanent under certain conditions; whereas we're using these machines under an unlimited set of unexpected and tested variables. What if no one at Bombardier ever expected a seadoo to last 21 years and kill that battery they assumed never needed to be replaced and/or charged?

In thinking through all of this, I started googling a bit.

In other forums I found information on MPEM battery pull even with no key on the DESS post. So then I started thinking further...why would the MPEM pull power from the battery without key. Why would it need that?

I do IT for a living, and every computer has a CR2032 or CR2025 battery which stores and retains Basic Input Output System (BIOS) information. Your date and time, CPU information, boot device, TPM, etc settings which are required before the computer boots into your operating system (Windows, Linux, in the case of apple privitized Unix). Those batteries are about 2.4V - 3.0V. When that replaceable battery goes dead, it loses all of it's settings within the BIOS, and even the date will return to the original MFG date any time the computer is unplugged from power. So, what if, on our Seadoos, the MPEM requires power to retain settings, i.e., keys, etc.. On computers, BIOS settings are considered permanent as well -- defaults are permanent, modifications and changes to those non-default settings are not. Remember, the factory does not program your keys. In fact, I am told that the MPEM's don't even come installed within the machines when they are shipped anymore, and this is something the dealer must do to prep the ski.

Furthermore, what if there is a little onboard rechargeable battery within the MPEM, (or capacitor) that retains enough power to retain key programming, etc. which requires power and/or recharging. So when a "starting/running" battery hasn't been installed for long periods of time, like in my case 7 years, and we install a battery, it starts to recharge the MPEM. The 2.4V - 3.0V loss would make sense if that was what was required to recharge the MPEM.

More info on capacitors:

if the power supply is removed or disconnected, the capacitor can supply its stored charge into the circuit. In this way, the capacitor acts like a small battery. This energy-storing property of a capacitor is called its capacitance, and is usually measured in Farad.

In other words, a capacitor can be gradually charged to reach the required voltage level to provide the energy needed by an electronic device. Since 1 farad is a very high value, capacitors used in electronics usually contain capacitances measured in picofarads, nanofarads, microfarads, and millifarads. A charged capacitor left unused can retain its charge for a long time, even years.

Capacitors are crucial components in so many electronic devices such as household appliances, handheld devices like smartphones, and computers. The main function of a capacitor in these devices is to store electrical energy to facilitate their operation in diverse ways. Thus capacitors can be used to provide different types of electronic filtering, as well as provide a means to store and discharge energy.

It is pertinent to note that if a fully charged capacitor is not discharged in the circuit, it can retain the charge even when the main power supply is disconnected. Therefore, extreme caution is required when working with capacitors in general.

Very good capacitors lose internal charge after 10,000 hours, and over the course of 7 years, that would be 61,320 hours.


So I did some digging about what is inside the 951 MPEM, and found this....everything highlighted appears to be a capacitor. That's a lot of capacitors to recharge.
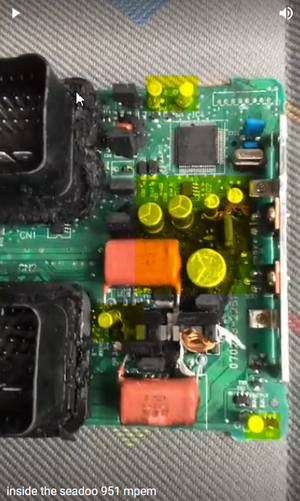
1678977003682.png

So maybe no one at seadoo thought 1) a ski would last that long and 2) no one would certainly have a battery disconeccted that long.

Don't get me wrong, I have listened to the advice here and I am replacing the battery - they are sending a new one to replace the brand new one. However, in thinking through all of this, it seems odd the battery would drop down to 10.9V, then pop back up to 12.7 (which is a 2.4 - 3.0V difference).

So far, the battery does not seem to lose power after being charged and sitting not installed. I charged it over night and am letting it sit for a day to re-verify this observation.

Yesterday when I took it to be checked, I removed it directly from the ski and did not charge, so of course it would have low reserve.
 
Last edited:
Nice picture on the 951 MPEM that is good to have for sure. As an aside I sure would like to know how to remove the potting junk from the MPEM. That stuff is hateful mean to remove.
 
Easy test at home is put a volt meter on the battery and try and crank the ski. If it drops below 12V the battery has issues.

That tool I linked to does all the pins I have ever removed on Seadoo's.
I understand that, but I can't crank the ski with a bad key so I can test under load. Plus for warranty I have to have an official diagnostic anyway. Trying to approach this as first things first.
 
Nice picture on the 951 MPEM that is good to have for sure. As an aside I sure would like to know how to remove the potting junk from the MPEM. That stuff is hateful mean to remove.
To me it kinda looked like they were willing to sacrifice a broken MPEM to get it off. I read somewhere you can heat it, or use an acid bath, and quite honestly that computer board looked like it had been exposed to heat / something else because it's warped. It is nice to be able to see the components on the board.
 
Just went back to the Youtube Video someone said:

Boil them in 200° distilled water
But, if that black gunk is simply rubber attached to the board to protect it, you may be able to use a concentrated heat gun around the connectors and the edges to peel it back entirely. These are used in repairing tablets and phones which are held together by a similar material. They come with multiple tips and can be used it apply heat to smaller concentrated areas so you don't over heat the electronics and the temp is adjustable.

https://www.amazon.com/gp/slredirect/picassoRedirect.html/ref=pa_sp_mtf_aps_sr_pg1_1?ie=UTF8&adId=A0272109288EBQF8SDGO9&qualifier=1679064791&id=5038278166934553&widgetName=sp_mtf&url=/Heat-Gun-Vinyl-Heat-Shrink-iHGun-1-Accuracy-Temperature-Adjustable/dp/B0752Z4165/ref=sr_1_12_sspa?crid=6936YL8YS0X9&keywords=heat+gun+for+tablet+repair&qid=1679064791&sprefix=heat+gun+for+tablet+repair%2Caps%2C357&sr=8-12-spons&ufe=app_do%3Aamzn1.fos.006c50ae-5d4c-4777-9bc0-4513d670b6bc&psc=1

If I had one to play with I would start with the edges around the MPEM first, peeling back slowly to connectors, then work it off around the connectors with a metal tool like this Amazon.com

So you could cut and pry.

The material kinda looks like a flex dip / protective dip you use to rubberize tools to use around electronics.

Hello Juice. I've read through all your troubleshooting and I'm impressed at your knowledge thus far, but you do have a couple holes in your information. For one, the potting/encapsulation material is epoxy based. The manufacturer of YOUR MPEM is Nippondenso and they may have used a different product than that of Mega-Tech Electro of Canada. The real early MPEM's have a potting compound that is VERY difficult to remove in chunks. It almost comes off as a powder. The newer ones seem to be more like silicone in that it removes/tears/splits more cleanly. It's all still epoxy from what I can tell.

As for the recommendation that boiling water should be used, I'm not sold on that idea because most all the components are automotive grade and rated for 85C or 185F operation. 212F is definitely risking damaging the components. Not only that, the epoxy has a tendency to lose heat very quickly as more and more is removed. Thermally cycling the surrounding components to boiling and back down to room temperature will likely cause havoc and possibly introduce micro-cracks in the solder joints. Using a heat gun and patience is quite possibly the best method if you plan on trying to preserve the functionality of the MPEM.

Now as for your question regarding memory and key storage: Of all the MPEM's I've opened up thus far, the information for the key is written to EEPROM inside the microcontroller or a separate serial EEPROM chip. The microcontrollers are often Motorola MC68HC705P9, MC68HC711E9CFU2 (512 bytes of internal EEPROM) from what I have encountered thus far. It does not require external power to keep the information in memory. You are correct in that the MPEM will always draw a small amount of current because as long as the battery is hooked up, the MPEM is looking for a DESS key. I don't know if your MPEM is equipped with a separate circuit, but BRP got smart (in 2003?) when too many customers complained of a dead battery and they integrated an external relay which switches power on to the MPEM.

Download the 2003 manual and check out the wiring diagram for the 2003 XP DI. Look for the "cut-out relay." Also, notice that the DESS post has FOUR wires instead of your ski having only 3. The idea is that when ANY DESS key is installed on the post, the magnet inside the key turns on the glass reed switch inside the DESS post and that completes the circuit for a small relay to supply power to the MPEM. What's ironic here is that the cut-out relay was originally used in the 1996 XP and GSX to remove power from the separate CDI unit before they incorporated all functionality into one streamlined(and very non-friendly to repair) brick.

The largest capacitors in the picture you poached from the YT video are for each ignition coil. They are rated for 400V. If you look closely, the transformer coils have been destroyed by the process of removing the encapsulation. The rest of the capacitors are more or less for signal conditioning.

Last bit of information here is that all the oldest MPEM's before BRP switched over to Bosch manufactured ECU's have two large diodes near where power enters the MPEM. One is the infamous Motorola MR2535L Transient Voltage Suppression diode for ESD protection, and the other is a freewheeling diode whose job is to discharge any stray voltages after power is removed.
 
Every day I try to do something so I can make sure this project gets finished. Updates:

2023-03-14

  • Battery should arrive and then the troubleshooting starts
  • New key should arrive
  • Installed new starter solenoid (1 locknut instead of 2)
  • Charged battery to 13.3 installed battery, down to 12.9
  • Attached old key. Faint long beep, like deprogrammed.
  • Checked voltage on battery down to 10.9
  • Took dogs for walk, came back, battery voltage while still in ski 12.9
  • New buzzer? 278000978
2023-03-15

  • Test battery voltage this morning - @ 12.7V
  • Remove & take for testing @ Autozone
  • Battery bad
  • Contacted MightMax for replacement under warranty
  • Ordered buzzer
  • Tested buzzer with battery beeps loudly
  • Cancelled buzzer / reordered buzzer
  • South Pasadena 727-873-3910 The Jetski Repair Shop
2023-03-16

  • Check / clean buzzer connectors
  • Fully charged battery – check to see if voltage goes down throughout the day
  • Called SBT about key programming – no
  • Powersports of Clearwater $56 (can’t do too old)
  • 951 MPEM pic / video
    also saved pic to manuals
2023-03-17

  • Removed VTS boot & screw
  • Cleaned out VTS port
  • Realized had wrong boot ordered new kit from Missouri on ebay
  • Cleaned / checked buzzer connection 2-16 2-18 (bottom right)
  • Checked key fit (doesn’t fit)
  • Sent seller note to return
  • Contacted SBT obtained receipts
  • Found receipt for jetpump from parkeryamaha.com no longer does salesonline 2011
  • Cleaned up dirt
  • Wiped out VTS
  • Tried to install VTS cover, will need to remove top black and mount
  • Grease gun not working – try to figure that out
2023-03-18

  • Removed MPEM and shipped to MN for reprogramming
  • Placed ends to MPEM in plastic bag and zip tied shut so moisture does not enter
  • New grease gun & grease
  • Cleaned up some of the hull
  • Cleaned up / checked wires for buzzer
  • Tried to spin PTO to install grease fittings. Cannot get pipe wrench seated for fear of damage to bolts. Couldn't remember clockwise/counter. Forgot to remove spark plugs for easy turn & dogs needed to go for walk.
2023-03-19
  • Ordered stainless steel nuts
  • New waterproof ends to VTS (old had to be cut out years ago)
  • Cleaned ends on ski end, doubled over and reattached. Verified they are attached will not fall off
  • Attached connectors to VTS side water proof as well
  • Placed ends in a plastic bag and zip tied so they stay dry till VTS boot arrival.
 
Add the Dollar Amounts to each new Part Line Item for a running Tally....

Always want to see if my $2K Rule of Thumb holds for bringing a Vintage Two Stroke Ski back to Life.

With Inflation, my number is probably low today.
 
Add the Dollar Amounts to each new Part Line Item for a running Tally....

Always want to see if my $2K Rule of Thumb holds for bringing a Vintage Two Stroke Ski back to Life.

With Inflation, my number is probably low today.
I've been using a spreadsheet. After returns & replacements I'm only at ~$500. Some of the parts I already had. I even have a seadoo bolt kit I bought off ebay for $45 in 2002 which has every single bolt, nut, retainer, etc.

Most expensive purchase thus far was actually a toss up between the cover and the battery. New most expensive will be the MPEM reprogramming.

I don't include the cost of specific tools I may need though.

When it comes time to buff it out, I have the Makita buffer and chemicals.

Still cheaper than buying a new ski amounting to the price of a car payment.
 
Last edited:
I've been using a spreadsheet. After returns & replacements I'm only at ~$500. Some of the parts I already had. I even have a seadoo bolt kit I bought off ebay for $45 in 2002 which has every single bolt, nut, retainer, etc.

Most expensive purchase thus far was actually a toss up between the cover and the battery. New most expensive will be the MPEM reprogramming.

I don't include the cost of specific tools I may need though.

When it comes time to buff it out, I have the Makita buffer and chemicals.

Still cheaper than buying a new ski amounting to the price of a car payment.
In 2011 I replaced the jetpump with a brand new one, new impellar, pusher, new rave valves, installed hydroturf, new seat cover. After that I probably put maybe 15 hours on it. But I did change the pump oil, etc., and had issues with the VTS. All through lack of use and keeping it on a floating dock. When I lived in Miami I used it throughout the week and on weekends.

If I can't buff it out, Ill buy a wrap and wrap it.
 
The one thing I am kinda worried about is if I need to swap out the starter. I believe it is on the same side as the carbs. In 2016, I was able to get pics, and nothing seemed rusty or nasty, but you never know. If I have to get in there and try to remove rusted allen bolts I cannot see, and I'm not familiar with finding -- the service manual isn't really that helpful since it has the black pipe and carbs removed, yet I've watched videos where people have removed the starter without removing either.
 
The one thing I am kinda worried about is if I need to swap out the starter. I believe it is on the same side as the carbs. In 2016, I was able to get pics, and nothing seemed rusty or nasty, but you never know. If I have to get in there and try to remove rusted allen bolts I cannot see, and I'm not familiar with finding -- the service manual isn't really that helpful since it has the black pipe and carbs removed, yet I've watched videos where people have removed the starter without removing either.
Good news is the allen bolts are not rusty. Got in there with a camera today. Starter has a bit of light surface rust. Squirted some Sea Foam Deep creep in the whole area in preparation/just in case. By light rust, I mean like a 1/2 in area no where hear the front where it plugs in. I do remember hearing just a click when I tried to start it years ago. But, that could have been the starter relay or a bad battery.
 
Last edited:
Bolts are stainless so there will be no rust. Only issue would be aluminum corrosion if used in salt water.
 
Always used in saltwater, but liquid CRC-656 sprayed liberally and regularly on all surfaces. In fact, I would rather have a hull full of greasy CRC than a spotless hull. I also love the smell.

My MPEM was delivered this morning. Got a text a few minutes ago that the DESS has been modified so I can use any magnetic dess key on the DESS post to make the ski run. Yeah me! So MPEM is functional and now will work with any key!
 
For the record:

I charged the "bad" battery on a trickle charger removed from the ski to 13.8

The battery over the last few days has drained minimally down to 13.0 (some of that probably from testing voltage).

Today I received the new buzzer. Tested the new buzzer straight on the battery and it did not lose any power testing the buzzer 10x.

MPEM has been reprogrammed for no DESS (so I never have to worry about programming a key again). Will be on it's way back shortly.

So at this point, I'm going to test the installed buzzer again, directly on the "bad battery" to see if power drops on the "bad" battery.

If it does, then the buzzer is pulling shorting out/pulling too much power.

If not, DESS post would be next to replace.
 
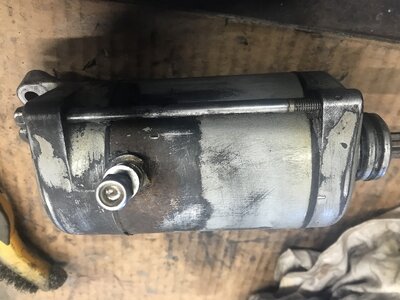
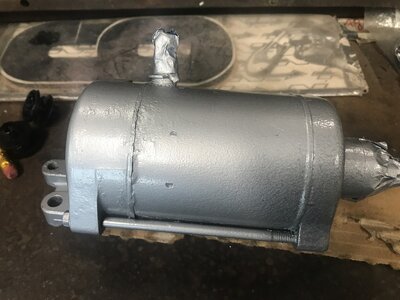
Battery will generally read around 12.7 volts or so after you let it sit. Betta pull the starter before you install the carbs. I removed the starter drive with the engine in the ski on a 1998 GTX 951. I wouldn't recommend it. LOL Hope your drive is OK. As for the starter, disassemble it and give it a cleaning. Sometimes the brushes are not even worn much at all. I like the paint for protection and it looks nicer some are really ugly. Got saltwater around here to. LOL :D

951 Starter  (2).JPG


951 Starter  (3).JPG
 
Battery will generally read around 12.7 volts or so after you let it sit. Betta pull the starter before you install the carbs. I removed the starter drive with the engine in the ski on a 1998 GTX 951. I wouldn't recommend it. LOL Hope your drive is OK. As for the starter, disassemble it and give it a cleaning. Sometimes the brushes are not even worn much at all. I like the paint for protection and it looks nicer some are really ugly. Got saltwater around here to. LOL :D

View attachment 61517


View attachment 61516
I never removed the carbs. They are still on the ski. Haven't touched the starter yet. Easy enough to remove the battery and carbs afterwards. I no longer have an airbox. It was modified to have flame arrestors.
 
I never removed the carbs. They are still on the ski. Haven't touched the starter yet. Easy enough to remove the battery and carbs afterwards. I no longer have an airbox. It was modified to have flame arrestors.
Should be able to find an airbox pretty cheap.
 
Should be able to find an airbox pretty cheap.
Why would I want to put an airbox back on when I have flame arrestors? Rather than rebuild the starter, I think I would opt for a brand new one with warranty, and then rebuild my old one as a spare if it's not too ugly. When I installed a new engine in my SPX, I installed a Goki starter. SBT is right down the street from me but shipping times seem to be within 2 days from everywhere. Even Minnesota.
 
Last edited:
I never removed the carbs. They are still on the ski. Haven't touched the starter yet. Easy enough to remove the battery and carbs afterwards. I no longer have an airbox. It was modified to have flame arrestors.
Wasn't the hull and seat opening smaller in the GTX. I believe it has a split opening and is skinnier than the RX opening?
 
Why would I want to put an airbox back on when I have flame arrestors? Rather than rebuild the starter, I think I would opt for a brand new one with warranty, and then rebuild my old one as a spare if it's not too ugly. When I installed a new engine in my SPX, I installed a Goki starter. SBT is right down the street from me but shipping times seem to be within 2 days from everywhere. Even Minnesota.
Two reasons on the 951.
1. The carbs are mounted low in the hull and with open air filters they can and do suck in water which will ruin a 951.
2. They reduce the intake vacuum signal making the already lean 951 carbs even more lean. A lean 2-stroke is not a happy 2-stroke.

951 carbs explained by Group K....
Flame Arrestors – While the installation of aftermarket flame arrestors has been a very popular modification for many recreational pwc’s, we do not use or recommend them on our Swift Kit or Y2K Sleeper Kit. The technical reasoning for this choice is related entirely to the stock carbs used on the 951 engines. The carbs used on all 951s are the first generation of a carburetor that is designed as much for emissions friendliness as it is for performance. Among the most notable design features that make this difference, is the significantly increased distance between the butterfly and the “booster venturi” style fuel atomizer (aka “bombsight” atomizer). We cannot claim to know all the effects of this design departure, however we know a lot about one particular effect called “fuel delivery signal”.

In short, signal is the amount of vacuum within the inlet tract that helps to draw fuel from the metering circuits in the carburetor. The air restriction of the stock flame arrestor serves greatly to keep that vacuum very high. This high vacuum actually helps the quickness of throttle response at all engine speeds. When a free breathing flame arrestor is installed, this vacuum (aka signal) is reduced. The reduced signal means a slightly leaner fuel mixture through the entire range. This is normally not a dangerous issue for most pwc engines. However the emissions-conscious stock 951 carbs have an exceptionally weak signal at ¾ throttle opening. This means that a more open arrestor will cause the 70 – 80% throttle range become “a lot” leaner than the rest of the range. There is no jetting that can solve this problem (we tried). The “only” effective solution is to leave the stock flame arrestor (with the bolt on air horns) intact. Despite the restrictive appearance of the stock arrestor, it can easily pass enough air volume for excellent performance up to the 7140 rev limiter. The stock arrestor has received an undeserved reputation as “choking” the 951 into a bad rich condition. In truth, the rich condition is a correctable jetting issue, not an air access issue.
 
Status
Not open for further replies.
Back
Top