


100guard
New Member
98 Speedster - Wear Ring tore off like a tire tread. Pics Galore ")
I'm not sure this had anything to do with low oil, hence a new thread is merited....although-whatdoIknow?
I enjoy the write-up of his DIY (step 1 exploration), so forgive my being verbose. You can skip and just go to the pictures.
Anyhoo..I'm NOT a DIY'er...by any means...but this house we bought came with a CRAP load of construction eqpt., socket wrenches (8 of them), and 6" extensions., 4" extensions, lol...so as soon as I started looking at the back of my boat I got this urge to go nuts.
I inspected the whole contraption, and realized...as long as I can take off the four bolts on each assembly, the whole thing can be taken off in one piece without kicking something out of whack. Am I correct in assuming that so long as I don't fiddle with any alignment related threadings, it should go back on fine? Anyway, I did it! I pulled it all off. SO HAPPY!! The bottom bolts., no problem..but the top, because of limited space, I piggy backed my 5" socket extension on the 3" one (approx lengths, is what I always say hehe) and bang., did the top four.
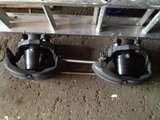
Right one is the tricky one as it has the connections to the drive & steering bars that are left suspended.
For me that's saying something...a LOT! I impressed myself. So nice to really take my mind off the days events by doing this project.
Something about socket wrenches clicking...so visceral and energizing.
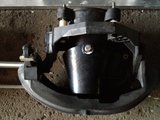
I got tripped up for a second as I realized the steering and drive bar needed to be detached or the whole thing wouldn't come off. Thankfully I had literally 6-8 socket wrenches (that's not counting my three new ones of my own set) so I could keep all the necessary sizes on each dedicated one so I knew which it was for LOL. I know have a dedicated 'Seadoo' bin where I'm keeping all these spare sizes in for the (God forbid!) next time. Anyway, took off the drive screw and bolt., and the steering, and eased the contraption down. What do I call this whole thing? I was a little paranoid so I didn't want ANY bolt to slip out, lest I lose a spacer or washer, but there really isn't anything is there? Just the white washer below, and one lone bolt. Done deal. The NUT STAYS where it is housed, and that's so easy.
Side Question. I'm always holding the steering wheel at like 2 o'clock. Can I adjust this so the wheel is neutral? or is that Cavitation related?
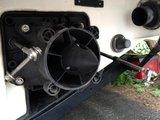
So anyway...I put it away., then I'm looking...btw, what is this wire? It seems like it's seated in that little spinnery wheel there (what the heck is that thing anyway???. Can I zap strap it somewhere? I don't like seeing it flip flopping.
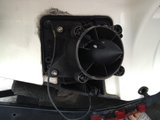
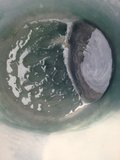
(BTW What started this was a low fuel gauge RedEyeofDeath (REOD) which I now know will never relate to the cone...only the Injection pump tank sensor or actual level) So I look at the cones to compare to see if there are any obvious spaces or cracks like I experienced last year with the one...but they look good. Have a look.
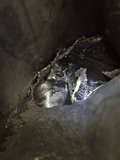
As I'm looking, I am shocked...to see this...and this...and these??? wow!!
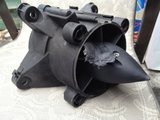
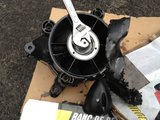
Now I'm wondering if I can take off THIS Assembly (what's this called?) off myself. I'm wondering is there a special lock I need to release from the inside of the boat? Does it get significantly more challenging from here? I then go rummaging through the previous owners misc bucket..and voila! Find a 21mm (or was it 22?) short socket that just barely grabs the four bolts., I take em off. A little nudge and I have it!
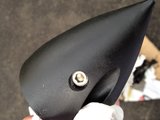
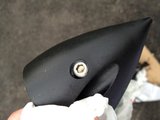
I take it off and see this. I'm blown away!! I grab my needle nose pliars and try to pull it out hehe...little stubborn.
I'm partially wondering if I managed to suck in a perfectly shaped piece of plastic...or if somehow...while going the 5kms for the bit I was (after the 40min return trek and 30min stop when we swam around while closer to shore) at...the same painful 5kms/hr LOL) managed to cause the impeller to grow in size? and manage to SHEAR off that piece of plastic? Does this happen? Has anybody else had it happen? Or did the impeller shift? bend down enough to catch that edge and slice it?
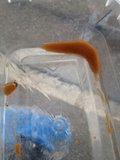
Anyway, after all this fun, I fail to find a socket small enough to take out the 3 screws on the cone (which at this point, I'm still thinking is the culprit {Could I have left the cone on to fix this}?) from the owners stash, I go grab MY set, and magically it has it...yippee. So I take it out, removed the three and out flows this stinky burnt oil. Does this oil look good? It seems to be a heterogenous mixture. Man does it stink something FIERCE. I had done this in the house...DIDN'T drop anywhere...JUST the smell....lingered in the house for TWO HOURS!!!! We came back and the house WREAKED LOL. Boy did I get an earful haha. I don't find it that bad...just strong.
This was in the connection between the shaft and the female end of the impeller...not really greasy...rust and water? Should this greased (it was) when put back?
So....sitrep:
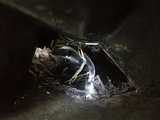
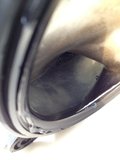
I can turn the impeller fine...but it is rubbing on the inner housing there as you can see. How the HECK does this happen? The shaft (the bar that goes to the engine?) grooves feel okay (to a layman such as I), the female end opposite the impeller also feels fine (should I grease or lube these when putting back together?). Reminder., the engine didn't seize., nothing sucked in...just combined (as RFoster130 believes I just got the REOD cuz the sensor came on early) with THAT...something shifted and the impeller suddenly grazed the interior housing and sliced & diced that up.

Having looked at the oil, did it have anything to do with it? or was the jet pump oil intact and operational?
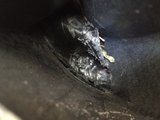
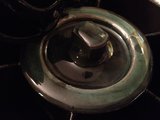
Does this plug look good? These where new cones, so I'm wondering if it should be so offset? I need to test if this is really as open as it looks. SHouldn't it sit snugly in, and properly? Not askew as it is?
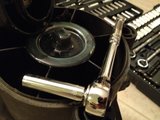
Anyway...what's my next step??? Last time I think I remember the shop had a male shaft to stick in the impeller to lock..and then you unscrew the ROD end like I have my adjustible wrench pictured? I'd have to take out the impeller, file down that frayed plastic...and I'm wondering,....on a cheap mans budget...can I still use this Assembly?
I don't understand what happened. Firstly...did I really suck in that plastic? Or did it really get cut away from the interior of that cylinder???? So what? That plastic is actually SEPARATE from the outer shell? So...the impeller CUT it at the bottom there? Then as it got loose, it got twisted (not hard to tease out) in there???
btw...did I mention I'm unemployed? WTF.
So: What I'm interested to know is...WTF happened? What caused it? What's my next step..if that's still a DIY, or if I can just give this to someone to fix, grind the impeller fin to clean it up as well as file/clean the interior of that Assembly which is now a little roomier (IE would resultin less propulsion I'd imagine?).
Is this called a catastrophic failure? I'd say no cuz really all I need is a new assembly. Rod/shaft/engine/impeller still good. Nowhere near the $7/$800 I spent last year on my fiasco LOL. I'd say it's a curious failure? lol?
I'm not sure this had anything to do with low oil, hence a new thread is merited....although-whatdoIknow?
I enjoy the write-up of his DIY (step 1 exploration), so forgive my being verbose. You can skip and just go to the pictures
.Anyhoo..I'm NOT a DIY'er...by any means...but this house we bought came with a CRAP load of construction eqpt., socket wrenches (8 of them), and 6" extensions., 4" extensions, lol...so as soon as I started looking at the back of my boat I got this urge to go nuts.
I inspected the whole contraption, and realized...as long as I can take off the four bolts on each assembly, the whole thing can be taken off in one piece without kicking something out of whack. Am I correct in assuming that so long as I don't fiddle with any alignment related threadings, it should go back on fine? Anyway, I did it! I pulled it all off. SO HAPPY!! The bottom bolts., no problem..but the top, because of limited space, I piggy backed my 5" socket extension on the 3" one (approx lengths, is what I always say hehe) and bang., did the top four.


Right one is the tricky one as it has the connections to the drive & steering bars that are left suspended.
For me that's saying something...a LOT! I impressed myself. So nice to really take my mind off the days events by doing this project.
Something about socket wrenches clicking...so visceral and energizing
.I got tripped up for a second as I realized the steering and drive bar needed to be detached or the whole thing wouldn't come off. Thankfully I had literally 6-8 socket wrenches (that's not counting my three new ones of my own set) so I could keep all the necessary sizes on each dedicated one so I knew which it was for LOL. I know have a dedicated 'Seadoo' bin where I'm keeping all these spare sizes in for the (God forbid!) next time. Anyway, took off the drive screw and bolt., and the steering, and eased the contraption down. What do I call this whole thing? I was a little paranoid so I didn't want ANY bolt to slip out, lest I lose a spacer or washer, but there really isn't anything is there? Just the white washer below, and one lone bolt. Done deal. The NUT STAYS where it is housed, and that's so easy.
Side Question. I'm always holding the steering wheel at like 2 o'clock. Can I adjust this so the wheel is neutral? or is that Cavitation related?

So anyway...I put it away., then I'm looking...btw, what is this wire? It seems like it's seated in that little spinnery wheel there (what the heck is that thing anyway???. Can I zap strap it somewhere? I don't like seeing it flip flopping.
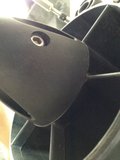
(BTW What started this was a low fuel gauge RedEyeofDeath (REOD) which I now know will never relate to the cone...only the Injection pump tank sensor or actual level) So I look at the cones to compare to see if there are any obvious spaces or cracks like I experienced last year with the one...but they look good. Have a look.

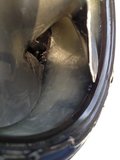
As I'm looking, I am shocked...to see this...and this...and these??? wow!!


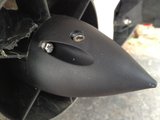
Now I'm wondering if I can take off THIS Assembly (what's this called?) off myself. I'm wondering is there a special lock I need to release from the inside of the boat? Does it get significantly more challenging from here? I then go rummaging through the previous owners misc bucket..and voila! Find a 21mm (or was it 22?) short socket that just barely grabs the four bolts., I take em off. A little nudge and I have it!
I take it off and see this. I'm blown away!! I grab my needle nose pliars and try to pull it out hehe...little stubborn.

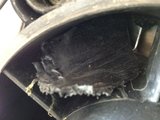
I'm partially wondering if I managed to suck in a perfectly shaped piece of plastic...or if somehow...while going the 5kms for the bit I was (after the 40min return trek and 30min stop when we swam around while closer to shore) at...the same painful 5kms/hr LOL) managed to cause the impeller to grow in size? and manage to SHEAR off that piece of plastic? Does this happen? Has anybody else had it happen? Or did the impeller shift? bend down enough to catch that edge and slice it?
Anyway, after all this fun, I fail to find a socket small enough to take out the 3 screws on the cone (which at this point, I'm still thinking is the culprit {Could I have left the cone on to fix this}?) from the owners stash, I go grab MY set, and magically it has it...yippee. So I take it out, removed the three and out flows this stinky burnt oil. Does this oil look good? It seems to be a heterogenous mixture. Man does it stink something FIERCE. I had done this in the house...DIDN'T drop anywhere...JUST the smell....lingered in the house for TWO HOURS!!!! We came back and the house WREAKED LOL. Boy did I get an earful haha. I don't find it that bad...just strong.


This was in the connection between the shaft and the female end of the impeller...not really greasy...rust and water? Should this greased (it was) when put back?
So....sitrep:
I can turn the impeller fine...but it is rubbing on the inner housing there as you can see. How the HECK does this happen? The shaft (the bar that goes to the engine?) grooves feel okay (to a layman such as I), the female end opposite the impeller also feels fine (should I grease or lube these when putting back together?). Reminder., the engine didn't seize., nothing sucked in...just combined (as RFoster130 believes I just got the REOD cuz the sensor came on early) with THAT...something shifted and the impeller suddenly grazed the interior housing and sliced & diced that up.


Having looked at the oil, did it have anything to do with it? or was the jet pump oil intact and operational?
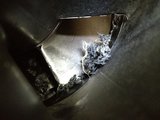
Does this plug look good? These where new cones, so I'm wondering if it should be so offset? I need to test if this is really as open as it looks. SHouldn't it sit snugly in, and properly? Not askew as it is?


Anyway...what's my next step??? Last time I think I remember the shop had a male shaft to stick in the impeller to lock..and then you unscrew the ROD end like I have my adjustible wrench pictured? I'd have to take out the impeller, file down that frayed plastic...and I'm wondering,....on a cheap mans budget...can I still use this Assembly?
I don't understand what happened. Firstly...did I really suck in that plastic? Or did it really get cut away from the interior of that cylinder???? So what? That plastic is actually SEPARATE from the outer shell? So...the impeller CUT it at the bottom there? Then as it got loose, it got twisted (not hard to tease out) in there???


btw...did I mention I'm unemployed? WTF.
So: What I'm interested to know is...WTF happened? What caused it? What's my next step..if that's still a DIY, or if I can just give this to someone to fix, grind the impeller fin to clean it up as well as file/clean the interior of that Assembly which is now a little roomier (IE would resultin less propulsion I'd imagine?).
Is this called a catastrophic failure? I'd say no cuz really all I need is a new assembly. Rod/shaft/engine/impeller still good. Nowhere near the $7/$800 I spent last year on my fiasco LOL. I'd say it's a curious failure? lol?
Last edited by a moderator:


