mikemopar
Member
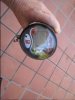
Got down and fixed my burned info center gauge and figured to show how I did it.
Repair Sea doo 96 GSX Info Center (IC) with a burned LCD polarized film
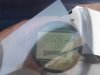
All LCD screens have a polarizing film on top of the screen. In laymen's terms it darkens the image giving it clarity. One place to purchase this film is from "Aflash Photonics" in Texas. http://www.polarization.com/polarshop/ . For our purpose the film comes in a 10"x6" sheet , hard coated, anti glare with a adhesive back for $31 (Jan 2011), shipping included. Enough to do 8 or more gauges.
Know this film:
• There is a top and bottom of the polarizing film. Both sides of the film has a protective sheet that eventually is removed. One side of the polarizing film is the sticky side and the other is not. It's best to check a corner of the sheet and determine which side of the film has the adhesive, and put a mark to indicate the top of the Polarizing film.
Procedures;
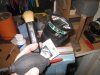
1. Set up - If you've never done this before it's best practice to mark or number the connectors so there is no guess work when re-plugging back together.
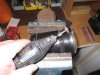
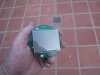
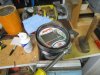
2. Unplug all your connectors and remove the IC gauge and the tach gauge from the hatch cover - The IC and tach gauge is held on by the rubber grommet. Just pry the IC out with a screwdriver. Removing both gauges will make it easier to position the film latter. Make a mark on the bottom of the housing for reference.
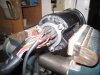
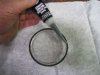
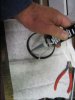
3. Remove the lens retainer and clear lens - My method is to cut the bottom of the metal ring with a Dremel tool. Spread open the ring and break the seal but careful not to bend the ring because it will be used for reassembly. Use a razor blade to cut the seal and remove the clear lens.

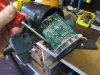
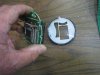
4. Remove the circuit board from the housing - Remove the 3 screws on the rear grommet retainer and push grommet into the housing. Be gentle on the circuit board, it should slide out easy.

5. Remove the LCD circuit board from the main circuit board - remove the 2 screws and un-plug the round LCD board.

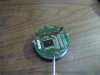
6. Remove the front LCD printed template from the LCD circuit board - Unscrew the 4 screws on the LCD circuit board

www.seadooforum.com/attachment.php?attachmentid=6484&stc=1&d=1296534343
Repair Sea doo 96 GSX Info Center (IC) with a burned LCD polarized film
All LCD screens have a polarizing film on top of the screen. In laymen's terms it darkens the image giving it clarity. One place to purchase this film is from "Aflash Photonics" in Texas. http://www.polarization.com/polarshop/ . For our purpose the film comes in a 10"x6" sheet , hard coated, anti glare with a adhesive back for $31 (Jan 2011), shipping included. Enough to do 8 or more gauges.
Know this film:
• There is a top and bottom of the polarizing film. Both sides of the film has a protective sheet that eventually is removed. One side of the polarizing film is the sticky side and the other is not. It's best to check a corner of the sheet and determine which side of the film has the adhesive, and put a mark to indicate the top of the Polarizing film.
Procedures;
1. Set up - If you've never done this before it's best practice to mark or number the connectors so there is no guess work when re-plugging back together.
2. Unplug all your connectors and remove the IC gauge and the tach gauge from the hatch cover - The IC and tach gauge is held on by the rubber grommet. Just pry the IC out with a screwdriver. Removing both gauges will make it easier to position the film latter. Make a mark on the bottom of the housing for reference.
3. Remove the lens retainer and clear lens - My method is to cut the bottom of the metal ring with a Dremel tool. Spread open the ring and break the seal but careful not to bend the ring because it will be used for reassembly. Use a razor blade to cut the seal and remove the clear lens.
4. Remove the circuit board from the housing - Remove the 3 screws on the rear grommet retainer and push grommet into the housing. Be gentle on the circuit board, it should slide out easy.
5. Remove the LCD circuit board from the main circuit board - remove the 2 screws and un-plug the round LCD board.
6. Remove the front LCD printed template from the LCD circuit board - Unscrew the 4 screws on the LCD circuit board
www.seadooforum.com/attachment.php?attachmentid=6484&stc=1&d=1296534343