• This site contains eBay affiliate links for which Sea-Doo Forum may be compensated.

Flywheel removal troubles

Status
Not open for further replies.

Triorieel

New Member
I have never had to remove a flywheel before, and this is seeming challenging.

I had to buy bolts at the store for my puller, you can see they are stressed out in the picture and I'm to afraid to go tighter as they may snap (although its pretty tight as is).
I heated up the flywheel to 170'C (340'F) with a heat gun. Not sure if I should be going hotter or not. I have a rag as a direct heat barrier to the fuel tank.

I have read and seen videos of people describing these things going 'pop' and flying with great speed (incase you were wondering about the wood and styrofoam)...

I have also tried nicely tapping stuff with a metal hammer hoping it will pop.

Any ideas?

20170720_143642_HDR[1].jpg
 
I put on new bolts and double stacked 1 inch washers...I have still banana'd them. I'm a pretty strong guy and I can't tighten the big bolt on the puller anymore. Is this normal to be so difficult?

All this to replace the bendix....
 
Last edited by a moderator:
Would you by chance know the threading on the flywheel? Maybe I can get a big nut at brafasco and weld together something so I can have the seadoo for this weekend.
 
I started to pull my flywheel last weekend... it wouldn't move, I tried pulling the rotor and that wouldn't move either. I left them alone and reassembled. I was worried about overheating the shaft and melting the lip seal on the crank.
 
I've always used the puller that chester posted up and never had an issue with one taking a flight across the garage but after watching the video I always remembered to not be sitting there with my nad's exposed, so I always am on the side just in case.

292.jpg


If anyone hasn't had a chance to see the "flying flywheel" video on youtube, its posted below, warning language is NSFW the dude drops about 40 F'Bombs in a row starting at the 2 minute mark... I watch this about once a year just for the giggles.

[video=youtube;Vs614yePjag]https://www.youtube.com/watch?v=Vs614yePjag[/video]
 
Last edited by a moderator:
For me to have it running for this weekend, I had to drive the seadoo an hour away to get someone to pop off the flywheel. They used the correct tool as mentioned and it came off without any issues. I will be buying one of those tools (I might get the ebay version, will have to shop around first).

As a side note:
I also mentioned I was going to replace the wear ring, the mechanic looked and laughed because I have the original brass ring. He said to also remove the washers behind the pump. He couldn't remember why the brass rings were supposed to be replaced. I just look at it as its probably going to be a tougher job to take out then tearing apart the plastic one.

I am now reassembling the engine and then doing wear ring and new impeller next.
 
The mechanic is an idiot. Seadoo's never came with a "brass" wearing. There is a brass pump but they all use the rubber/fiberglass wear ring. Also no clue what washers he is talking about.

But glad you got the flywheel off.
 
What is the temperature you guys heat the flywheel? if the only issues is loctite that melts 200ish. Being a machinist, I pull a lot of stuff apart. There are many tricks. I made a puller for my engine and got a pretty good strain on it but... I didn't like pushing on the end of the shaft. Looked to me like it was pretty much "Nature Welded" (rusted/corroded/stuck) I was working in the engine compartment so that hampered my access a bit. I was proud of myself in "knowing when to quit" :) I didn't need to take them off, but taking them off would have made clean up easier. Plus I was pulling on three rotor mounting bolts. :)
 
Last edited by a moderator:
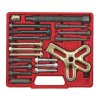
I am not sure what tool you made, but the proper tool worked great. Worked much better then this kind:
27187nopkg.jpg

Heat wasn't even used with the proper tool.
 

Attachments

  • IMG_1089.jpg
    IMG_1089.jpg
    7 KB · Views: 68
I'm still trying to figure out "Why the loctite"? Generally on any tapered fit you use no lubrication and clean the fit as best you can making sure no high spots or dirt. A good taper locks in. Unless they want the loctite on there to prevent corrosion and make it easier to remove from that respect. I don't get it. LOL

Yes my puller was a flange with 3 holes that matched up with 3 of the bolt holes that mount the rotor to the flywheel. I made the puller from a flywheel off a Suzuki SV650. :) I have a lathe at home. That was the quickest thing for me to do. I agree with using the proper puller. There is more stretch and you really can't focus the power as easily with the proper tool.
 
Not only does the taper lock in...but it also has a key. But yes, it did look like there was loctite on the connection.

It cost me to take it somewhere else, but by this point I lost a whole day trying to get the darn thing off.
 
What is the temperature you guys heat the flywheel? if the only issues is loctite that melts 200ish. Being a machinist, I pull a lot of stuff apart. There are many tricks. I made a puller for my engine and got a pretty good strain on it but... I didn't like pushing on the end of the shaft. Looked to me like it was pretty much "Nature Welded" (rusted/corroded/stuck) I was working in the engine compartment so that hampered my access a bit. I was proud of myself in "knowing when to quit" :) I didn't need to take them off, but taking them off would have made clean up easier. Plus I was pulling on three rotor mounting bolts. :)

Don't use heat, just use the proper tool.

Chester
 
I read somewhere and saw in a video where heat was applied and I can understand melting the loctite. Heat can be a problem if not done correctly it will actually make the part more difficult to remove. You want the part to grow in a direction "away" from the fit so you heat the outside diameter first. I've fought many a fit and the proper tool, while being the best choice, doesn't always get the job done. Seems most of the crap I do is... "Stuck" and I have to use every trick in the book and sometimes that doesn't work.

Had I continued, I could have pulled the threads out of the flywheel then had to remove the engine, and definitely get the flywheel off and repair or replace. I congratulate myself for not being so hard-headed as to continue. I didn't bend break or deform anything and while it was a lot of time spent... I am happy with the outcome. If I ever have to remove that flywheel on my GTX, the engine will come out because it will be serious. :)

Also of note is the small diameter of the end of the crankshaft on the GTX (where the oil pump drive fits). You can only put so much pressure on that before you deform the fit. I'm not sure if the recommended tool pushes in the area but again the proper tool is always the best choice. Anyone know how much the tool costs?
 
Last edited by a moderator:
I can 't buy a tool that I can make... it stands against my principles.
That's like letting someone kiss my girlfriend for me. :)
 
The mechanic is an idiot. Seadoo's never came with a "brass" wearing. There is a brass pump but they all use the rubber/fiberglass wear ring. Also no clue what washers he is talking about.

But glad you got the flywheel off.

Actually you are wrong here, the early GTX ltd's did come with a brass pump with no plastic wear ring, all brass I would not know this if I had not seen one and held it in my hand but it does exist.
 
Actually you are wrong here, the early GTX ltd's did come with a brass pump with no plastic wear ring, all brass I would not know this if I had not seen one and held it in my hand but it does exist.

I had to hold off on my wear ring today. Before I start, I just want to make sure I'm not going to run into any issues, removing it and installing a plastic one? Or maybe just install my new impeller in the brass wear ring and hope the cavitation was from the old impeller?
 
I can 't buy a tool that I can make... it stands against my principles.
That's like letting someone kiss my girlfriend for me. :)

I hear you, I have a mill and a lathe at home. But for $25 shipped to my house????? I think my time is worth about $35 per hour on the light side. I can't make that tool in an hour, so......I'd just be wasting money by trying to save money and making it myself. Sometimes it doesn't pay to get dirty, principals or no principals. I actually have the BRP version so I spent $55 but that was probably 15 years ago, It would still cost me more than $55 to make just one. The first pop is worth all the kitty.

http://www.ebay.com/itm/Seadoo-PWC-...ash=item419ab83b52:g:BB8AAOSwMzVTxBzD&vxp=mtr
 
This site contains eBay affiliate links for which Sea-Doo Forum may be compensated.
Actually you are wrong here, the early GTX ltd's did come with a brass pump with no plastic wear ring, all brass I would not know this if I had not seen one and held it in my hand but it does exist.

Wow! That's a new one to me. Guess I am the idiot. Learn something new everyday. It looks like it uses an o-ring between the insert and pump too. That thing must be the biggest pain in the ass to remove and install.
 
Last edited by a moderator:
I hear you, I have a mill and a lathe at home. But for $25 shipped to my house?????

I got time... IF I need to make a tool. I'll have the flywheel off before the box up the tool for shipping. I don't like having jobs waiting on parts unless it is necessary. Waiting 4 days for the next step is annoying when you are all caught up. Whatever works... $25 even $40 isn't a bad price if your time is valuable. I'm retired so... I got all day that save a few duckies and move the job along.

Good stuff.
 
Status
Not open for further replies.
Back
Top