Australian SeaDoo 1800 Rebuild/Restore

Status
Not open for further replies.

Aus1800

New Member
First of all G'day,

Love the Forum! Its already been a big help and inspiration.

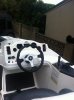
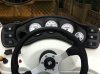
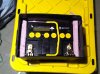
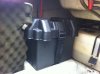
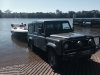
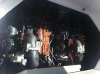
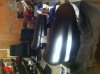
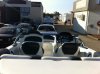
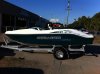
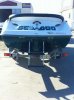
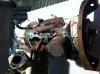
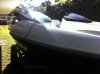
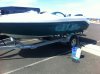
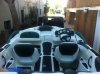
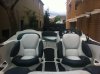
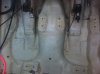
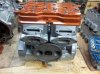
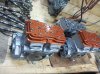
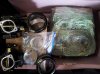
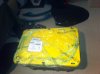
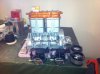
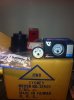
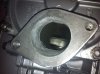
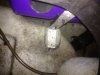
Bought the hull with water damaged engines for what feels like way too much but remember stuff down here coast more.

Pictures speak louder than words with things like this.
 

Attachments

  • $(KGrHqF,!oMFILv7NBkCBSFfHGFNMQ~~48_20.JPG
    $(KGrHqF,!oMFILv7NBkCBSFfHGFNMQ~~48_20.JPG
    99.5 KB · Views: 44
  • $(KGrHqF,!p8FIMs!+y+lBSFfHLf(Iw~~48_20.JPG
    $(KGrHqF,!p8FIMs!+y+lBSFfHLf(Iw~~48_20.JPG
    103.2 KB · Views: 41
  • $(KGrHqFHJBsFIE2jpzs2BSFfHMNi0g~~48_20.JPG
    $(KGrHqFHJBsFIE2jpzs2BSFfHMNi0g~~48_20.JPG
    105.1 KB · Views: 43
  • $(KGrHqJHJBoFIE5BfqcQBSFfHJhWR!~~48_20.JPG
    $(KGrHqJHJBoFIE5BfqcQBSFfHJhWR!~~48_20.JPG
    107.3 KB · Views: 44
  • $T2eC16V,!)!E9s2fB+wFBSFfHKUGrw~~48_20.JPG
    $T2eC16V,!)!E9s2fB+wFBSFfHKUGrw~~48_20.JPG
    37.6 KB · Views: 37
Last edited by a moderator:
The engines tells a very different story...

basically the boat was a bit of a Sh!t fight its a real shame i didn't do better before photos.

Broken windscreens
latches
gas struts gone
seats were ok but very dirty
missing parts all over the shop

unusable engines
drive shafts; Port might be ok the starboard looks like stick (will replace both)
Jet drives (unknown but might as well rebuild them)

thats just off the top of my head.
 

Attachments

  • IMG_1094.jpg
    IMG_1094.jpg
    428.2 KB · Views: 49
  • IMG_0986.jpg
    IMG_0986.jpg
    362.4 KB · Views: 37
  • IMG_0985.jpg
    IMG_0985.jpg
    387.4 KB · Views: 35
  • IMG_1037.jpg
    IMG_1037.jpg
    501.6 KB · Views: 38
Last edited by a moderator:
Making some progress. Since I don't have a garage I've turned my living room into one.
 

Attachments

  • IMG_1051.jpg
    IMG_1051.jpg
    496.4 KB · Views: 42
  • IMG_1057.jpg
    IMG_1057.jpg
    433.3 KB · Views: 46
  • IMG_1060.jpg
    IMG_1060.jpg
    579.1 KB · Views: 40
  • IMG_1091.jpg
    IMG_1091.jpg
    673.2 KB · Views: 38
  • IMG_1100.jpg
    IMG_1100.jpg
    653.6 KB · Views: 42
Engines

Had Some engines done in the US and shipped over.

From WaterCraft SC

2mm Over bore wiseco pistons. With rave valves.
New 40mm mikuni carbs with Jetting.
some intake work.

Fedexed to my door
 

Attachments

  • 20131002_164403.jpg
    20131002_164403.jpg
    814.6 KB · Views: 30
  • 20131004_171008 (1).jpg
    20131004_171008 (1).jpg
    860.8 KB · Views: 36
  • 20131008_171938.jpg
    20131008_171938.jpg
    673.5 KB · Views: 27
  • IMG_1155.jpg
    IMG_1155.jpg
    513.6 KB · Views: 28
  • IMG_1158.jpg
    IMG_1158.jpg
    515.5 KB · Views: 27
Last edited by a moderator:
Had Some engines done in the US and shipped over.

From WaterCraft SC

2mm Over bore wiseco pistons. With rave valves.
New 40mm mikuni carbs with Jetting
There was talk of some intake work but im not sure what was done.

Fedexed to my door

Will the name be "Double Trouble"?

I see you've been going on this long enough to know what needs doing, and moving right along....
 
alrighty!!! another Challenger 1800 build thread!:thumbsup:

Looks good! your moving right along there Mate!:cheers:

I`m really digging those front helm seats! are they stock?
 
Thanks man, I've been through yours a bunch of times- really nice work, wish i could have a place like yours to work on mine.
The seats are stock as far as i know its a 1997.
 
Intake work.

guess whats special ?
 

Attachments

  • IMG_1165.jpg
    IMG_1165.jpg
    627.3 KB · Views: 27
  • IMG_1219[1].jpg
    IMG_1219[1].jpg
    377.1 KB · Views: 19
Last edited by a moderator:
Hoping for some help.

In the process of cleaning my engine bay I noticed that the bracket for one of mufflers loose, so with out thinking I grabbed my rivet gun & smashed it in the old hole and fired a bigger rivet into what i thought was just fiberglass. After a hiss I thought that something wasn't right.

basically I think I've punctured the water box ?

might have sealed it with the rivet

Do I need to grind the fiberglass off and get what I assume is alloy under it welded up?

thoughts ?

any help would be appreciated.
 

Attachments

  • IMG_1161.JPG
    IMG_1161.JPG
    478.3 KB · Views: 31
Hoping for some help.

In the process of cleaning my engine bay I noticed that the bracket for one of mufflers loose, so with out thinking I grabbed my rivet gun & smashed it in the old hole and fired a bigger rivet into what i thought was just fiberglass. After a hiss I thought that something wasn't right.

basically I think I've punctured the water box ?

might have sealed it with the rivet

Do I need to grind the fiberglass off and get what I assume is alloy under it welded up?

thoughts ?

any help would be appreciated.

are you talking about the bracket to hull? I don`t see any worries with that.
 
Yeah the bracket at the back on the side above the drive shaft / jet drive.

To be honest I don't really understand how the water system works, I assume that it pressurizes in the drive ?
 
Really happy with WaterCraft SC so far, good work for a very reasonable price. But most of all the customer service was excellent.

Slowing moving foreword.
 

Attachments

  • IMG_1225[1].jpg
    IMG_1225[1].jpg
    448.5 KB · Views: 25
  • IMG_1222[1].jpg
    IMG_1222[1].jpg
    374.4 KB · Views: 25
  • IMG_1221[1].jpg
    IMG_1221[1].jpg
    672.6 KB · Views: 28
Great thread! Another 1800 build. Looking forward to seeing the engines installed.
You going to install after market fuel pumps? :)
 
Cup/Drink holders
Painted handles
New wheel

Really needs a clean.
 

Attachments

  • IMG_1239.jpg
    IMG_1239.jpg
    466.9 KB · Views: 29
  • IMG_1240.jpg
    IMG_1240.jpg
    409.7 KB · Views: 33
I like that new wheel, please tell me more? is it a Grant wheel? is there an adapter? any part numbers and where did you find it?

Thanks buddy!
 
I like that new wheel, please tell me more? is it a Grant wheel? is there an adapter? any part numbers and where did you find it?

Thanks buddy!
Nope didn't need a boss kit or adapter, the wheel is as follows.
https://www.whitworths.com.au/main_...intAbsolutePage=1&LinkedItem=82087&search123=

These are the cup holders. They didn't need glue that's how tight of a fit they are, I hit them down with a nylon mallet. Really happy with them.
http://www.ebay.com.au/itm/281148380607?ssPageName=STRK:MEWNX:IT&_trksid=p3984.m1497.l2649

I'll add links from now on with parts as its a pain in the ass when you end up with the wrong ones, as I found with the fuel gauge that I just got.
 
Last edited by a moderator:
Still working on it.

When I replaced the gas struts I took them in to the auto shop & did what any red blooded guy would do- got the biggest ones, now when i pull the release it pops up by it's self. I saw a few post with people complaining about needing two people to do it.

http://www.youtube.com/watch?v=UcpGxy3s6hg&feature=youtu.be
 

Attachments

  • IMG_1255.jpg
    IMG_1255.jpg
    413 KB · Views: 19
  • IMG_1260.jpg
    IMG_1260.jpg
    509 KB · Views: 22
  • image (5).jpg
    image (5).jpg
    97.9 KB · Views: 21
  • IMG_1262.jpg
    IMG_1262.jpg
    530.7 KB · Views: 21
  • IMG_1263.jpg
    IMG_1263.jpg
    563 KB · Views: 19
Last edited by a moderator:
Baby steps.

Baby steps,

Engines are in and running.
New beeper.
battier Isolate switch.
new fuel gauge.
L.E.D lights.
 

Attachments

  • IMG_1508.JPG
    IMG_1508.JPG
    431.8 KB · Views: 20
  • IMG_1510.jpg
    IMG_1510.jpg
    462 KB · Views: 22
  • IMG_1521.jpg
    IMG_1521.jpg
    570.7 KB · Views: 18
  • IMG_1528.jpg
    IMG_1528.jpg
    642.8 KB · Views: 18
  • IMG_1529.jpg
    IMG_1529.jpg
    420.7 KB · Views: 21
Status
Not open for further replies.
Back
Top