I’m not super confident in my measuring capabilities when it comes to measuring the pistons, to much to have to worry about, up/down, side/side finding the largest measurement. Anyways assuming the number on top of the piston is actually 81.90, not 100 percent sure as the last did it is hard to see them piston to cylinder wall clearance would be PTO .0156 and Mag .0116 which puts me past the wear limit of .008 by .003 and .007. I seen in the manual the top of that piston said 91.94, I will go clean the top off the other piston and see if I can see it better.
-
This site contains eBay affiliate links for which Sea-Doo Forum may be compensated.
You are using an out of date browser. It may not display this or other websites correctly.
You should upgrade or use an alternative browser.
You should upgrade or use an alternative browser.
98 Challenger Project
- Thread starter burtshaver2021
- Start date
Doesn't matter what it says, measurement matters. Measure the piston skirt at the bottom. I think max is .008" I mic everything but generally they always get new pistons and a complete top end. I've only taken one engine apart that was in spec and it was at the very top of the spec. Most are are one our two thousands over. Easy for me to get them bored so that's not a problem. I have a hone which after you bore you need to hone. 
I'm concerned with your bottom end. If there was goop in there, it's in the crank bearings especially the rods. You need to clear that out. As long as there is no damage already begun. I've saved a few engines long term by repeated flushing and soak in oil. Never removed the crank on those but took my time and let them soak a few days in oil. After you flush it you can rotate the crank and listen, feel if it is OK. Then put oil in there rotate and let it sit and keep working it then flush it again... then fill with oil and soak it. dump the oil out, blow it out and fire it up. Good Luck
I'm concerned with your bottom end. If there was goop in there, it's in the crank bearings especially the rods. You need to clear that out. As long as there is no damage already begun. I've saved a few engines long term by repeated flushing and soak in oil. Never removed the crank on those but took my time and let them soak a few days in oil. After you flush it you can rotate the crank and listen, feel if it is OK. Then put oil in there rotate and let it sit and keep working it then flush it again... then fill with oil and soak it. dump the oil out, blow it out and fire it up.
Thank you for the advice. The jelly like stuff was in the cooling jackets of the cylinders not the crankcase, Even the water supply fitting on the cylinder cover was plugged with it, not sure what it is. I‘be hot w couple things rolling around in my head, no of which are brains. Those are standard bore pistons, except for ring end gap, everything is within spec. There’s a bit of wear on the PTO cylinder but still within Spec and the Mag cylinder is near the top end of the spectrum in Spec so I’m debating whether to just hone them and instal new standard pistons and rings or just have them bored 1 size over. Another thing I noticed is there doesn’t seem to be any chamfer on the ports, I’m not experienced enough to know for sure, but they seem to be pretty sharp edges on them. I don’t have any doubt that the motor would be healthy with a hone and new pistons and rings, I try not to be a hack but when there within spec it hard to spend the money if not needed. If they were out of spec. I would definitely be getting them bored. I think I will look over the measurements again to double check and call Hurricane Performance who is a local shop here and see what they would charge for a bore and hone and just a hone, that may help me decide. I’ve been looking up about honing on the internet and there’s a few guys I’ve came across that really seam to know what they are doing, they are going up one size with a course hone on a drill press, can’t remember what that type of hone is called but.... not sure vin going to get one, but at least going to do a bit of research, I’ve also seen the fine grit ball hones to finish up with, and chamfering bc the ports with a diamond bit on a dremel first, ball hone de burrs the chamfer. No the crank looks great, not a spec of rust, no discolouration, inner and outer seals are good, axial play is good, no movement or noise so I’m pretty confident it’s good. I will give it all some thought, I’m in big rush, as long as it’s on the water by September 5th,  I so appreciate the advice, I’m going to flush that crank out with some 2 stroke oil and lightly blow it out. I always dump a whole bunch of oil in them when I first get them, if they are going to sit for awhile till I get to them, so it had lots of lubrication down there. On another note, what’s your plans for that speedster? Is it a keeper?
I’ve been sitting here going over the measurements I took and I messed up on my piston to cylinder wall clearance. First of all, I was having difficulty measuring the pistons, probably just lack of experience and I find measuring those cylindrical objects a pain in the ass, I must have not quite been square because I measured my pto piston at 3.240 and mag piston at 3.236 when the standard size of them is 3.2244, so unless they are gaining weight I wasn’t quite perpendicular to it. Will
try again, anyways the manual says if there is any wear to the pistons at all, to replace them so to get the piston to cylinder wall clearance the manual says to subtract the standard piston size of 3.2244 from the measurement of the cylinder on the thrust side down 5/8”. . My piston to cylinder wall clearance on pto is .0066 and .0036 on the mag side which is 10th of a thousandth of an inch smaller than new, but I think measuring that small I’m bound to be off by a couple 10ths of a thousandths. The manual specs are .0036 to .0044 new and wear limit is .008 .
try again, anyways the manual says if there is any wear to the pistons at all, to replace them so to get the piston to cylinder wall clearance the manual says to subtract the standard piston size of 3.2244 from the measurement of the cylinder on the thrust side down 5/8”. . My piston to cylinder wall clearance on pto is .0066 and .0036 on the mag side which is 10th of a thousandth of an inch smaller than new, but I think measuring that small I’m bound to be off by a couple 10ths of a thousandths. The manual specs are .0036 to .0044 new and wear limit is .008 .
That .0066 is getting pretty close to the .008?
Nah... that's fine.That .0066 is getting pretty close to the .008?
I'm trying to imagine where you are measuring the pistons. The skirt size is very important, at the bottom of the piston. That is the only place we measured the pistons back in the day.
The hone is not a big deal at all. You are only breaking the glaze on the cylinder walls to help the new rings seat. After we bore cylinder I spend about 2 minutes with the hone. Gotta be careful also because a good hone will take material off the cylinder wall pretty quick. You cylinders seem to be in good shape by your description.
I'd get a small file set and put a chamfer on the ports. They should not be sharp. Take your time. It isn't difficult. Good Luck !!
I’m measuring the pistons up about 1 inch from the end of the skirt. I’ve been looking up these ball hones, From what I’m reading I think I need the silicon carbide? Not sure what grit to get? 240 be good? Would I actually be making new cross hatching or am I just de glazing the cylinder? I’ve read that you can de glaze them with a scotchbrite pad? And the size of home? It’s a 82mm bore (3.228) do I find the next size up from this? Actually would you mind just coming up here to Canada and honing this for me, might be easier for you than answering 10,001 questions. I will do a little more research this weekend before ordering a hone. I appreciate your opinion. Thank you
Yep, I've deglazed using 120 grit emery. Go in at a 45 degree in both directions and you are making the cross-hatch. Even a hone doesn't do good cross-hatch. All we do is move the hone quickly through the bore a few times at the end of the process. When my friend bores cylinders, and he has been doing that for 50 years, he hones them for about 15 seconds. He has a pan where the cylinder is submerged in diesel. Places the cylinder in there and does the honing procedure. Basically just removing tool marks on a fresh bore and making the surface finish more uniform.
Personally I believe you are fun where you are on the cylinders. The danger of a hone is that it removes material. You are only (.0014") from wear limit. A hone may take out (.005") Hones cost money and you don't need to spend it. I've seen where shops charge $20 for a hone job. Basically that is the cost for not having to purchase the tool. Emery paper will do fine and the engine will not know the difference. You'll cut your hand on the outside edge of your little finger when working the emery paper. Let me know how that feels.

Good Luck !!
Personally I believe you are fun where you are on the cylinders. The danger of a hone is that it removes material. You are only (.0014") from wear limit. A hone may take out (.005") Hones cost money and you don't need to spend it. I've seen where shops charge $20 for a hone job. Basically that is the cost for not having to purchase the tool. Emery paper will do fine and the engine will not know the difference. You'll cut your hand on the outside edge of your little finger when working the emery paper. Let me know how that feels.
Good Luck !!
Thank you, the one video I seen where the guy looked very knowledgeable he had a set up that was pumping ATF over his work while honing. Ok, good to know, I didn’t realize a ball hone would take off that much material .005, I was expecting it to be more in the .001 neighborhood if that but with never doing it... how would I know. So I want to make sure I get this straight, right now I see no cross hatching, if I go at it with some 120 grit emery paper will the criss hatching become visible again? Would I be creating new cross hatching with the emery paper or simply just making the cross hatching that is there re appear by de glazing it? Would I be using that emery cloth dry or keep it wet with diesel or atf fluid? I’m assuming wet but don’t know? If I chamfer the ports will the emery cloth de burr the chamfers? I will also try and find some videos and information online before I do anything to them, I just want to know exactly what I’m doing before I start so I don’t damage anything.
Hurricane Performance Canada Inc | Prescott ON
So I called Hurricane Performance in Prescott Ontario today and was explaining to David the owner the situation and my measurement with this motor, I offered to pay for his advice but he said the it was free. I understand the work he must of put in to operate this business so it’s much appreciated. Dave instructed me to chamfer those ports with a file and hone with a 180 grit ball hone, after asking him a couple more questions, he said bring them on up and he would put some cross hatching on for me, I think he means for free but if I’m paying that’s of course perfectly fine and expected. There will be a tip either way. He said if everything is in spec to just re ring it. I explained about being 1.5 thousandths from the wear limit and he said your still within spec and the honing will be unmeasurable (not take off a measurable amount of the cylinder wall ) . Peoples willingness to help really makes me feel good.
So I called Hurricane Performance in Prescott Ontario today and was explaining to David the owner the situation and my measurement with this motor, I offered to pay for his advice but he said the it was free. I understand the work he must of put in to operate this business so it’s much appreciated. Dave instructed me to chamfer those ports with a file and hone with a 180 grit ball hone, after asking him a couple more questions, he said bring them on up and he would put some cross hatching on for me, I think he means for free but if I’m paying that’s of course perfectly fine and expected. There will be a tip either way. He said if everything is in spec to just re ring it. I explained about being 1.5 thousandths from the wear limit and he said your still within spec and the honing will be unmeasurable (not take off a measurable amount of the cylinder wall ) . Peoples willingness to help really makes me feel good.
Any recommendations on where to purchase files for creating the chamfer? What course of file? I’m not overly familiar with files, only really ever used files for sharpening chainsaw chains. I will see what I can find online as for what type of file I should be using.
Sandman251
Well-Known Member
Following your story. They can always get interesting. One thing, and maybe somebody touched on this already, but I think the boat you have there is a 2000, not a 1998. To my knowledge the only 14.5 footer Sea-Doo made in 98 was the last of the Sportster singles. Just concerned that some of the parts might be slightly different. One way to check for sure, regardless of the title, is to check the hull identification number plate. It's located on the starboard side under the swim platform. I think by then, they were using black plastic plates. The last two numbers are your year.
I appreciate you following along, definitely more fun with people if the same likes and interests to share with and the more heads the better. I originally thought it may be a 2000 as well but once I got to pick up the boat the hin tag did say it’s a 98, also I have downloaded the manual and my boat is in the 98 manual with the twin 717 motors. I will double check on this though just to be sure. Today I went up to Hurricane Performance with my crankcase which still has the pistons attached to it, and my cylinders. I had spoke to Dave the owner from there last week, went over my measurements quickly over the phone and wanted his opinion on whether to bore or just re ring it. I was a little worried about what I thought could have been a scratch on the piston and cylinder wall so I took everything up to him today, he said they feel fine, which makes me feel better as I have so little experience. He mentioned that it’s to bad I hadn’t already filed down the ports to create a chamfer, he would have honed them right then and there. Anyways he verified that carbon steel files would work fine, didn’t need diamond files. I extremely grateful to have Dave from Hurricane and @etemplet here on the forum guiding me through parts of this project. Starboard compression is 150 and 140 so I’m going take that starboard engine out so I can pressure test crankcase, rotary valve and cooling system, put this Port engine back together once I get the ports chamfered, honed and new rings. Go through the fuel system, fix that reverse gate and then the rest will be just a lot of cleaning and paint up those engines.Following your story. They can always get interesting. One thing, and maybe somebody touched on this already, but I think the boat you have there is a 2000, not a 1998. To my knowledge the only 14.5 footer Sea-Doo made in 98 was the last of the Sportster singles. Just concerned that some of the parts might be slightly different. One way to check for sure, regardless of the title, is to check the hull identification number plate. It's located on the starboard side under the swim platform. I think by then, they were using black plastic plates. The last two numbers are your year.
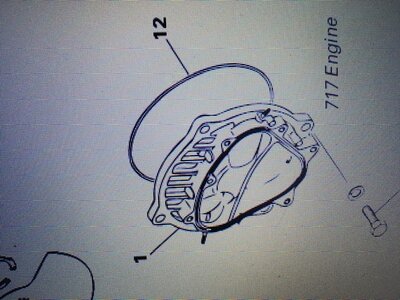
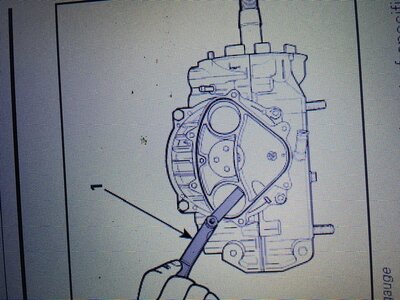
Just wanted to verify, when checking the rotary valve to cover clearance I remove the cover #1 in the first picture, remove the oring #12, reinstall the cover #1, torque the cover down to 15 pounds and then check the clearance between the valve and cover with a 45 degree feeler gauge as in the second picture.? I don’t ever need to remove the rotary valve itself? Just want to double check before I go ahead and check this. I would have thought I was supposed to do it as the engine airs now with the covers oring still in place, but the manual says to take it off first
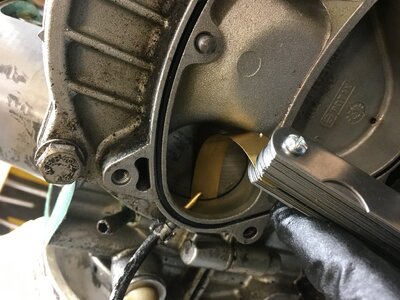
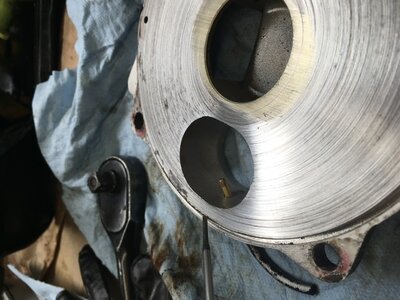
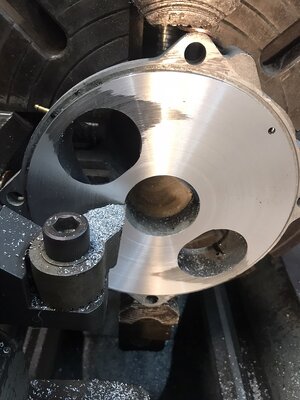
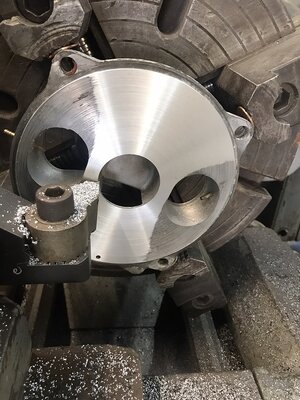
I checked the rotary valve clearance today on the port engine, of course I couldn’t wait till I ordered some 45 degree angled feeler gauges so I bent the feeler gauges I had best I could, I wish I would have just waited to order the right feeler gauges as I worry the pressure I applied to the rotary valve may have bent it? After taking the rotary valve I see it sits pretty tight against the case so I may not have? Thoughts? Anyways the clearance needs to be in the .010 to .014 range and If I’m remembering correctly i was able to get a .014 gauge in there, I didn’t want to try a thicker gauge because the thicker they are the harder they are to bend and again I was worried about damaging or scratching the valve. I’m sure with the proper gauge I would have been able to get at least a .016 in there. It was worst on the outside. I also noticed that there was a protruding groove around the perimeter of the cover, higher closer to the ports, so I’m guessing the valve has worn the cover and this protruding groove around the perimeter is how high the material on the cover used to be till it got worn down by the valve. I was wondering what people’s opinions were, SBT there’s a fellow Tony Peila I believe that’s on a Facebook group that does this and my preference @etemplet , would you be interested in machining this flat for me? Also, should I order a new valve? I’m going to take t he starboard engine out and check that one too before I mail it anywhere.
Not sure why this picture is here again.... I guess I will be needing a top dead Center gauge, I’ve seen people find it with a pencil in the cylinder, but it would drive me crazy worrying if I actually got it correctly at TDC, any suggestions when purchasing one? I’m thinking if possible I would like one that can multi task, if not, that’s fine too
This should give you a good look at how they wear. The shiny inside section is where the tool touched. That meant I had to remove more material. You can see how it cleaned up. I use solder to check for proper clearance. (.032") I've run (.017") with no issues at all. I've seen some pretty bent of valves as well. Put a straight edge across the RV cover and then put a feeler gauge under the straight edge to give you and idea of the amount of wear. I have a lathe so I machine my own stuff.
Attachments
Nice work, I didn’t get an accurate measurement because I couldn’t bend any gauge past .014 without permanently creasing the gauge but my guess would be about .017 of clearance by the ports, you can see in my one picture a lip that was left around the outside of the cover. I figure it’s probably a good idea to take care of this now while the engine is out and she’s not running anyways. I’m hoping to get many years of enjoyment out of this girl so.....
BrianMoore
Member
Solder and a micrometer are easy and accurate at this point. The protruding groove around the perimeter is the original surface.
I had a dial indicator and a magnetic base to find TDC. You can come practically as close with a screwdriver or pencil. Whatever you use mark where it is on either side of TDC when the piston is moving quite a bit then divide by two. I think my marks were a couple inches or so either side of TDC.
I had a dial indicator and a magnetic base to find TDC. You can come practically as close with a screwdriver or pencil. Whatever you use mark where it is on either side of TDC when the piston is moving quite a bit then divide by two. I think my marks were a couple inches or so either side of TDC.
I picked up my OSD marine order today, I was looking forward to setting the new rings I got for the PTO piston for the Port Engine, Witj the old rings the ring end gap was .054” for the rectangular ring and over .090” for the L ring. With the new rings ring end gap measured .023” for the rectangular and .026 for the L ring. New is .010 to .016 and wear limit is .039” so I’m happy with the results of the new rings, it also corroborates my cylinder measurements. Not sure why I didn’t order 2 sets of rings as the mag cylinder ring end gap was .044” and .064” oddly that Mag Cylinder had 150 pounds of compression. Maybe there was still some oil left in there that gave me a false high reading,
General PDP Template
So I can feel a little bit of a ridge at the top of the one cylinder, i was going to purchase this ridge reamer but wanted to check here first in case I’m wasting my money.
So I can feel a little bit of a ridge at the top of the one cylinder, i was going to purchase this ridge reamer but wanted to check here first in case I’m wasting my money.
Similar threads
- Replies
- 0
- Views
- 117
- Replies
- 0
- Views
- 104
- Replies
- 4
- Views
- 413
- Replies
- 2
- Views
- 284
Share:


