• This site contains eBay affiliate links for which Sea-Doo Forum may be compensated.

'95 GTX impeller bearing replacement (was: how to static test?)

Status
Not open for further replies.
IF you are doing new bearings it is a good idea to replace the shaft.

Yes, the shaft has a groove in it. You have to be really careful the thrust bearing doesn't get caught in the grove and crushed when putting the impeller on.

The easiest way to do it correctly is to put the new shaft in the vice then put everything over the stationary shaft and finally torque the impeller on.
 
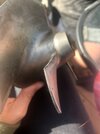
About the impeller itself: What is the received wisdom on dealing with damage to the leading edge? I'm talking about small (<1mm) nicks and folds. Should they be dressed smooth?
 
While you are in there. Does it have a wear ring and if so how does it look? Order one that is made of Delrin. Looks like cutting board material
 
Its nothing,,,take a cold file and going along the angle of the blade,,both sides,,,file off the rough edges,,,then take the file and file along the top flat edge so that is flat,,,no irregularities,,,do not file along the curved edge of the prop that rotates along the wear ring.
 
I'm finally getting to the pump rebuild on this thing, and have a really quick question.

When the seal is pressed in after the needle bearing, the book of words specifies packing it with "synthetic grease p/n 293 550 010". What (commonly available grease, I hope) should I be using here?
 
Found the Lucas locally, thanks. Now that I'm looking at the seal, it appears that "packing" means just a little teeny smidge in the groove, because the needle bearings are bathed in oil. Do I have that right?
 
Okay, cool. Now, about that Permatex 518 - it calls for their surface prep stuff. I've used 515 when assembling Subaru engine halves, camshaft bearing seals, etc., and though it specifies the prep too,
I've never used it and never had a problem. So can I get away without it on 518 as well, assuming a
good degreasing?
 
Thanks, and I appreciate your patience as I work through this for the first time.

Now that I'm actually assembling it, everything's going smoothly - almost. I pressed in the two roller bearings to the specified depths without any problem and followed them with the seal. But the new shaft (actually a used one, bought online) didn't slide freely into the bearings - it took some moderate tapping. Now that it's in place, it rotates nicely, but the bearings are too tight to allow for the required end play (.54mm/.021"). What's your take on this?
 
Last edited:
Figured it's time for an update - it's been a mess of a summer, but we got this ride on the water.

I rebuilt the impeller using the available kit, but something wasn't right - the shaft turned, but wouldn't spin freely and there was zero endplay, which was obviously bad. A mech eng buddy - compressor specialist - came out and took a look and we pulled it all apart again. Turned out the part I hadn't caught was that the housing core, where the needle bearings press in, had (very small) bumps in it, presumably somehow caused by the previous dry failure. Those pushed the needle bearings in just far enough to squeeze the shaft. Emery-papered those down, reassembled, and found there was now too much end play, caused by wear on the housing core face where the thrust washer sits. This being a battlefield repair situation, I cut a 1mm Al shim matching the washer, put it between the housing and the washer, and got the end play Close Enough. My logic was that the (soft) Al would bed into the damaged brass (?) face and not spin. We ran it for a few days this week and things seem okay, though ultimately I'd like to have that face machined flat again as the basis for a more proper fix.

So I'm reasonably happy with it - it's a learning curve. Now on to...
 
Status
Not open for further replies.
Back
Top