• This site contains eBay affiliate links for which Sea-Doo Forum may be compensated.

2000 Seadoo GTI - Crank Damage?

Status
Not open for further replies.
You never know what you're getting when You buy a used engine and most cost within a couple hundreded of rebuilt. $700 VS $900 and you're not rolling the dice. But try finding an engine right now.
 
Last edited:
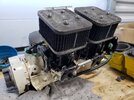
Cases are trash, crank is trash, rotary drive is trashed, pistons trashed.

Tough luck on that one.
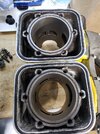
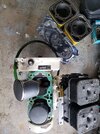
If I replace the bottom end entirely, do you think the cylinder walls can just be honed to clean them up and then replace the pistons? Doesn't seem like they are terrible to me, but I'm new to this..
 
Nope, cylinders need to be bored oversized and new oversized pistons installed.

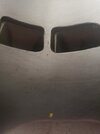
Okay, why is this necessary? I don't have any scratches or gouges in my cyl walls, surprisingly. All I have is a slight bit of smooth surface rusting going on the top quarter of 1 cyl. Shouldn't a ball hone be able to remove that and smooth it out? I know it probably won't be perfect, but should be close enough right?

Just trying to learn and understand the reasoning behind your suggestions.
 
Your pistons have scoring that have already started transferring aluminum to the cylinders and that will only get worse.
The rust will cause micro pitting on the cylinder walls that will not allow the rings to seal properly. Both of these situations on the cylinder walls can't be fixed by a simple hone.

I would guess if you measured the cylinders with a bore gauge they would be out of spec also.
 
Ok, thank you for the explanation. Makes sense now.

I may have a solid, full rebuilt motor lined up. I'm hoping to be able to go pick it up tomorrow. If it's as good as it sounds that is...
 
Keep us updated
I don’t post a lot but love following along and learning thru these threads from guys like midymac, etemplet and the other knowledgeable guys who always post to help out us new guys.
 
Keep us updated
I don’t post a lot but love following along and learning thru these threads from guys like midymac, etemplet and the other knowledgeable guys who always post to help out us new guys.
100% agree. I am constantly on threads reading and absorbing wisdom from experienced individuals. I feel that I'm pretty decently mechanical and capable of a ton, but I definitely don't know the ins/outs of this type of work by any means.

Learned a ton in the past 2 weeks alone about all of this!
 
All good but no matter how much you know are think you know... these skis will give a real azz whippin wake up call. That shoe? One size fits all but that is the fun part. The one thing I ask most people that are having problems, "Did you change the spark plugs?" I have a friend, both skis not running right. He even made a video with the throttle wide open talking about how it wouldn't go. Engine wasn't broken in yet and we mixed extra oil in the fuel. It's gonna foul spark plugs. LOL Sometimes I think of this proposition. "I'll fix your ski for free if it's broken and if it is the spark plugs I get to kick you squah in the nuts and you can't block." Bawaaheeehaaa !!! I wonder how many would take me up on that? I couldn't do it but I'd find a man hatin woman to do it. LOL She might pay me to let her. :D
 
So many things respond with "Ouch...." to in that post...

After 30+ calls, days of looking, 350miles/6hrs driving and $600 later, Guess what I found?! :D

Now, I have more questions though...

- Any suggested ring compression techniques without the tool? To get the jugs back on over the pistons.

- How do I adjust for and check the squish gap? I only have the gasket that came in that kit he gave me. I dont want to be smacking the piston into the head.... what happens if you have too much gap? Not enough compression/detonation?

- Any alignment/shim techniques without either of the shims or tool? How important is this?

- No oil pump... So for now until I get some and install them, what's the proper/best way to bypass them so that the rotary gear/valve aren't damaged?

- Do you need to run higher mix on new piston/rings, etc if so, how long to break in? Can drive like crazy, or do I have to baby it?d5c90986ef8b393b8c56498ac371cb5f.jpg633e00768e01d42faeee17a6d596a06c.jpg18d80515799bbc42bf4a82c8c2901054.jpg1a9cf7a2f569376a2a5ccab43680810a.jpg11a52b7a459e084e6180b153930ae258.jpg
 
Questions, questions, questions......

So used bottom end?
I would at least split the cases, check the bearings, rotary gear, rotary shaft and install new seals.

Is the topend new?

Are the cylinders freshly bored?
It doesn't look like the chamfered the ports at all or if so very little from the pictures which would be really bad.

There is no ring compressor, you align the ring gap over the locating pin and use your hands to compress the rings, takes practice.

You have to assemble the top end with no base gasket then measure squish to determine what base gasket to use then pull it all apart and install the correct gasket.

You have to align the cylinders using the exhaust manifold per the service manual.

You have to align the engine in the hull with the correct alignment tool.

Finally I see an sbt gasket kit so I assume SBT pistons? Who did the cylinder boring? Also not a fan of SBT gaskets.
 
This was a friend of a friend who knows a guy type of scenario. He bought this with the intention of using it in an HX hull and do some racing parts on it or something, never did. It sat in his automotive workshops' part room for in the corner for 5yrs. He bagged and fogged it before leaving it he said. The guy he got it from did the work. Said it was all ready to go and just needed a gasket set, etc.

Questions, questions, questions......

So used bottom end?
I would at least split the cases, check the bearings, rotary gear, rotary shaft and install new seals.

The guy I got it from said the previous guy had the bottom end rebuilt, new bearings and seals. I do want to take it apart and look into it as well, I'll post pics when I do.

What would you suggest pre-lubing it with prior to starting? Standard 2stroke pwc oil, or gear oil or something else?

Is the topend new?

Are the cylinders freshly bored?
It doesn't look like the chamfered the ports at all or if so very little from the pictures which would be really bad.

Cyl is supposed to be .5 over and new pistons/rings/bearings. Not sure if the ports have been chamfered, how can I tell and make sure it's done/good enough? How can I tell if it's been bored properly? Take some calipers and make sure they read .5 over?

There is no ring compressor, you align the ring gap over the locating pin and use your hands to compress the rings, takes practice.

Hmm, I could have sworn I saw one before. Something that holds them instead of your hand.. but that's fine, i can do it manually. The locating pin is the tiny notch inside the ring groove, correct?

You have to assemble the top end with no base gasket then measure squish to determine what base gasket to use then pull it all apart and install the correct gasket.

That's what I thought, the SBT gasket seems thinner, it has a thick green one on it already, guessing original? Seems decent condition, can be reused? No rips or anything. Can you run two of you need more gap?

You have to align the cylinders using the exhaust manifold per the service manual.

You have to align the engine in the hull with the correct alignment tool.

I do know of the cyl on the exhaust alignment, but I was asking about hull. No way to do so without the alignment tool? No one has ever done it without?

Finally I see an sbt gasket kit so I assume SBT pistons? Who did the cylinder boring? Also not a fan of SBT gaskets.

Rings are sbt so I'm guessing pistons are too. No idea who did the boring. Everyone seems to either love or hate on SBT... not sure what to think about them at this point...

I'd venture as far as to say that an SBT setup is still better than my messed up setup regardless of their quality. bb050c637d63d8ddca0477d4b0d216ed.jpg
 
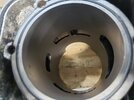
Looking at that last picture I see no chamfering at all and you will catch a ring if that is the case.

I don't know of anybody that would take apart a bottom end and install new seals and not remove the old base gasket for a thorough cleaning. I am suspicious anything was done with the bottom end.

You are going to have to find someone that does a lot of two stroke cylinders to check and do the chamfering if it hasn't been done correctly.

No, no way to align without the correct tool.

I hate to hear these stories and already feel for you. I really think you would have been better off passing on this engine but I hope you prove me wrong.

I see a lot of cylinders like this done by local automotive machine shops that have no experience with 2-stroke engines. They just bore them and give them back to the customer like a regular 4-stroke engine and have no clue you have to chamfer the ports.

You will also have to pull the rear PTO and intake manifold as your GTI is different on both.
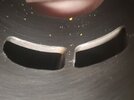
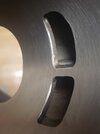
I do believe they are, it is really hard to get the phone to focus when sticking it into the cylinder xD

See the new picture, is this what you mean? I can run a finger over it and not get caught, some areas feel like maybe could be done a tad more, but mostly all around seems decent.

My guess is that it just hadn't been gotten to yet? Open up and deal with the bottom, didn't get around to taking it off and cleaning up the surface yet? Unless it's a replacement and the guy I got it from stuck it on.

I will prove you wrong! >:D in a good way of course lol. I'll make sure it's good before I run it, I do appreciate you looking out for these things though. Every bit from everybody helps!

Don't worry my friend, in the words of the great George Lopez, "I GOT THIS!!!"

Yes the PTO is for an HX I believe, anyone want it? The intake though, what's different? Other than it being dual carb? I'm missing something obvious I feel. e3284598872f57da64a89d9deb01b892.jpgb7f75148132db7a37c10f9113b67faa9.jpgfa64813dbe0f58c797c7557b3c64849b.jpg
 
Taking my digital calipers, both the cylinder and the piston are 82.5mm. Doesn't the cyl have to be larger by .1 or something?

Unless I'm measuring it wrong... very possible.
 
Cross hatch looks ok but not perfect.

You do not really have any chamfering on the ports and will catch a ring, do not run it like that. It should be a nice clean taper to guide the rings back into the piston groove.
unnamed.gif

You can't measure cylinders with a caliper, you have to use a bore gauge.
 
Woot woot! Got it rebuilt, installed and running!

Put in a new wear ring, replaced carbon seal, lubed it all up!

Hardest part was priming it with dry lines... but once it was, it started right up. Only ran it for 10-15 sec to ensure it was running on its own though.

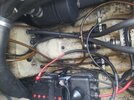
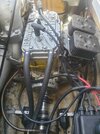
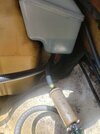
I threw a line from the oil tank to the rotary valve inlet in the bottom middle, and another out the other side to the bottom of the oil tank (is this the proper way to keep the rotary oiled without a pump? I have it bypassed still for now.)

After it ran, I looked everything over and made sure no leaks or other issues, saw no oil in the RV lines even though I did put some into the oil tank. Is there a certain way to prime it or something? I figured gravity would do the trick and possible pressure within while running, but perhaps not?

I want to button it all up and go through a pretty thorough checklist to make sure i didn't miss anything or be stupid about it and do something wrong. Anyone have a good list or a handful of items to look at to make sure it's 100% before taking it out?

EDIT: I see that I did hook up the oil incorrectly... the top of the two oil lines is supposed to normally feed the two tiny rv nipples that are capped off, right? So that can be capped itself, right? Then the big one beneath it goes to the RV in, and the RV out on the other side drops into the top of the oil tank?a67b2aaba9f14246ab8017570ecd7498.jpgbc645b15117b071b7b1bf38c1484ab1f.jpgb7ed24fe4cfff21b3cd45cd4339575f9.jpg
 
Status
Not open for further replies.
Back
Top