• This site contains eBay affiliate links for which Sea-Doo Forum may be compensated.

Tricks and traps to the Mikuni Carb Rebuilding

Status
Not open for further replies.

Mickirig1

Well-Known Member
Please add to this. Your tricks and traps.
Read, Read, Read, all you can on the site. The Carb tuning Sticky above has a lot on info! Read it over and over. It explains a lot on carbs. Watch videos of carb rebuilding and cleaning on the Internet.
If not done yet: Replace the gray Tempo gas lines. Clean the factory fuel filter. Clean the fuel selector valve or replace. Add an inline fuel filter. My carb the top line is return, the bottom is the in line. Use 100% stainless clamps. Make sure your gas tank vent valve works. It can cause pressure to force gas past your pop off. Gas fumes in bilge is not good on start up!
1. Note how the throttle cable was on carb,if you put it back 180 degrees from where it came off, the slack is gone. Readjust slack into it and adjust oil pump cable.
2. Take pictures as you take it apart. You will thank me!
3. Have it in a pan or container that will catch parts and little screws. As you take it apart.
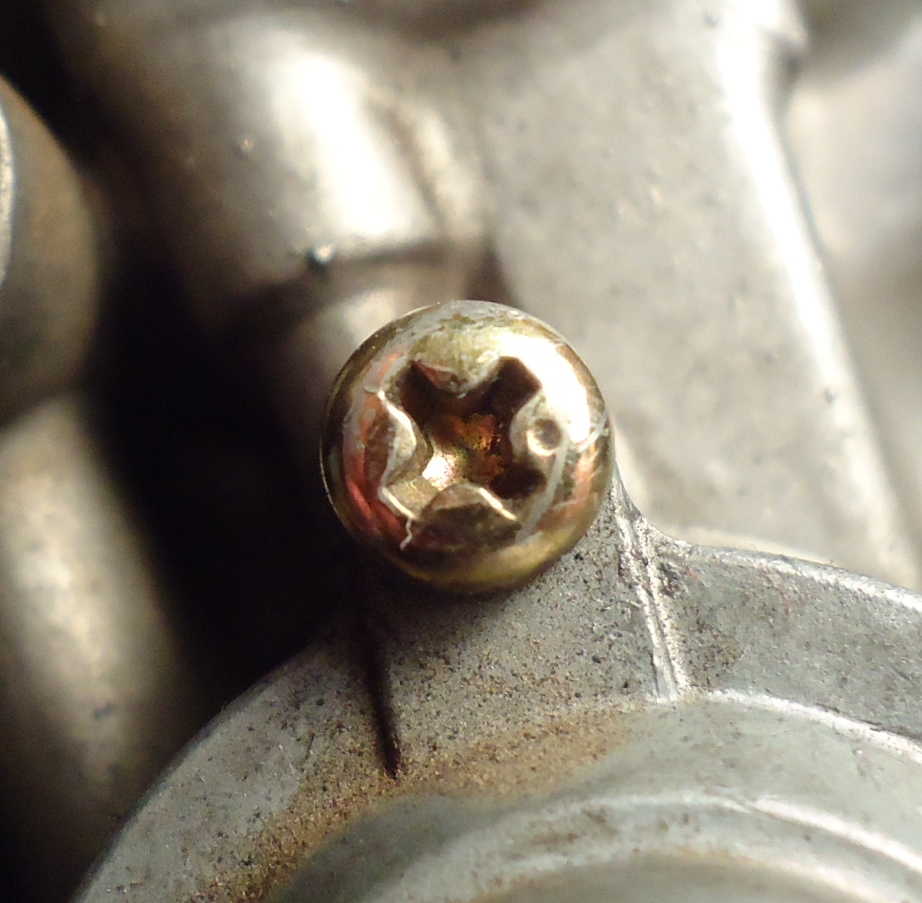
4. Screws that are too tight need loosened with a hammer powered impact driver. It's not worth making a phillips screw head into a funnel shape. On a piece of wood oppsite .Turn barrel of driver in direction screw in coming out. Light / Medium hammer hit should do it.
5. Make a tool out of a 10 penny nail ect, to install the round plastic check valves. It's a 2mm ball with a smaller shank. Ground with a bench grinder, air cut off, dremil with cut off wheels.
It can be used to remove the small rubber plugs that anchor the valves. Then practice with old parts installing the old parts, lube with oil. Then, New stuff goes right in, no problem!
6. Keep old parts away from new. Take pictures!
7. Check pop off at least 3 times. WD40 sprayed to fill up depression it's in. Protect eyes.
8. Carb cleaner is no friend to plastic and rubber parts!

ADD TO THIS PLEASE.
 
Carb rebuild kits are available on the Internet. I got Mine from OSDparts.com. Search the Internet. The stuff is out there.
 
Beware non oem carb kits!! The tit on the diaphram will hold the needle open when you screw the cover down.

Keep all parts in ziplock bags and mark them with a sharpie.

After leak check, pressurize to near pop off and allow to sit for 10 minutes. if it leaks. You've got trouble! Fix it.

Do not use the springs in the new kit, unless yours are bad and can't get you the pop off you need. Only go with the same color/weight as you removed.

Electric impact driver works wonders to take out screws vs impact driver but you have to be firm on the pressure.

For really stuck low or high speed screws, try warming with a hair dryer or heat gun but don't over do it !!
One thing that has worked for me was boiling the carb whole and then taking everything out while it was still hot.

You can only align the two carbs when they are installed on the engine.
There is enough slop in the mounting holes that you can be up to 1/8th off in throttle position from MAG to PTO carb.

Turn idle off and then loosen the linkage all the way, turn it back in until you feel slight resistance. That's when your set.

USE EXTREMELY LONG BOLTS to hold your flam arrestor onto the carb body's. AND use the same bolts to hold the breather box onto the flame arrestor. That way if you get the bolts mixed up you will always have the same length bolts and be safe.

You cannot tune top end without the airbox on, Only the low speed screw while your only idling.
 
Use JIS screwdrivers. The older models have JIS screws, you know if the Phillips has a dot near it. The JIS screws are designed not to cam out and will, therefore, be damaged by a Phillips screwdriver if it is too tight. I bought these on Amazon and I was amazed how well the grabbed the screw. I didn't need an impact driver at all.

http://www.amazon.com/Hozan-JIS-4-J...d=1406756098&sr=8-1&keywords=jis+screwdrivers

jis-phillips-screwdriver-differences.jpg


Notice the dimple indicating the screw is JIS:

762.jpg
 
Look at the diagram on differant throttle plate openings. Which jet and adjuster screw comes into play.
It will give you a good idea where the problems lie.
Make sure your return spring is hooked and functioning on the oil pump lever. I let go of mine and is swung down and came unhooked.
Baby wipes make good hand cleanup after adjuster screw adjusting.
 
Before you clean the carb replace the round check valves. Then use the old rubber stoppers to do this. Poke a hole in the middle of one. Slip it over the carb cleaner straw with the small end toward the end of straw. Then use it to clean all the passages. Remove the pilot jet and main jet then spray the: Pilot, main, high speed, low speed etc. Push it down to seal the hole as you spray carb cleaner. It lets you build up some pressure, with no blow back. See the part about blocking the big hole on low speed cleaning in the sticky above.
 
Before you clean the carb replace the round check valves. Then use the old rubber stoppers to do this. Poke a hole in the middle of one. Slip it over the carb cleaner straw with the small end toward the end of straw. Then use it to clean all the passages. Remove the pilot jet and main jet then spray the: Pilot, main, high speed, low speed etc. Push it down to seal the hole as you spray carb cleaner. It lets you build up some pressure, with no blow back. See the part about blocking the big hole on low speed cleaning in the sticky above.


Also while your at it, take the low speed screw out and use the same technique to spray though that orifice.
I've had one set of carbs where I thought the needle was bottomed out but it was hitting the crud at the bottom. Once cleaned (took nearly half a can) it game me another whole turn !!
 
For the JIS screw's, if you have a ph2 tip it will strip.

If you have a PHR2 tip it won't strip so easily and won't cam out like the tipical Phillips bits do.
 
Wire tie the throttle wide open to clean. I also varied the opening as I sprayed first. Maybe over kill but, I feel it may get all the crude out of the passages. I blow them out with air too. The main jet and pilot jet need cleaned too. Hold on tight to them when you do it. It's hard to find a little brass piece in the garage!
 
2 tips on install and remove.

When removing, keep the choke plates closed (pull the choke out, then twist the handle) This will keep you from dropping airbox screws in the engine.

When installing hand start and tighten all fasteners. They should require very little torque to install, finally snug with a ratchet/allen key.
 
Like Mekanix said above : You can't tune the high speed circuit with the air box your going to use off ! Just look at the size / surface area of the rectangle flame arrestor. Then look at the air box intake hole size. You see why.
Still not getting good WOT response? Do the fuel selector on reserve test. It makes a differance? REPLACE IT.
 
Very helpful thread as is also the noted sticky.

A couple of questions for clarity (sorry if I missed these answers elsewhere - have done quite a bit of searching and reading).

Should I remove the jets to clean them or leave them in and spray cleaner thru them?

Should I remove the high speed needle to clean? It seems there is conflicting info on this. Any pros/cons regarding do or don't would be appreciated.
 
Yes, remove anything you can to clean. Jets and screws. Remember that the carb or brake cleaners will destroy any rubber parts.
 
No need to remove the butterfly plates, unless absolutely necessary to install new shaft bushings. Generally, I don't remove the jets unless the carb has corrosion inside, hesitates badly, or is packed with chunks of debris.
 
No need to remove the butterfly plates, unless absolutely necessary to install new shaft bushings. Generally, I don't remove the jets unless the carb has corrosion inside, hesitates badly, or is packed with chunks of debris.

Sorry, do not remove the choke or throttle butterflies.

I like to remove the jets just to make sure they are clean, especially the pilot jet and to make sure I get a good clear stream of cleaner out of the small idle/low speed holes. Just me though.
 
All sounds reasonable except I am still on the fence about the high speed needle.

To quote from the "How To Rebuild your Carb" post "In the manual, the high speed screw is really not adjustable and can't be removed without taking that cap off. The manual recommend you not take that cap off, it's preset at the factory and only gives the user the ability to "fine tune" it by 1/4 turn either way. Playing with the high speed screw is very dangerous to leaning out at high speeds, and it only takes 1/8th of a turn to lean out to cause sever if not permanent engine damage."

Any convincing arguments about why I should ignore or follow this?

The HS mixture adjuster on my 951 were spec'd by the factory tune as fully closed, that setting is fairly easy to duplicate. I removed those plastic limiter caps and tossed them in the garbage, try turning that screw any precise amount while the plastic limiter cap slips and rotates around on the head. Then you don't know what you've got.

I wanted to confirm my HS settings were sufficiently rich, and needed access to accomplish my testing.

I'll bet anyone $100 the factory settings aren't too rich, thus factory settings + some amount might be necessary in the future as our fuel progressively gets crappier. I'd rather remove those caps while the carb is on my bench, as opposed to reaching upside down underside of the mounted carbs deep in the bilge.
Interesting. This point and the fact that the HS O ring inevitably got carb cleaner on it seem like compelling reasons to go against the manual and take it out.

I'm leaning (no pun meant) toward removing it and adding this to the things that I need to set when tuning it (only one carb on my 587 Grandma ski :) )
 
The high speed screw is just like the low speed and there is no reason not to remove it when cleaning the carbs. The o-ring on it needs to be replaced also. Take the plastic cap off then see if it will turn in and count the turns just like you should be doing on the low speed so you can put it back the same way you found it. As far as I know all of the seadoo's have the high speed screw closed from the factory like Sportster indicated so no reason you can't set it closed again then just re install the plastic cap when you are done.
 
Always make sure you clear all passages in the low speed circuit. Theres the large orifice and 3 smaller ones further behind the butterfly. Carb cleaner and the air compressor works great. Verify your pop off pressure and prep all surfaces on reassembly so they are spotless. Stock skis with factory needle settings always seem to run spot on
 
Last edited by a moderator:
Status
Not open for further replies.
Back
Top