nerdlinger
New Member
The problem: 99 XP (947/951) broken starter mount bolt - hardened steel with loctite.
I tried to drill it out with both a 90 degree drill attachment and a 28000 rpm dremel and all I got was a hole in the aluminum around the broken bolt. There was just no way to get it started on center in the bolt from the angle you have to attack it. Three nights of failed attempts meant either finding another way or paying a mechanic $600 to pull the engine and drill it for me.
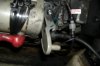
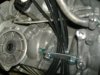
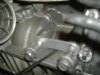
I still had one viable starter mount bolt, but it obviously wasn't enough, so I needed an additional anchoring point. I noticed that in the bottom end of the block, which is above and behind the starter, there were two bolts. I made a bracket (see picture) to connect to these two bolts, then ran cable ties behind it (see picture). The cable ties wrap around the starter and help hold it securely (see picture).
I also added a second bracket that connects from the unused middle hole of the molded bracket that connects the starter to the air intake. This bracket connects from that middle hole to a short bolt to the right of the starter.
I now have a very secure starter that is still removable. Before you consider the permanence of JB Weld on the broken mounting bolt, see if my fix will work for you. I didn't want to JB Weld it in case I needed to take it off at some point.
My project was on a 99 XP Limited with about 150 hours on it. The lengths below should work for any 947/951 engine.
How I did it:
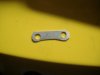
Buy a 3-foot strip of thin aluminum at Home Depot. It is about 3/4 inch wide, perfect size for the bracket. Cut a piece 70mm long for the bracket connecting the two bolts behind the starter, then drill two holes with a 3/8 inch bit that are 53mm apart on center. Bore the holes slightly larger so the 3/8 inch bolts fit through. Next, cut an arc out of one of the long edges to allow space for the cable ties to fit through. Be sure to round the ends of the bracket and polish the "cable tie edge" so they are smooth. I used a Rotozip to cut it and trim it, then a dremel to smooth the edges. If you don't have them, then tin snips can cut the aluminum and there are tools for sanding metal edges.
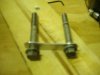
Install the bracket/bolts with the "cable tie edge" up, then run cable ties (I fit 6 of them) through the bracket to get ready for the starter (see picture). Use 14-inch or longer cable ties so they don't slide out of place and you lose one when you are putting the starter in. Once you get the starter in place, connect the cable ties, but don't tighten them until the starter mount bolt (if you have one intact bolt) and the long, horizontal starter bolts are secured. I ran the ties underneath the top horizontal bolt and over the top of the bottom horizontal bolt. There was space under the top one, but not the bottom one.
The second bracket: cut a 55mm piece of aluminum and drill two holes 43mm on center. One hole was 3/8 inch bored out for the 3/8 inch bolt I removed from the right of the starter, the other hole was 1/4 inch because the empty middle hole of the starter/air intake connector was a smaller opening. You will need to find a bolt that fits through that small hole, and then use a nut and lock washer to hold it in place. My advice is to attach the second bracket to the starter/air intake connector first, because I didn't, and there was very little room behind it to hold the nut in place. Afterwards, put some grease on the nut/lock washer/bolt assembly since they might be susceptible to rust.
I put grease on the main bracket behind the starter to give some lubrication to the cable ties to minimize any chance of them cutting on a sharp edge of the bracket I may have missed. I'm not worried about corrosion since the piece was aluminum.
Tighten all the bolts to specs. Point the cables ties downward before you cut them so the edges aren't facing up toward the carbs.
Good luck. I hope this helps anyone who needs it, and also saves you a lot of money. PM me if you have any questions.
I tried to drill it out with both a 90 degree drill attachment and a 28000 rpm dremel and all I got was a hole in the aluminum around the broken bolt. There was just no way to get it started on center in the bolt from the angle you have to attack it. Three nights of failed attempts meant either finding another way or paying a mechanic $600 to pull the engine and drill it for me.
I still had one viable starter mount bolt, but it obviously wasn't enough, so I needed an additional anchoring point. I noticed that in the bottom end of the block, which is above and behind the starter, there were two bolts. I made a bracket (see picture) to connect to these two bolts, then ran cable ties behind it (see picture). The cable ties wrap around the starter and help hold it securely (see picture).
I also added a second bracket that connects from the unused middle hole of the molded bracket that connects the starter to the air intake. This bracket connects from that middle hole to a short bolt to the right of the starter.
I now have a very secure starter that is still removable. Before you consider the permanence of JB Weld on the broken mounting bolt, see if my fix will work for you. I didn't want to JB Weld it in case I needed to take it off at some point.
My project was on a 99 XP Limited with about 150 hours on it. The lengths below should work for any 947/951 engine.
How I did it:
Buy a 3-foot strip of thin aluminum at Home Depot. It is about 3/4 inch wide, perfect size for the bracket. Cut a piece 70mm long for the bracket connecting the two bolts behind the starter, then drill two holes with a 3/8 inch bit that are 53mm apart on center. Bore the holes slightly larger so the 3/8 inch bolts fit through. Next, cut an arc out of one of the long edges to allow space for the cable ties to fit through. Be sure to round the ends of the bracket and polish the "cable tie edge" so they are smooth. I used a Rotozip to cut it and trim it, then a dremel to smooth the edges. If you don't have them, then tin snips can cut the aluminum and there are tools for sanding metal edges.
Install the bracket/bolts with the "cable tie edge" up, then run cable ties (I fit 6 of them) through the bracket to get ready for the starter (see picture). Use 14-inch or longer cable ties so they don't slide out of place and you lose one when you are putting the starter in. Once you get the starter in place, connect the cable ties, but don't tighten them until the starter mount bolt (if you have one intact bolt) and the long, horizontal starter bolts are secured. I ran the ties underneath the top horizontal bolt and over the top of the bottom horizontal bolt. There was space under the top one, but not the bottom one.
The second bracket: cut a 55mm piece of aluminum and drill two holes 43mm on center. One hole was 3/8 inch bored out for the 3/8 inch bolt I removed from the right of the starter, the other hole was 1/4 inch because the empty middle hole of the starter/air intake connector was a smaller opening. You will need to find a bolt that fits through that small hole, and then use a nut and lock washer to hold it in place. My advice is to attach the second bracket to the starter/air intake connector first, because I didn't, and there was very little room behind it to hold the nut in place. Afterwards, put some grease on the nut/lock washer/bolt assembly since they might be susceptible to rust.
I put grease on the main bracket behind the starter to give some lubrication to the cable ties to minimize any chance of them cutting on a sharp edge of the bracket I may have missed. I'm not worried about corrosion since the piece was aluminum.
Tighten all the bolts to specs. Point the cables ties downward before you cut them so the edges aren't facing up toward the carbs.
Good luck. I hope this helps anyone who needs it, and also saves you a lot of money. PM me if you have any questions.