Ed Clark
Active Member
So, I had occasion to remove the PTO flywheels from two 717 engines. Not having performed this job before, I had no idea what I was in for. I learned that it takes an incredible amount of ass to get these things loosened. At least in my case. Of course I first tried an air impact and it was like swatting at a fly. Then I went to successively larger and longer breaker bars. I was loathe to use the suggested method in the manual of using a pipe wrench when all else fails. But, the main problem was that as the force on the breaker bar went up, so did the tendency for the engine to just pick up off the floor and go with it. Been there? Done that?
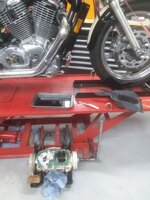
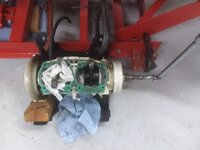
So, I was all ready to take the engine out in the yard and bolt the support pan to an old railroad tie retaining wall that I had. Then I happened to spy something in the shop that I thought just might work. I had a motorcycle up on a worktable. Estimated weight of both around 1,000 pounds. In photo one below you can sort of see an overview of my set-up. Photo two is a closer view of how I anchored the engine.
By the way, you will also have to find some way to anchor the starter flywheel. I happened to have a tool like was shown in the service manual. Ridiculous. Doesn't stand a chance of working. I really think the best way might be to weld up a scrap starter driveshaft so as the flywheel is locked by the jury rigged starter. However, I didn't have a sacrificial lamb available so I finally managed to jam a piece of wood between the starter flywheel and the engine support pan.
Using the above method for anchoring the engine and with my 210 plus pounds standing on the breaker bar and bouncing a little as I held on for dear life I was able to loosen both the PTO flywheels in question. Once they broke loose, they both just readily unscrewed by hand and all threads were in good condition and well lubricated! I will conservatively estimate that using my method with a 1-1/2 ft. breaker bar that the flywheel absorbed between 400 and 500 foot-pounds of torque before it broke loose. In any case, it was enough that the side of the worktable that the engine was clamped too was beginning to lift off the floor.
Just thought "enquiring" minds might like to know.


