Oil leaks and changing oil types.

Status
Not open for further replies.

Bflauto

Member
Questions about changing oil types...
Newbie here, tried searching but didnt really find answers yet..
So Im going over a new (to me) 96 GTX. I noticed an oil puddle in the hull. It looks to be the grommet on the bottom of the oil tank.
I replaced it this afternoon. There is a bunch of oil left in th hull that I will need to clean up.
So a couple questions..
1. I noticed that I have blue oil. I've read on some forums that I MUST use BRP XPS 2 synthetic or else my engine will explode and everyone will laugh at me. (Not really but you get the point). So i'd like to swap over to the appropriate oil. How nit-picky must i be to get rid of all the blue oil? If i have a teaspoon of oil left in the tank will it be ok to mix with XPS-2?
2. I plan on replacing the oil lines while i'm at it. I've read all about bleeding the lines but havent found any videos of anyone doing it. Do folks take off their carbs to get to the oil line on the left side of the engine (when facing front of ski)? If so, do i need to replace gaskets?
3. The fuel is also currently pre-mixed with blue oil as well. Do i need to completely drain this fuel when i swap over to XPS-2, due to "mixing oil types" being a bad thing?
4. Any tips or tricks for cleaning up the oil in the hull without removing fuel tank and engine?
5. How to drain the blue oil from the return line?
6. Any other area where the oil must be drained from?
Thanks so much!
 
1. Yes blue oil is 99.9% of the time the wrong oil and can cause problems. You don't have to use the Seadoo XPS but it needs to be an API-TC full synthetic oil. The tank needs to be cleaned.
2. The only oil lines that need to be replaced are the little 3/32" ones from the oil pump to the intake manifold. You can get the Tygon hose from any mower shop or Home Depot. If you take the aribox and air box base off the carbs you can do it with carbs intact.
3. I would just top the tank off with fresh fuel to dilute it as much as you can.
4. Castrol Super Clean works the best for cleaning out a nasty bilge.
5. If you remove the 12mm oil hose from the engine under the carbs most of the old oil will drain from the rotary cavity.
6. No. But the tank should be rinsed out and a new white in-line oil filter installed, $10.
mikidymac, thanks so much for the reply. I've seen a lot of posts from you in the past, and am so appreciative that someone with such great knowledge took the time to reply.

Followup question about #5..
Do i need to do anything special to refill the oil in the rotary cavity?

I have 3 oil lines running to my oil tank. 2 on the bottom and one up top.
What are all 3 for? One goes to pump. What are the other 2?
 
No, the rotary cavity will fill from gravity.
1. Small 8mm oil line goes to the oil pump for the oil injection. There is a small bleed screw on the oil pump to purge the air out.
2. 12mm hose going to the carb side of the engine feeds oil to the rotary cavity from gravity, the oil does not circulate.
3. 12mm hose going to the exhaust side just purges air out of the oil cavity and lets the oil seek it's own lever with the oil tank.
You answered my question. Was wondering if oil was circulated between 2 and 3. That would have been odd to me to then burn recirculated oil in hose #1.
Makes perfect sense to me now..
 
The rotary cavity oil feed line was hose clamped on. I ended up having to take the carbs off to get at it. Before i pulled off the oil line, i sucked all the oil out using a hand pump. Hopefully that helped get anything extra out of the rotary cavity. The carb base gasket was toast, so I get to buy new ones. Yay.

I removed the oil tank again and cleaned out all traces of the blue mystery oil. I wrote to the seller and asked what kind of oil, and he thinks it was "2 cycle pennzoil". When i asked if it was synthetic, he replied, "i dont think so"... Smh‍♂️
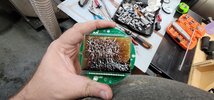
... So i'm glad i am getting this junk out now.
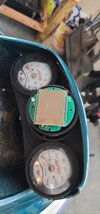
I'll order the 12mm and 8mm oil line tomorrow and hopefully have this oil system all buttoned up by next weekend.

Between now and then I have a ton of misc things to fix up.
  • Lcd gauge polarizer is UV wrecked.
  • Replace 3 gray fuel lines
  • (Maybe) Replace fuel selector
  • Inspect wear ring
  • Inspect carbon seal
  • Replace oil and fuel filters
  • (Later on) Repair chips in the gel coat
  • Clean the hull of spilled oil.
  • Replace the hand grips
  • Drain as much of the premixed fuel as i can
Some other questions:
Should i go ahead and rebuild the cards while they are off? I did hear the ski fire up and run wide open (on hose water) and it sounded decent and responsive.

Those tiny little oil injector lines. Havent really figured how to pull them off yet. Theres paint on them so i cant tell if they have the metal type bands around them.

I'll keep this post up to date as best as i can with my progress. Im hoping to get this in the water once for a functional test before we run out of warm weather in Tennessee.

Thanks all.


20211014_161555.jpg
 
You don’t need to replace the 8 & 12 mm hoses
I forgot to mention, the hose clamp that secured the hose onto the rotary cavity inlet port chewed up the hose pretty good. I could probably cut it down 1 inch. But i figured it might just be better to start with fresh oil line.

But on the injector lines, Im curious if I have to use those metal crimp rings, or can i get away with zip ties?
 
Last edited:
Thanks again.
So its raining today. I shifted focus on the uv damaged lcd gauge. I was able to successfully remove the lcd screen and clean off the old polarizer. I have some polarizer film on its way in the mail.

I was able to plug in the key and view the lcd display with a pair of polarized sunglasses. I toggled the info buttons enough to learn that there is 307 hours on this ski. I have a feeling that the engine has been rebuilt once possibly because the paint is cracked around the head bolts.
Still trying to get this out to the lake in 2 weeks to test it. Before the cold weather sets in.
 

Attachments

  • 20211015_100510.jpg
    20211015_100510.jpg
    273.6 KB · Views: 14
  • 20211015_110856.jpg
    20211015_110856.jpg
    151.8 KB · Views: 14
Thanks again.
So its raining today. I shifted focus on the uv damaged lcd gauge. I was able to successfully remove the lcd screen and clean off the old polarizer. I have some polarizer film on its way in the mail.

I was able to plug in the key and view the lcd display with a pair of polarized sunglasses. I toggled the info buttons enough to learn that there is 307 hours on this ski. I have a feeling that the engine has been rebuilt once possibly because the paint is cracked around the head bolts.
Still trying to get this out to the lake in 2 weeks to test it. Before the cold weather sets in.
When I took the LCD display apart on mine, the outer polarizer and adhesive was not nearly as damaged as yours was, however, the reflective layer at the very back of my LCD was severely burnt, and that is impossible to repair. So, even though I "fixed" my LCD screen it's still hard to read unless lighting conditions are right. Looks like your reflective layer did not get nearly as damaged as mine did.

This was the best I could do even after replacing the polarizer. Good luck to you.

gsxl-burnt-lcd.png

It at least made it more readable, so it was still worth it. I think yours will probably turn out better.
IMG_4675.jpg
 
When I took the LCD display apart on mine, the outer polarizer and adhesive was not nearly as damaged as yours was, however, the reflective layer at the very back of my LCD was severely burnt, and that is impossible to repair. So, even though I "fixed" my LCD screen it's still hard to read unless lighting conditions are right. Looks like your reflective layer did not get nearly as damaged as mine did.

This was the best I could do even after replacing the polarizer. Good luck to you.

View attachment 57077

It at least made it more readable, so it was still worth it. I think yours will probably turn out better.
View attachment 57078
Are you sure yours was totally bad? I know that lcd polarization requires alignment of the polarized film and the screen. So if it looks poor at first, rotating the film several degrees or more may improve the visibility. Just a shot in the dark..
 
Are you sure yours was totally bad? I know that lcd polarization requires alignment of the polarized film and the screen. So if it looks poor at first, rotating the film several degrees or more may improve the visibility. Just a shot in the dark..
Here's a before picture. The display quality is very much improved, but, it's not nearly as perfect of a result as I've seen a lot of other people get :/

gsxl-original-lcd.png

I did test the alignment of the polarizer before adhering it to the glass panel. The issue is the reflector in the very back of the display doesn't reflect enough light, so there's not enough contrast to read the LCD segments. Too bad Bombardier didn't use a VFD display.
 
Here's a before picture. The display quality is very much improved, but, it's not nearly as perfect of a result as I've seen a lot of other people get :/

View attachment 57079

I did test the alignment of the polarizer before adhering it to the glass panel. The issue is the reflector in the very back of the display doesn't reflect enough light, so there's not enough contrast to read the LCD segments. Too bad Bombardier didn't use a VFD display.
I replaced mine and had a section of the display that was not repairable. Some of the liquid crystal seems washed out near the gas level indicator. Oh well. Not gonna buy a 400 dollar replacement gauge.
 
I replaced mine and had a section of the display that was not repairable. Some of the liquid crystal seems washed out near the gas level indicator. Oh well. Not gonna buy a 400 dollar replacement gauge.
Yes it's possible for the display glass to crack and for liquid crystal to leak out. It's also possible that there's a bad trace either on the PCB or on the display glass itself that is preventing certain rows and/or columns from lighting up.
 
Status
Not open for further replies.
Back
Top