• This site contains eBay affiliate links for which Sea-Doo Forum may be compensated.

"Oh Crap" moment - Shutting off randomly on water!

Status
Not open for further replies.

mejim707

Active Member
So I'm out today and the boat is running awesome, but suddenly it would randomly shut off while at speed, or just idling. I'd pull the key and put it back on the post, hear the beep, and it would fire right back up and run fine.

This happened a number of times. The last time it happened however I pulled the key, popped it back on the post and nothing. No beep, no lights, nothing! I did this a bunch of times and I had no response as I floated away into oblivion. Oh Crap!!

So, I grabbed the post, jiggled it heavily, then put the key on and I got the beep, started and I headed right to the dock.

Got home and the key wouldn't activate at all. I tried it about 7 times. Pulled the console storage container and reseated the post cable connector. No dice, I played with the fob and post a little and finally got the beep. I was able to get it working consistent enough to flush the engine.

No bueno my friends. No bueno at all!

So, could the key fob or post be causing this and do these go bad? Can I change the post or is it programmed to the MPEM?

Any advice on how to test this would be awesome!

Thank you in advance!
 
There is a delay from when you pull the fob and when you can put it back in and have it work. A five count seems to be plenty.

If you put it back in too quickly, no joy.
 
Yup, could be key,..could be post,,,(maybe mpem),,,OR...a poor ground somewhere,,,I would start by going through every connector and ground.
 
There is a delay from when you pull the fob and when you can put it back in and have it work. A five count seems to be plenty.

If you put it back in too quickly, no joy.
I was waiting a few seconds between attempts. But No matter what I did or how long I waited the key would not activate until I shoot the post like crazy.
 
Yup, could be key,..could be post,,,(maybe mpem),,,OR...a poor ground somewhere,,,I would start by going through every connector and ground.
I went to the local place yesterday and bought a new post / Safety Switch. Cost $110 but at least it's done right with brand new parts. Again, I'm not doing this because I can't get a new boat, I'm spending this time because this boat deserves this restore. It's a cool little boat and gets a lot of compliments.

When I pulled the cover off the Safety Switch harness, I noticed a number of places in the harness with splices. I cut off the heat shrink and none of the wire splices were soldered.

I cut the connector off, spliced in mine, soldered it cleanly, and heat shrunk that. It's a much better splice.
I'm not 100% sure if this was the issue but it sure seems like it. I've tried the new post about 20 times and haven't had a single issue.

I'll pull the electrical box cover and inspect the connections in there just to be sure as well! Sadly, the wires in that box are not exactly "clean". It's a bit of a pain to inspect those wires but I'll leave that for a future project.
 
Yup, could be key,..could be post,,,(maybe mpem),,,OR...a poor ground somewhere,,,I would start by going through every connector and ground.

I bought a new post and reseated all of the connections in the electrical box (which is a mess). I was out yesterday and had no issues with it shutting off randomly. It performed perfectly.

I also downloaded a GPS speedometer and matched the speed. 40 on the dash matched the GPS speedometer. I didn't dare going faster than 40 because this lake has some waves that sneak up and launch you into space. I'm not ready to get this boat space worthy.

To get 45 MPH I need to go at like 6am when the water is semi-smooth and I can just open it up. From what I understand ~45 is actually the correct max speed for this boat so it appear to be performing at it's optimal performance.
 
On a perfect day, riding by myself, I can get to 50mph. I don't run there very long because that's where the engine seems to eat itself.

After my last rebuild I set the PTO carb highspeed needle to 3/4 turn out. So far no sign of trouble.
 
On a perfect day, riding by myself, I can get to 50mph. I don't run there very long because that's where the engine seems to eat itself.

After my last rebuild I set the PTO carb highspeed needle to 3/4 turn out. So far no sign of trouble.
Question on your HS adjustment. I've read the you should only mess with the LS 1 turn out +/- 14 turn on the challenger and that's it. Everything says don't touch the HS adjustment or you could face "severe engine damage". I'd imagine the engine damage is too much fuel and a fuel hydrolock condition.

But. a local repair shop said "1 turn out on the LS, and just a crack on the HS" as he pointed at his keister.
So do you think opening up the HS will offer a good enough performance boost to make messing with it worth the risk? I can't bring myself to it lol
 
At peak power the danger is running too lean. Opening the high speed needle makes the mixture richer. Running richer is safer. Running too rich gets you into things like misfire, carbon deposits, and lower power. Running to lean gets you into detonation (knock) and localized over heating which results in melting holes in pistons. (Melted aluminum splashing around inside the engine results in all sorts of bad things).

In most high performance two strokes, peak power occurs when the mixture is too lean for safe operation.

The needle is there to allow calibration of the carburetor to cover for any number of other out of tolerance components in the assembly of your particular engine. Boring and using larger pistons as part of a normal rebuild is the sort of out of tolerance condition that would require an adjustment. Thicker gaskets can cause this.

In my case this is my third rebuild, second bore of the cylinders. In each case I could see that the PTO cylinder and piston had symptoms of being too lean. To be safe I turned out the high speed needle a full turn. On the first rebuild I had turned it out the 1/4 turn allowed by the caps. Apparently that wasn't enough. Maybe there is a restriction in my PTO carb.

During a test run I could hear miss firing at WOT. Thus I turned it back in 1/4 turn. Now it runs well. Checking the spark plug it's not wet and a bit brown. The top of the piston had just a bit of carbon but is mostly clean.

Better to be rich than lean, especially at max power.

Just verified in the shop manual, turning HS needle out (CCW) enriches the mixture.

For whatever reason, on my specific engine assembly and carburetor my PTO needs more fuel to run safe. Your particular engine will be different. I have seen on this forum discussions, about looking at spark plugs to determine if the you are rich or lean. It is a tedious but necessary process.

25 years ago I spent a year developing a fuel injection system for two stroke engines. At one point we were actively seeking out the point where the engine was running too lean at max power. The line between just right and too lean is very narrow. And the time between running great and piston damage is very short.

In a few weeks we went through 15~20 pistons and cylinders. Our engine techs could swap them out in 15 minutes. There was probably $250K worth of sophisticated measuring equipment monitoring the engine and it still got away from us several times a week.

Err on the side of rich mixture. What you lose in peak performance will pay you back in reliability.

Hope you can find a bit of wisdom in all these words. And a warning about asking engineers for an explanation.
This is a great comment thank you! You were developing a fuel injection conversions for 2 cycle engines? That's wild! Did it every go to market?

Very helpful information and you're totally right, getting the fuel adjusted correctly by checking the spark plugs is very tedious!

For instance, I don't understand how they say 1 full turn out, +/- 14 turn. But what if the plug still shows signs of running lean? Can you turn it in more? The shop manual also says to adjust each carb exactly the same. So if you've set your pop off perfectly on both, but one is still a little on the lean side while the other is dead on, then do you adjust both up or just one?

The instructions I was using came from seadoosource; https://www.seadoosource.com/carbadjust.html

This says to only run at 1/4 throttle for 5 minutes, essentially just putting around, then pull the lanyard and check the plugs. I do this, but how does this help for high speed?

It's all very confusing and the exact procedures seem to vary. I've looked at the plugs so many times it's all a blur right now lol

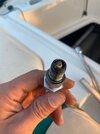
This is the last check I did yesterday. These are brand new plugs with a few hours on them form just time spent tweaking the fuel adjustments. Currently LS on both is 1 1/8 out, and HS is still 0.

Would you suggest I crack the HS open a touch? Maybe like 1/8 turn out on both?

PTO Plug:
PTO-Plug.JPG

MAG Plug:
MAG-Plug.JPG
 
The Two Stroke fuel injection I was working on was based on the SAAB system described as part of this article. I spent the summer of '94 in Sweden working with the inventors.
StackPath

Delphi took the project over after purchasing the Swedish company. It didn't go into production for the two stroke project I was working on, but it did go into production for Harley Davidson, which I did not work on. The article indicates that it went into production on some GM automotive projects. We were having some trouble detecting knock in the two stroke.

After thinking about it for 27 years, I think it had to do with the knock occuring around the periphery of the combustion chamber away from the spark plug gap where the sensing was occuring. The particular engine we were working with had about a 1/4" squish area around the outside of the piston and the head that is common in two strokes, but less so in 4 strokes. On the engines we damaged during testing the failure of the piston was almost always on the edge of the piston.

Sometimes when the piston sticks quickly and securely, the wrist pin will be pulled out of the bottom of the piston and the connecting rod will proceed to beat the crap out of the piston. Bits of aluminum all over the place then.

All this occurs when operating the engine too lean at high power. Knock or Detonation causes the temperature in the combustion chamber, the area between the head and the top of the piston, to jump up very quickly resulting in melted aluminum.

The range of adjustment of the HS and LS needles is based on the normal production variation of a new production engine and carburetor. Other things that happen to the engine later may fall outside the range of 'normal' adjustment. Things like corrosion, or dirt in the small passages of the carburetor. Change in compression due to wear or rebuilding of an engine.

The pictures of your plugs look like they have a nice tan color and aren't too wet. It sounds like you have been running at high speed already, so doing that then shutting down quickly and checking the plugs again is worthwhile. If your plugs look the same than you are good to go. No reason to open up the high speed needles.

In my case I was transfering metal from the cylinder wall to the piston (or vice versa). Obviously too lean. I opened the HS needle, had some misfire and closed it a bit and ended up at 3/4 open. There may be some issue with the carburetor that wasn't obvious when I rebuilt it, but I'm running fine and feel confident that the metal will stay where it is supposed to :0)
 
Status
Not open for further replies.
Back
Top