• This site contains eBay affiliate links for which Sea-Doo Forum may be compensated.

Hydrophilic Hull Coatings, Sea-slide, HySpeedKote

Status
Not open for further replies.

UKGlenn

Member
The winter months mean lots of time surfing the net and thinking about what i want to do with my boat this year.
So far on the list is
Sound Deaden the engine area.
Install Smart Tabs or extend the ride plate.
Install a second battery for the stereo.
And maybe give the hull a coat of Hydrophilic coating!
Has anyone any experience of this? Has anyone noticed any improvements?
I might try some anyway its not like it costs much and if it does indeed save fuel as much as it says it does i'd be quids in over the summer.
 
OK... I'll go down your list and throw in my 2 cents.


1) Sound deadening: It's been mixed when I see guys do it here. It's expensive, and it will help with the noise levels at idle/low speeds. BUT... a lot of the noise on a boat is water, and wind while on plane. Not to mention... a lot of noise is resonated into the hull. (past the deadening materials) SO, SOME people were disappointed.

2) Tabs: most guys are happy with them, but depends on the $$$. I remember, a few years back... someone put on expensive power/hydraulic tabs, and wasn't happy. There was installation issues, and they were very expensive. Since it's still cold... I'm betting you can find a deal on them.

3) Second battery: Best thing you can do for yourself. Yes, it will help out with the stereo, but more importantly... you won't be dead in the water, if you are using a lot of power, hanging out in a cove. There are lots of threads on this one.

4) Belly coating: Unless you are leaving the boat in the water all summer... DON'T DO IT ! Every report I've seen says you will burn more fuel, and lose a few MPH up top. It's good if you need to scrape barnacles, and are getting it re-coated every couple years. But for a "Sport boat"... it's not a good thing.
 
Thanks Tony for the input.
The flat battery and not starting is one of my big fears. The kids and wife love the stereo on and I'm forever turning it down as I try to conserve amps. The coating is a temporary "dolphin Skin" that holds water particles allowing the drag between hull and water to be reduced. unlike an anti fouling coat it is clear and wears away relatively quickly. Obviously though the manufacturers claims and real life could be far apart.
 
Regarding the sound deadening, what have you looked into? The self-adhesive Dynamat type? I'm looking into it also, we have a lot of canal / canal homes in our area and when people come to visit, they most often want to putt around the canals for sightseeing, that's when sitting in the back over the 2 stroke can get loud, especially for the older relatives.
 
In the UK I've been looking at thishttp://www.deadening.co.uk/products/dodo-sound-stopper-mlv
I was told that the mlv layer turns the sound into heat and the foam layers isolate the mlv from vibrations. It's supposed to be an all rounder.
 
OK... I'll have to look at that skin. May be cool if it's not too expensive.

I can't tall you how many boats I put a second battery in, when my shop was open. I put a double battery in my Old Sportster, and it was one of the first "Mods" to my islandia. It's a little work on the smaller boats (finding a good spot) But on the Islandia... it was actually set up for duals originally, but seadoo decided to not put them. BUT, because of that, there's a spot for the second tray, and swapping out the switch is easy. I think it took me less than an hour to install.


300.jpg


302.jpg
 
I was thinking of putting in a split charge relay and rewiring the power for the stereo and glove box directly from the second battery. The second battery is isolated from the first at rest and is only connected to the alternator if there is 13v flowing in the circuit. I.e when the engine is running and the alternator is charging. I like your double switch though.
 
I was thinking of putting in a split charge relay and rewiring the power for the stereo and glove box directly from the second battery. The second battery is isolated from the first at rest and is only connected to the alternator if there is 13v flowing in the circuit. I.e when the engine is running and the alternator is charging. I like your double switch though.

I vote for a mechanical rotary switch and a good single or dual channel charger that won't boil out (overcharge) your batteries, 3-stage or 2-stage type. There are some really nice chargers out there now capable of diagnosing battery issues. JUST MAKE SURE when using these (or any) charger, the batteries aren't connected to your delicate and expensive engine computer.

I installed a cigarette lighter plug at my helm I use this for powering various appliances during the day and use it for connecting my shore powered float charger.

I think you should plan on shore-power charging your batteries, considering it takes up to 24 hours to properly charge them.
 
I was thinking of putting in a split charge relay and rewiring the power for the stereo and glove box directly from the second battery. The second battery is isolated from the first at rest and is only connected to the alternator if there is 13v flowing in the circuit. I.e when the engine is running and the alternator is charging. I like your double switch though.


Actually............


With the 240 merc... it's easy... You don't need an isolator !!! This engine has two 20a charging coils, with two regulators. SO... just hook one regulator to one battery, and the second to the other battery. The double switch will allow you to "Self Jump start" your own boat.

Generally, I leave my switch on #1. BUT, both batteries charge while running. If I hear the low voltage alarm... I just switch to the second battery. If that one gets low too... I flip it to "Both" and I can always start up.
 
That sounds interesting Tony. Can you tell me a little more about it? Where are the coils located? Is it one of the unused terminal blocks or something similar?
 
It's just on the side of the engine. You will see both regulators, but in "Single battery" setups... the red wires will come together, to charge the single battery. Normally they are together on top of the solenoid, where the main battery cable is connected.

When you put in a second battery, just take one of the red regulator wires off that terminal, and connect it to the second battery, right to the positive post.
 
WAIT !!!!!!!!!!!


I just saw the year of your boat. If you have the newer engine, with a single alternator... then you will need an isolator of some kind. (sorry about that)
 
Yes it's the newer engine. The boats away at the moment having some scuffs sorted but I'll have a look when it's back.
I am also having a stainless sell frame made up to turn the seat into a bolster seat so I can sit a bit higher above the windscreen. I usually end up sitting on my leg and getting a dead leg.
 
It's just on the side of the engine. You will see both regulators, but in "Single battery" setups... the red wires will come together, to charge the single battery. Normally they are together on top of the solenoid, where the main battery cable is connected.

When you put in a second battery, just take one of the red regulator wires off that terminal, and connect it to the second battery, right to the positive post.

I got my dual switch in the mail yesterday. It came with cables.

281.jpg


My hubby asked if he wires it in series or parallel? And I forget what battery you told me to get. Could you refresh my memory?
 
Last edited by a moderator:
I would connect your dual battery switch using this diagram, basically placing the switch on the positive side of the batteries between them and the engine.

You could also place the switch on the negative side of the batteries, between them and the engine, this method is not shown in this diagram b/c it appears your black cables have red insulation on the ends (denoting them as for positive red colored) cables.

One thing to be aware of is the color of the cables must match which side of the system the cable is being used (black for negative ground, red for positive) to avoid confusion and damage.
 

Attachments

  • Dual Battery Boat Switch.jpg
    Dual Battery Boat Switch.jpg
    32.6 KB · Views: 28
It's just on the side of the engine. You will see both regulators, but in "Single battery" setups... the red wires will come together, to charge the single battery. Normally they are together on top of the solenoid, where the main battery cable is connected.

When you put in a second battery, just take one of the red regulator wires off that terminal, and connect it to the second battery, right to the positive post.

Hi Tony,

I am trying to figure out the right wires for what you are describing. I have attached a picture of my engine in the area I think you are describing. if I am not totally in the wrong spot, on mine there are number of wires to choose from. can you please provide some guidance for how I can narrow this down to the two (maybe more?) that I need to attach to each battery? My guess are the two slightly thicker wires since they have to actually carry a charge but I don't want to go on just assumptions.

Thanks,
David
 

Attachments

  • 20160926_170633.jpg
    20160926_170633.jpg
    1.9 MB · Views: 17
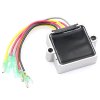
Lumps, each of the regulators has two red wires, these two wires must be kept together. Thus b/c you have two regulators you may connect the two red wires of 1st regulator to the 1st battery for the 1st half of total charge capacity, and the two red wires of 2nd regulator to the 2nd battery for the 2nd half of total charge capacity.

So each battery will be charged simultaneously and independently of the other but only half of the total capacity will be available for each.
 

Attachments

  • s-l400.jpg
    s-l400.jpg
    21.2 KB · Views: 10
Last edited by a moderator:
Thanks Sportster! that makes sense.

Lumps, you're welcome.

FYI, I forgot to mention, you should fuse the regulator feed at the battery, using at least 14 gauge wire (I prefer using 12 gauge wire for 20A circuits), also locate a blade fuse holder within a few inches of the battery terminal.

The reason for installing the fuse within inches of the battery is to limit current in case of an unexpected event, the entire wire cannot become red hot and start a fire.

This must be done for any low current circuit connections direct to the battery + terminal to prevent a fire hazard b/c the battery is very powerful.

sounds good. better be safe then catch fire right beside the gas tank? a couple more questions though. it sounds like there are 3 options for wiring the charging. can you please confirm these are accurate?

1) install the switch but leave the charging alone. this would only charge the currently selected battery but would charge at full strength
2) pull one set of the wires from the solenoid and run it to the new battery via a fuse. this would let both batteries charge at half strength if the original battery was selected. if the new battery was selected it would have both chargers and would charge at full. the old battery would not charge
3) pull both sets of wires and run one set to each battery. this would let both batteries charge at half strength regardless which battery was selected.

if this is accurate, I am leaning towards 2). this is half the wiring and still lets you be able to charge at full power if you get really low. is this the normal way? are there any flaws to doing it this way?

Thanks,
Lumps

Yes, that's correct. Also in the 2nd option you won't be able to send full charging capacity to #1 battery.
 
Status
Not open for further replies.
Back
Top