• This site contains eBay affiliate links for which Sea-Doo Forum may be compensated.

Gelcoat, hull, graphics general

Status
Not open for further replies.

LionOnABeach

Active Member
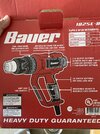
My wife bought me new graphics for my birthday so I’m currently in the process of removing. I started with a razor and was doing ok, but leaving residue. Went to China Freight and got a heat gun for $35, set it to setting 3 of 7, and man, did that help! Just worked slow and constant pulling while moving the gun around. Are off clean and easy.
Before I put the new graphics on, I wanted to fix some dings and scratches in the hull. A couple are deep so Ike going to get a color matches kit from GelCote. I’ve never done this so anyone have tips on prepping the areas, sanding, etc? I’ve watched plenty of videos on YouTube, so it looks straightforward. Also, what do you guys use for buffing/waxing? I want to fix the dings, go over everything with buffing/rubbing/wax(?) so it’s all clean and then put on graphics. I think I’ll need a low speed wheel too (China freight again).
Any tips or tricks, please share! I k ow the sanding will be a pain, but I got time.
thanks!
 
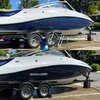
Heat gun. Decals off
 

Attachments

  • 82802E74-599D-4390-85BC-2893848B4431.jpeg
    82802E74-599D-4390-85BC-2893848B4431.jpeg
    436.6 KB · Views: 53
  • 253807A9-146D-4BA7-8B32-137BB605D04D.jpeg
    253807A9-146D-4BA7-8B32-137BB605D04D.jpeg
    317 KB · Views: 48
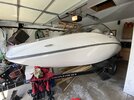
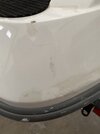
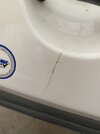
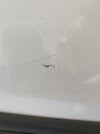
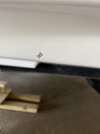
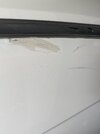
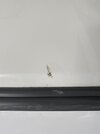
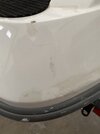
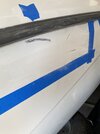
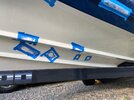
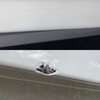
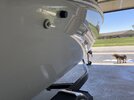
Some of the damage and attempted repairs from the PO. I’m not looking for showroom quality, just fix it and have it look decent.
 

Attachments

  • CADD9471-6916-4678-9ADF-157E131888C3.jpeg
    CADD9471-6916-4678-9ADF-157E131888C3.jpeg
    158.7 KB · Views: 47
  • 15D1B501-BE61-4D99-AB12-54986CB85A3E.jpeg
    15D1B501-BE61-4D99-AB12-54986CB85A3E.jpeg
    162 KB · Views: 40
  • 2184050B-BA08-479E-8106-CF65F7BD6C1B.jpeg
    2184050B-BA08-479E-8106-CF65F7BD6C1B.jpeg
    108.9 KB · Views: 40
  • 8D33D7D8-F956-40CC-A88E-A22C7958C7B3.jpeg
    8D33D7D8-F956-40CC-A88E-A22C7958C7B3.jpeg
    118.8 KB · Views: 41
  • D7A7149D-04D0-41BF-B417-55D43F4F3AF7.jpeg
    D7A7149D-04D0-41BF-B417-55D43F4F3AF7.jpeg
    101.2 KB · Views: 38
  • 739226D9-1D8A-46EA-9B42-1F71F2B94167.jpeg
    739226D9-1D8A-46EA-9B42-1F71F2B94167.jpeg
    92.2 KB · Views: 41
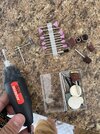
I’m getting ready to do some gel patches in next day or so, temps dropped for the weekend so figure wait until warms up a bit for faster curing. I cleaned up using a dremel tool and sanding drum. Also used captain Tolleys crack sealer to make sure not something I can’t see etc.

Once I do the gel repair and have sanded smooth then I’ll wet sand where the graphics were and then 3 step buffing, compound, sealant, wax etc. I’ve been really happy with the hula boat care stuff for few years. Get a mirror like polish so I’m happy. For buffer/polisher a variable speed is nice. Would recommend around 1,500 rpms, Nothing above 2000.
Thank you!
Do you - or have you - done the 3-step process to the entire hull every year or do you just wax as needed?
 
Been running about every other year, I’m looking at adding a ceramic coating this year after I’m done( taking it to someone who knows what they’re doing for it) to add a little more protection. If not for the dock dings,couple scratches And peeling decals I probably would just wax as the gel looks good still mirror finish from when I did 3step in ‘19
 
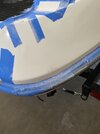
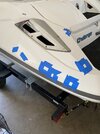
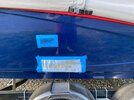
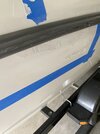
So I got around to marking off all what I’m going to try and repair. I want to get the areas done first where the graphics go. Not really worried about how well it looks since they will be covered, but want it repaired. Some of the spots are down to the fiberglass; I’ll use a dremel tool to clean them up. Some or pretty shallow and you can feel with your fingernail; I think I’ll use the sanding drum on the dremel to rough them up and give something for the patch to bite into. And some blemishes are from the PO repairs, which just look like crap with yellowed patch that was never sanded; I’ll rough those up and clean out as well to try and do a proper fix. Again, I want it to look decent, just not showroom quality. I’ll post pics and progress as I go.
 
$10 China Freight rotary tool worked just fine. The sanding drum thing sucked though. Wound up just using some 400 grit and that alone made things look so much better. And I read the tracking info wrong, won’t get the gelcoat kits from GelCote until Friday. Oh well
 

Attachments

  • 382E01D3-660E-45A3-9F50-1DDC87DB3383.jpeg
    382E01D3-660E-45A3-9F50-1DDC87DB3383.jpeg
    158.7 KB · Views: 33
  • 0CC1F66D-CF64-453A-8DA2-495EE186A169.jpeg
    0CC1F66D-CF64-453A-8DA2-495EE186A169.jpeg
    649.4 KB · Views: 33
  • 046D168F-1AB5-42F0-AE4C-4E03AA2C3A91.jpeg
    046D168F-1AB5-42F0-AE4C-4E03AA2C3A91.jpeg
    101.2 KB · Views: 32
  • 59541CB0-1485-4DE7-833E-76EC84E3A083.jpeg
    59541CB0-1485-4DE7-833E-76EC84E3A083.jpeg
    235.2 KB · Views: 32
  • 56A44852-28C7-4444-A6B5-3782EB949B18.jpeg
    56A44852-28C7-4444-A6B5-3782EB949B18.jpeg
    269.6 KB · Views: 36
  • 2796890A-FFB4-4910-90BC-2E9306BDB8F5.jpeg
    2796890A-FFB4-4910-90BC-2E9306BDB8F5.jpeg
    192 KB · Views: 31
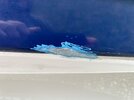
Twining, lol, crying. I have several spots I’m doing right now too. 1st coat is done for the blue and the white. Need a bit more sanding and then 2nd coat of gel and then buffing won’t see it. Have a bunch to go but prelim results look good.

Learned a lot in the first coat, getting some full Mylar sheets to trim down for each area vs the two little strips in the one kit and then wax paper for the rest. Also getting a better applicator for putting gel on. Went to thick and now having to sand a lot to get it flush.

Image1620876592.741786.jpgImage1620876608.590144.jpgImage1620876627.098669.jpgImage1620876636.216206.jpg
 
Lol! That’s awesome man.
Where did you get the Mylar sheets? I’m going to need/want a bunch.
I admit I was intimidated at first, but so far it’s easy, just tedious. My hands were white from sanding and it’s the first time I’ve actually worn a mask that will do something positive.
move got everything cleaned up, wiped with acetone and ready to fill. Will keep you posted and keep up the good work
 
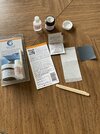
Got my two kits from GelCote today. Will got at it and let you all know how it goes. I was worried it wouldn’t be enough, but this looks like it will do plenty. The only drawback with having all the scratches to repair is they only give you two small sheets of Mylar to cover the repairs. I’ll cut it and make it work and the only downside is more sanding which is not that bad.
 

Attachments

  • 2347D787-93B3-42EB-B55D-EEE273C86DA1.jpeg
    2347D787-93B3-42EB-B55D-EEE273C86DA1.jpeg
    492 KB · Views: 31
Yeah, I’m about to do round two, the sanding sucks. Get a good scrapper for application and try to get as close to even with the surface. I had tapped off the areas really close and then used the gel but it made repair area level with the tape, lots and lots of sanding later.

I did pick up a sheet of Mylar from the craft store. It’s clear but at least I can cut and get close, still will have to sand after etc.
 
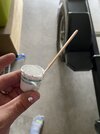
I didn’t need two kits; one is plenty. I didn’t about four scoops with the popsicle stick which I estimated to be about 15-20 mls. The instructions said 4 drops MEK/hardened per 15 mls of coat, so I did about 7-8 drops. Mixed in one of those cups that come with kids medicine, lol. Used the popsicle stick to apply. A rubber spatula would probably work better. I worked front to back around the boat. Filled just fine and was viscous enough not to run. Really easy. I probably left a bunch to be sanded but I figured I err on the side of having to sand more than re apply. The <1 oz I used covered everything and I still had leftover. I’m sure I’ll have to sand the crap out of it, but it was a lot easier than I thought. I didn’t use the Mylar so we’ll see how it goes. It’s 70 right now and the boat is in the garage so I’ll check it in the morning. My hope is I can sand it all smooth tomorrow, go over the entire boat with rubbing compound and wheel, and then polish and wax. Honestly it will look better ow with matched gelcoat than before with the off-white crap job from PO. Highly recommend GelCote! More to come.
 

Attachments

  • 4559BFD6-6532-48A0-8452-7C4902F07B1F.jpeg
    4559BFD6-6532-48A0-8452-7C4902F07B1F.jpeg
    172.5 KB · Views: 29
  • 949D37B0-1AA5-422B-8E59-A881361A65B7.jpeg
    949D37B0-1AA5-422B-8E59-A881361A65B7.jpeg
    207.4 KB · Views: 30
Yeah, I’m about to do round two, the sanding sucks. Get a good scrapper for application and try to get as close to even with the surface. I had tapped off the areas really close and then used the gel but it made repair area level with the tape, lots and lots of sanding later.

I did pick up a sheet of Mylar from the craft store. It’s clear but at least I can cut and get close, still will have to sand after etc.
Yeah, I know I’m in for sanding. Thanks for the heads up!
 
Have read a few areas have to cover the gel in order for it to set, otherwise will take a lot longer. Keep oxygen out of curing etc
 
Sanding wasn’t bad, just tedious. I’ll need to add some more to the deeper divots. Probably should have let it get a little more thick and viscous before putting it on the vertical scratches. Then again a thicker coat would take longer to cure. Maybe when filling in large scratches several thin applications is best. But more sanding...ugh. Anyhow, will touch up a few spots and sand, wet sand, then go over everything with compound, polish and wax. Fun fun.
 
Sanding wasn’t bad, just tedious. I’ll need to add some more to the deeper divots. Probably should have let it get a little more thick and viscous before putting it on the vertical scratches. Then again a thicker coat would take longer to cure. Maybe when filling in large scratches several thin applications is best. But more sanding...ugh. Anyhow, will touch up a few spots and sand, wet sand, then go over everything with compound, polish and wax. Fun fun.

Just came in from hours of sanding and spreading on 2nd coats. Will be glad when done and in the water.
 
Had to leave for Texas for work before I could due 2nd gelcoat. This time I used an old library card as a flexible scraper; worked much better. Much less excess, used like a spatula to fill the last little digits. Didn’t sand tonight bc I was sanding the deck all day. But shouldn’t be too bad since I was a lot cleaner this time. Will keep you posted.
 
used a medium cut cleaner/polish and then a high gloss polish. Going to wax it tomorrow night. Really happy with the gloss, but my less than stellar repairs are highlighted. It’s good from far to kinda close, but it’s far from professional. I should have gone to 1000 grit wet sanding and a touch more aggressive compound. Oh well. To the untrained eye, looks great and I’m happy with it!
 

Attachments

  • 1AAE9B0E-11F1-4B8C-8DB3-9643D8EBB097.jpeg
    1AAE9B0E-11F1-4B8C-8DB3-9643D8EBB097.jpeg
    417.5 KB · Views: 21
Right on, I’ve been battling cold weather so it’s dragging out my repairs.one on the side is good enough for summer and will be my fall project. Have have sealant and final polish to go but overall happy, couple cloudy spots that I’ll comeback to. Friends can’t see the repairs but i don’t feel up to my standards yet either.
A872C404-E190-4D44-BE31-2C22ED6D0455.jpegD2765862-2CDC-4E71-805E-BC6AA4DFDAE4.jpeg
 
Right on, I’ve been battling cold weather so it’s dragging out my repairs.one on the side is good enough for summer and will be my fall project. Have have sealant and final polish to go but overall happy, couple cloudy spots that I’ll comeback to. Friends can’t see the repairs but i don’t feel up to my standards yet either.
View attachment 54128View attachment 54129
Looking great! when you’re the one doing it, you always know! My main goal is to get it ready for the new graphics, which will cover a lot of the blemishes. And the rest...as long as it’s decent and I’m on the water, who cares. I can work on it next winter!
How do you do the bottom of the boat? Or do you? I’m going to punt on it until I have more time and pick up a crawler so I can just lay on my back.
 
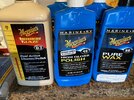
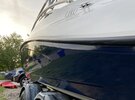
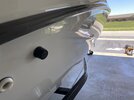
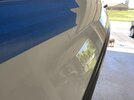
Hand waxed it; easiest part of the whole process. Used Meguiars Pure Wax 56. Applied with a cotton hand towel; let it dry to haze and wiped with cotton towels. Very happy with it. I’m still anal about my blemishes that I see but the captain says it looks great. Now, what I’ve been dreading, drilling into my hull and mounting the tower!
 

Attachments

  • 6540D55D-A403-41C9-89D5-FA20318CD9E0.jpeg
    6540D55D-A403-41C9-89D5-FA20318CD9E0.jpeg
    218.8 KB · Views: 15
  • 8468905E-B43E-4E8E-B7F6-3076029F821A.jpeg
    8468905E-B43E-4E8E-B7F6-3076029F821A.jpeg
    157.5 KB · Views: 15
  • DC40CAC7-24EE-47CA-B715-E5804A24E721.jpeg
    DC40CAC7-24EE-47CA-B715-E5804A24E721.jpeg
    223.5 KB · Views: 17
  • C6304B14-455C-4F93-8CD4-C0223D54F5BF.jpeg
    C6304B14-455C-4F93-8CD4-C0223D54F5BF.jpeg
    369.3 KB · Views: 20
Hand waxed it; easiest part of the whole process. Used Meguiars Pure Wax 56. Applied with a cotton hand towel; let it dry to haze and wiped with cotton towels. Very happy with it. I’m still anal about my blemishes that I see but the captain says it looks great. Now, what I’ve been dreading, drilling into my hull and mounting the tower!

Haven’t done the bottom yet, I’ll probably hit with the buffer for a cleaner wax then sealant, don’t think it needs the full cut and buff treatment. And yeah towel over the gravel on the back :(

Good luck on the tower. After the first hole it’s easier, it’s make sure to start your cuts /drills in reverse to get thru the gel without chipping. Once thru the gel switch to forward and have at it.
 
Status
Not open for further replies.
Back
Top