• This site contains eBay affiliate links for which Sea-Doo Forum may be compensated.

Bowser's WaveRunner

Bowser

Active Member
52960491819_3f42c24733.jpg


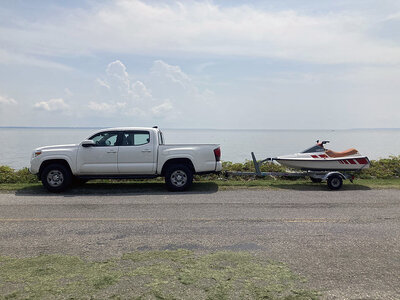
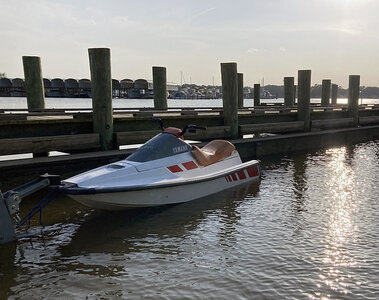
This WaveRunner 500G is now a part of my vintage flotilla.
I found it listed for free an hour from home- so with my EZLoader trailer I made the trip to pick it up. The man offering it was very generous; we chatted for an hour, walked his property, explored the waterfront he was on, and even took home a couple house plants he grew!
Story goes he bought it for cheap from a friend a few years ago with intent to restore it once retired but has too many other projects on his plate, so here we are. Last time it was registered was year 2000.

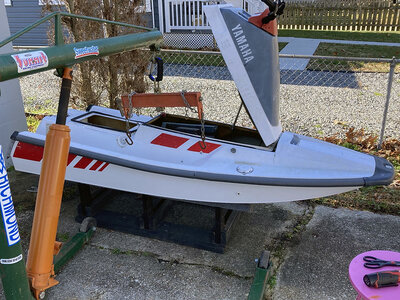
52952848939_6bde63be3b.jpg


It's from 1988! Come to find out this model is part of jet ski history. It’s the first iteration of a seated jet ski.
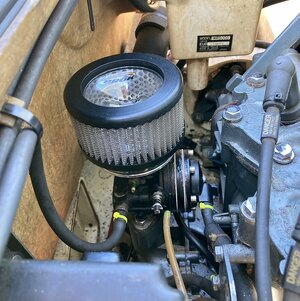
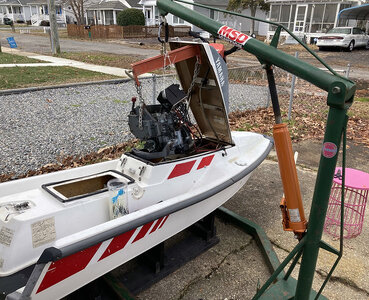
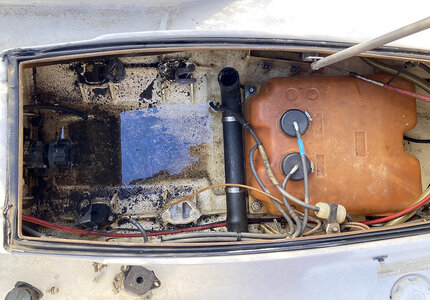
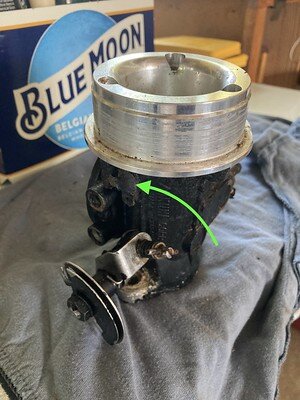
35 years has done its damage but inside the hull is surprisingly clean. Since poking around in it I’ve found it has a modified air intake to fit a larger pod style flame arrestor. The 34mm Mikuni carb has been modded too by having the choke butterfly valve removed. I'm not sure what to expect for how this will affect performance-
52952866064_03a13f40b8_w.jpg


SO the compression testing yielded 150 psi on the MAG and ~130 - 100 psi on the PTO cylinder. This was cold testing with a squirt of oil down the plug holes, charged battery, and WOT.
Despite less than stellar results I think I’m going to proceed with the restoration.
The motor smoothly rev’d up with some premix and new plugs! I’m eager to get the carbs restored and titling/ registration solved.

I know this is SeaDoo Forums but I’m sure there’s lotsa cross-over knowledge & appreciation.
 
Cool find but your history is a little off.

First was the 1969 Seadoo
homepageseadoophoto.jpg

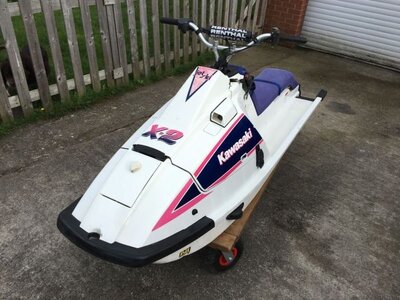
The first Japanese were the 1987 Kawasaki X2...
X2.jpg
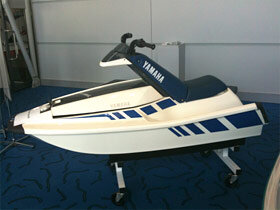
And 1987 Yamaha WR500
img_001.jpg
And Wave Jammer 500
img_005.jpg
 
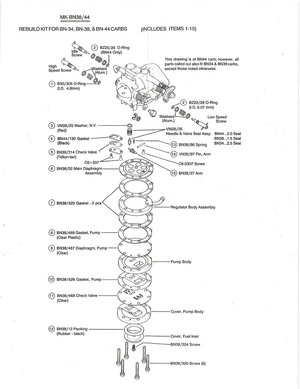
Alrighty I have the carburetor cleaned and ready for rebuild. Awaiting on replacement washers for the mixture screws to come in the mail. I asked ChatGPT what to expect not having a choke valve and it found issue with cold starts mostly.
Finding repair data can be a bit tough so I will be uploading notes here for reference as I go.

52979006854_7a6630f17b_b.jpg


Funny enough I was stuck finding a replacement hull drain plug that fit- turns out these models did not come with a drain from the factory, it was modified later on this ski.
Just need to test if the motor can stay running next!

52978882946_91bc030035_z.jpg


Cool find but your history is a little off.

First was the 1969 Seadoo

The first Japanese were the 1987 Kawasaki X2...

And 1987 Yamaha WR500

And Wave Jammer 500

Those first two models are so retro wow. The Kawi almost looks like the front of their Snowmobiles. 😄 The Yamaha webpage mentions this WR500 is the first seated style ski with an “open stern” feature- maybe that's the differentiating factor although that X2 sure looks like it.
 
Carburetor is all replaced and clean. Using Genuine Mikuni kit plus the proper 2.5 seat + needle.
I did not pop off pressure check it but left the needle valve arm resting gently on the needle w/ the other end level to the surrounding metal. It’s a gamble I know- if it runs poorly or not at all this may be a suspect.
Mixture screws set to: Low Speed: 1-1/4 :: High Speed: 3/4 out from seated.

53003740635_874ba377ee_z.jpg

I replaced the outer JIS screws with Allen screws and it looks reeaal nice matching the chrome high flow intake adapter.
Assembling this carb was interesting cause of the round pancake stack it forms by the end.
Pictured is the brass nipple that was added aftermarket in place of the choke valve.
 
It runs !
It 2-stroke runs away!


Testing on the trailer, I got it to fire up well after a couple cranks. Let it run for a few seconds then stopped it.
When it started up again I could tell it was revving past normal so killed it via stop switch. Tried it on the hose and it revved with no response from the throttle- killed it via switch.
The boat was out of the water PLUS no flame arrestor at the time PLUS my fiddling with the mixture screws probably caused this run away. Hoping to get it in the water this weekend. Awaiting the pre-filter in the mail, it'd be nice to test with this on too.

I slipped on the aftermarket flame arrestor and boy does it look mean. It's neat to look down the throat of the intake through the top.

53027458232_a8e1366c25_z.jpg
 
Keep in mind you are going to be lean as the carb is designed to work with the restriction of the stock aircleaner.

A lean 2-stroke is a dead 2-stroke.

I would also get high quality zipties for the fuel lines as the colored ones are typically cheap and a fuel leak can be explosive.
 
Good points, I'm hoping to get some wisdom to prevent lean seizure..
Assuming I should open the mixture screws more to accomodate for the aftermarket mods allowing more airflow. Should I also adjust the premix ratio too?

Good eye on the zipties- was thinking that I need to replace with SS hose clamps.
 
Yarrgh ! It works!
Check the video to see the massive exhaust leak in the hull lol.


I took a better look at the exhaust manifold and sure enough the gasket was blown straight through. Now I’m stuck mulling over how best to lift out the motor for exhaust gasket repair…

I didn’t run it much longer than shown in the clips. Started up with a little priming, appropriate amounts of smoke shot out the back then reduced while on the trailer.
I let it run at idle while puttering about but when I held it WOT it did not pick up speed so I guess that’s a high-speed screw issue?

While returning to the trailer I felt the steering cable herniate through the shielding so that’ll be replaced as soon as I tackle the gaskets.

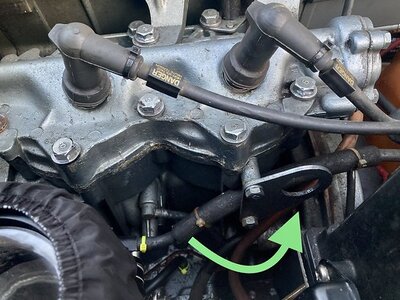
I guess this is a lift point for the motor, shown with arrow. I’ll look around more for a second proper lift point but any suggestions would be appreciated.

53039212711_98e58eec14.jpg

I’m just relieved I know it runs. Felt like sitting on a RC boat it’s so small.
 
Prepping for removal of the motor to replace the exhaust gasket..
I just bought a used engine hoist since it seems the restoration bug has bitten me. ;)
Thankfully SBT has a removal guide and I gained some confidence since removing the SPX’s 657x motor this past spring.
Wishing access to the motor mounts isn’t too much of a PITA.

As summer winds down the humid weather really brings out the mosquitos that make working on the ski’s a no-go. Hoping I’ll get this WR500’s motor out before fall now that I have the proper hoist.
 
I visited with fam in upstate New York this past weekend. They live on a big lake up there and let me drive their WaveRunner VXR. Man that thing was FAST. I reached top speed of 70mph with ease but what was more impressive was the acceleration holy smokes if my finger squeezed that throttle too abruptly I probably would have fallen off. Plenty of incentive to get one of my skis running.

Speaking of.. I am still in the process of loosening the motor mount bolts on the WR500. Using a buddy’s extended reach ratchet I got one of four loose- just need to take another crack at the others. Those power ratchets don’t have as much torque as I’d like but I refuse to bust another knuckle on this thing until it’s my last resort.
 
Well in my quest to get the motor out the hull I have hit a small obstacle.
Three of the four mounts spin freely like in this video- I guess that means they're broken and need to be replaced?


One of the three that spin does not lift up at all. Unlike this one that doesn’t lift, the other two spinny bois lift up & off if I tug on the motor. So I’m a bit stumped on what to do about this one that is not budging but spins easily? Maybe the rubber just hasn’t fully separated? Pointers would be appreciated.

Only one of the four mounts unscrewed cleanly. There are what look like shims within a few of the mounts as far as I can tell. Worse comes to worse I’ll attach the motor to my hoist and just crank on the mount that doesn’t want to budge but spins easily..
 
Weekend update -
I have all four motor mounts loose, I just needed to unscrew the tricky one further. TBD how replacement will be.. a quick Google search looks pricey.

NOW just need to set aside some time to hoist the motor out the hull. 💀
 
Removed the motor easily; took a little shimmying to lift it out but effortless with the hoist!

53482533086_2ab7c28c41_z.jpg


53482674978_c1c274d847_z.jpg

The motor mounts were nearly completely corroded away, like not even mounted to the hull. I guess that explains why the whole ski vibrated when I ran it last summer.

53482674953_85ca62b3c7_z.jpg

I took note of the shims between the mounts and motor and will just replace them like I found ‘em upon install which should be all that’s needed for alignment 🙏 Looks like the motor has been removed in the past- there were a couple washers on a motor mount bolt that were not supposed to be there. All in all though the hardware & motor looks in good shape.

Planning to open up the muffler before ordering the gasket kit to make sure I buy all the right stuff..
I’ll certainly be replacing the motor mounts, mount liners beneath them, and the motor damper under the starter housing that was uh, missing. I guess I can glue it to the housing using black RTV unless anyone has a better idea, there’s remnants of glue where it used to be.

Any extra guidance on pertinent things to replace while it’s out would be appreciated. I’m considering replacing the intake mani gasket too. Maybe remove the starter and re-paint since it’s uniformly covered in light rust.
 
Motor is opened to access the blown gasket!
Pretty easy to open up the muffler & manifold, very slight corrosion but every bolt came out.

53496360660_bdcd910df9_z.jpg

53496092813_9181136764_z.jpg

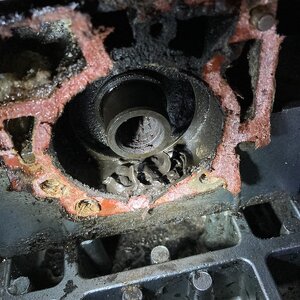
In the process, I found the bearing around the PTO shaft to be broken. I think it’d been broken awhile by how gummed up the retaining trim shrapnel was sitting at the bottom of the case.

53496360655_cda7d3f3f9_z.jpg


NEXT steps.. remove the PTO coupler from the drive shaft (will use rubber grip on my vice and crank on it with a chain wrench) and remove the oil seal & inner ring of the bearing from shaft.
Fully open muffler and manifold case; muffler had 8mm screws that weren’t budging initially so I left ‘em and the manifold case is still jammed together.
& order the replacement parts. 😄
 
Pressing on with disassembly and cleaning the mating surfaces.
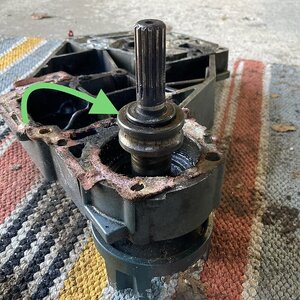
This bearing piece is giving me a hard time and raises a couple questions ->

53513048722_ca0b095095_z.jpg

I believe this bearing slides off the driveshaft shank (here slides downwards) but it’s well stuck on there. I’m going to place a large socket over the splines, P.Bizzle Blast it, and whack away with a mallet until one of us gives out. The raised section the arrow is pointing to is part of the drive shaft so I’ll fit the socket just over it until it contacts the bearing..

Also this bearing when replaced, does it get lubed?
I know the splines will get a hearty slather of Liqui Molly Marine lube.

I’ve been scraping off the old gaskets with a razor blade so far with good luck but there’ still stuck on residue that my mechanic buddies suggest I use isopropyl and a scotch bride pad to fully remove.
The rest of the gaskets I had in mind (intake, muffler, etc.) I’ll just leave as is and not press my luck any more.
Driveshaft socket tool is in the mail to put in the vice and crank off the coupler.

Progress !

P.S. - I used a shop-vac to suck out crud underneath the motor mounts and discovered a super crusty, gummed up 10mm bolt and washer in the goo. The muck can be seen in my post two above this one in the top left crevice.
 
Heat that inner race first just in case there is locktite involved. Even without a locking compound, heat will help break things apart.

Why are you working on it while the shaft is still in the housing? If it does have to move down in that picture, you'll still not be able to get it off with how I image it is put together.

On really stuck races on a shaft, there is always the cut and crack method. It has never failed me. Once you crack it, it almost falls off.
 
Brian thank you for the pointers- I'll def torch the race by default next time I give it a try.
Yes I am doing what I can until I can unscrew the coupler and properly take the drive shaft etc. out of the assembly.
Will try the method you linked if needed!

__ __ __ __
I took a couple losses earlier; the driveshaft going through the hull is seized and I snapped off bolts trying to access the jet pump to investigate ..

53521465533_5909b3e08f_z.jpg

This thing will NOT spin; I think I ducked up not checking the oil in the pump cone before testing last summer.
Even taking a chain wrench to spin it doesn't work. I don't really know the mechanics behind this issue either.
So in my attempt to access the pump cone, the long thin bolts securing the pump & nozzle snapped.
sigh

The pieces of bolt stuck should be retrievable. Hoping I can recover some of the jet pump assembly and learn what caused this.
 
I paid the local motorsports dealership to unscrew the coupler off the driveshaft since I was unlucky getting it to budge.
The inner race is still attached- the mechanic said I’d need to press it out. I’m mulling over the cost of taking it to a machinist and have them press it or just buying a replacement drive shaft shank. BUT does the new bearing need to be machine pressed back on?

I’m glad I can now order all ze gaskets, bearing, and seal up the muffler knowing the motor is functional.
__ __ __ __

The jet pump is giving me a hard time.. I can’t seen to separate the housing to access the pump cone.
There are metal tabs I could pry at but may snap with the force. Any pointers are appreciated.
Worse comes to worse I’ll take the entire assembly out (pump, intake grate, impeller, etc.) since it comes out as one piece. There does not seem to be many guides on how this comes apart- just a simple Youtube vid of a jerry-rigged assembly removal.

53556300695_b1ff65624e_z.jpg

The impeller blades are comically worn down too. Couldn’t even call it a blade anymore so that’ll need replacing. Woot.
 
Are the SBT gasket kits any good?
Specifically for the exhaust gaskets needing replacement.
I could by SBT’s kit for $55 that includes 4 more gaskets than I need
- OR —
I could buy the four needed gaskets separately for ~$55 but they’d be “genuine” Yamaha parts.

Pls advise !
 
I paid the local motorsports dealership to unscrew the coupler off the driveshaft since I was unlucky getting it to budge.
The inner race is still attached- the mechanic said I’d need to press it out. I’m mulling over the cost of taking it to a machinist and have them press it or just buying a replacement drive shaft shank. BUT does the new bearing need to be machine pressed back on?

I’m glad I can now order all ze gaskets, bearing, and seal up the muffler knowing the motor is functional.
__ __ __ __

The jet pump is giving me a hard time.. I can’t seen to separate the housing to access the pump cone.
There are metal tabs I could pry at but may snap with the force. Any pointers are appreciated.
Worse comes to worse I’ll take the entire assembly out (pump, intake grate, impeller, etc.) since it comes out as one piece. There does not seem to be many guides on how this comes apart- just a simple Youtube vid of a jerry-rigged assembly removal.

View attachment 64878

The impeller blades are comically worn down too. Couldn’t even call it a blade anymore so that’ll need replacing. Woot.
Shouldn’t cost much to have the inner race pressed off, probably a 10 minute job. I have a 20 ton press I purchased new for 349.00 CDN, maybe consider purchasing a press? Especially if you do your own automotive work. As for pressing it back on, I’m not sure exactly what your speaking of but if the old race needs to be pressed off then the new bearing will need to be pressed on. You may be able to work it on with some tools that you already have if you freeze the shaft in a freezer and heat the bearing up, if you do end up pressing it on be sure to apply the pressure to the inside race of the bearing or you will damage the bearing. On the other hand it shouldn’t cost much to have a shop press it on for you
 
Are the SBT gasket kits any good?
Specifically for the exhaust gaskets needing replacement.
I could by SBT’s kit for $55 that includes 4 more gaskets than I need
- OR —
I could buy the four needed gaskets separately for ~$55 but they’d be “genuine” Yamaha parts.

Pls advise !
I’ve been advised against SBT for gaskets on this form before and was steered towards OEM. If they are the same price and you don’t need the 4 extra, I would just order from Yamaha and not need to worry about it.
 
Thank you kindly for the advice Burt.

The inner race came off pretty easily with a dead-blow hammer and bench vice. I think I could "press" on the replacement bearing by freezing the driveshaft and getting crafty with deep sockets to contact just the inner race as you mentioned.


I'll get to buying the OEM gaskets for the exhaust instead 👍
 
Back
Top